
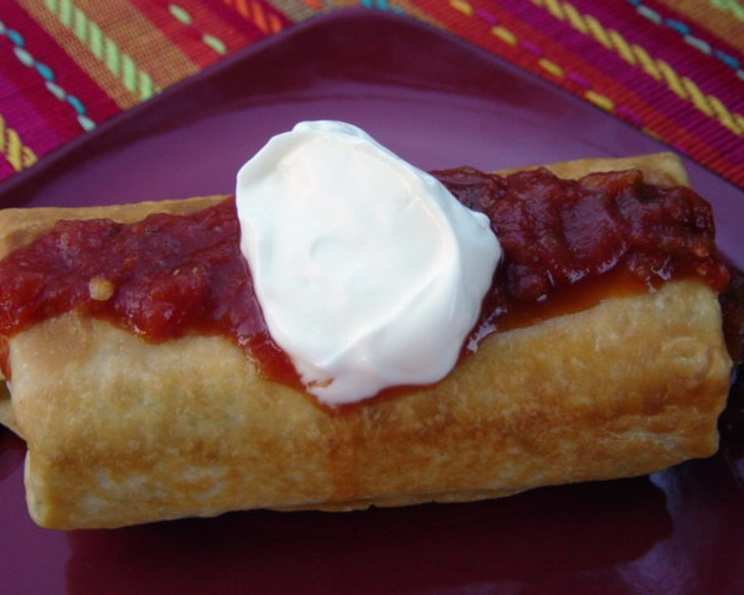
Make-Ahead Chimichangas: A Taste of Home, Ready When You Are
Chimichangas were a staple in my college days – cheap, filling, and endlessly customizable. I remember late-night study sessions fueled by these crispy, cheesy delights, often cobbled together with whatever leftovers we could find in the fridge. One time, we even used leftover chili and sweet potato fries as filling (surprisingly delicious!). The best part? We could make a big batch on Sunday and have them ready to go for the entire week, perfect for those days when even boiling water felt like too much effort.
Recipe Overview
- Prep Time: 20 minutes
- Cook Time: 40 minutes
- Total Time: 1 hour
- Servings: 8
- Dietary Type: Adaptable (see Variations & Substitutions)
Ingredients
- 1 lb pork or chicken
- 1 (16 ounce) jar salsa
- 1 (16 ounce) can refried beans
- 1 (4 ounce) can diced green chili peppers, undrained
- 1 (1 1/2 ounce) envelope burrito seasoning mix or taco seasoning mix
- 16 flour tortillas, 7 or 8 inch
- 16 ounces Monterey Jack cheese or cheddar cheese, cut into sixteen 5 x 1/2 inch sticks
- Salsa (optional), for serving
- Sour cream (optional), for serving
- Cooked rice (optional), for serving
- Cooking oil (optional), for frying
Equipment Needed
- Large skillet
- Another skillet (for warming tortillas)
- Baking sheet
- Freezer containers (for make-ahead)
- Forks (for shredding meat)
Instructions
-
If you haven’t already, cook your choice of pork or chicken. Once cooked, use two forks to shred the meat. You should have approximately 3 cups of shredded meat. This step is crucial for ensuring even distribution of the filling and a pleasant texture in your chimichangas.
-
In a large skillet, combine the shredded pork or chicken, salsa, refried beans, undrained diced green chili peppers, and burrito or taco seasoning mix. The chili peppers add a lovely touch of heat, so adjust the amount to your preference.
-
Cook and stir the mixture over medium heat until everything is thoroughly heated through. This will take about 5-7 minutes. Stir frequently to prevent sticking and ensure the flavors meld together beautifully.
-
In another skillet, heat the flour tortillas one at a time over medium-low heat for about 30 seconds per side. This step makes the tortillas more pliable and prevents them from cracking when you roll them. Don’t overheat, as they can become brittle.
-
Now, it’s time to assemble the chimichangas. For each one, place approximately 1/3 cup of the meat mixture atop a tortilla, near one edge.
-
Top the meat mixture with a cheese stick. The cheese will melt beautifully during baking, creating a gooey, satisfying center.
-
Fold in the sides of the tortilla, then roll it up tightly, starting with the cheese side. This ensures a secure roll and prevents the filling from spilling out.
-
To bake the chimichangas, preheat your oven to 350 degrees F (175 degrees C). Place the rolled chimichangas on a baking sheet.
-
Bake the chimichangas, covered, for 30 minutes. Covering them helps to keep the tortillas soft and prevent them from drying out during the initial baking phase.
-
Uncover the chimichangas and bake for an additional 10 minutes, or until they are heated through and lightly browned.
-
Serve hot with your favorite toppings, such as salsa, sour cream, and cooked rice, if desired.
Make-Ahead Tip: To freeze the chimichangas, place them in freezer containers. Seal, label, and freeze for up to 6 months.
To prepare frozen chimichangas:
- Wrap the frozen chimichangas individually in foil. Bake in a 350 degree F (175 degrees C) oven for about 50 minutes, or until they are heated through.
- Alternatively, thaw the chimichangas in the refrigerator overnight. Bake them, uncovered, at 350 degrees F (175 degrees C) for about 30 minutes. Unwrap and bake for 10 minutes more, or until the tortilla is crisp and brown.
For a fried version:
- Heat about 1/4-inch depth of oil in a skillet. Cook the desired number of frozen chimichangas, uncovered, in the hot oil for about 25 minutes (or about 18 minutes if thawed) over medium-low heat, or until golden brown, turning often to ensure even cooking.
Expert Tips & Tricks
- Don’t overfill the tortillas. This is a common mistake that leads to bursting chimichangas. Stick to the recommended 1/3 cup of filling per tortilla.
- Use high-quality cheese. The better the cheese, the better the melt and flavor. Monterey Jack and cheddar are classic choices, but feel free to experiment with pepper jack or Oaxaca cheese for a spicier kick.
- For extra crispy chimichangas, brush the outside of the tortillas with melted butter or oil before baking or frying.
- Control the Heat: For a milder flavor, remove the seeds and membranes from the chili peppers before adding them. For extra heat, add a pinch of cayenne pepper to the meat mixture.
- Prevent Soggy Chimichangas: When thawing frozen chimichangas, pat them dry with a paper towel before baking to remove excess moisture.
Serving & Storage Suggestions
Serve these chimichangas hot, straight from the oven or skillet. They are delicious on their own, but even better with a variety of toppings. Consider setting up a chimichanga bar with options like salsa, sour cream, guacamole, pico de gallo, shredded lettuce, and chopped tomatoes.
Leftover cooked chimichangas can be stored in the refrigerator for up to 3-4 days. Reheat them in the oven, microwave, or skillet until heated through.
Frozen chimichangas, as mentioned above, can be stored for up to 6 months.
Nutritional Information
Please note that the following nutritional information is an estimate and may vary based on specific ingredients and portion sizes.
| Nutrient | Amount per Serving | % Daily Value |
|---|---|---|
| Calories | 450 kcal | 23% |
| Total Fat | 25g | 38% |
| Saturated Fat | 12g | 60% |
| Cholesterol | 75mg | 25% |
| Sodium | 800mg | 33% |
| Total Carbohydrate | 35g | 12% |
| Dietary Fiber | 5g | 20% |
| Sugars | 5g | N/A |
| Protein | 20g | 40% |
Variations & Substitutions
- Vegetarian Chimichangas: Substitute the meat with cooked black beans, pinto beans, or a mix of vegetables like corn, bell peppers, and zucchini.
- Gluten-Free Chimichangas: Use gluten-free tortillas. Keep in mind these may be more fragile, so handle with extra care.
- Spicy Chimichangas: Add chopped jalapeños, a dash of hot sauce, or a pinch of cayenne pepper to the meat mixture.
- Creamy Chimichangas: Stir in a dollop of cream cheese or sour cream to the meat mixture for added richness.
- Healthier Chimichangas: Use whole wheat tortillas, lean ground turkey or chicken, and low-fat cheese. Bake instead of frying.
FAQs (Frequently Asked Questions)
Q: Can I use ground beef instead of pork or chicken?
A: Absolutely! Ground beef is a great substitute. Just be sure to drain off any excess fat after cooking.
Q: My tortillas keep cracking when I try to roll them. What am I doing wrong?
A: The tortillas are likely too dry. Be sure to warm them in a skillet before rolling to make them more pliable. You can also lightly dampen them with a paper towel.
Q: Can I air fry these instead of baking or frying?
A: Yes, you can air fry them! Preheat your air fryer to 375 degrees F (190 degrees C) and cook for about 10-12 minutes, or until golden brown and crispy, flipping halfway through.
Q: How can I prevent the cheese from melting out during baking?
A: Make sure to roll the chimichangas tightly and tuck in the sides securely. You can also use a toothpick to secure the seam.
Q: Can I add rice to the filling?
A: Yes, cooked rice makes a great addition to the filling. Just reduce the amount of meat or beans slightly to prevent overfilling the tortillas.
Final Thoughts
These make-ahead chimichangas are more than just a recipe; they’re a testament to the power of simple, delicious food to bring people together. Whether you’re feeding a crowd, meal prepping for the week, or simply craving a taste of home, I encourage you to give this recipe a try. Don’t be afraid to experiment with different fillings and toppings to create your own signature chimichanga. And most importantly, share your creations with those you love!