
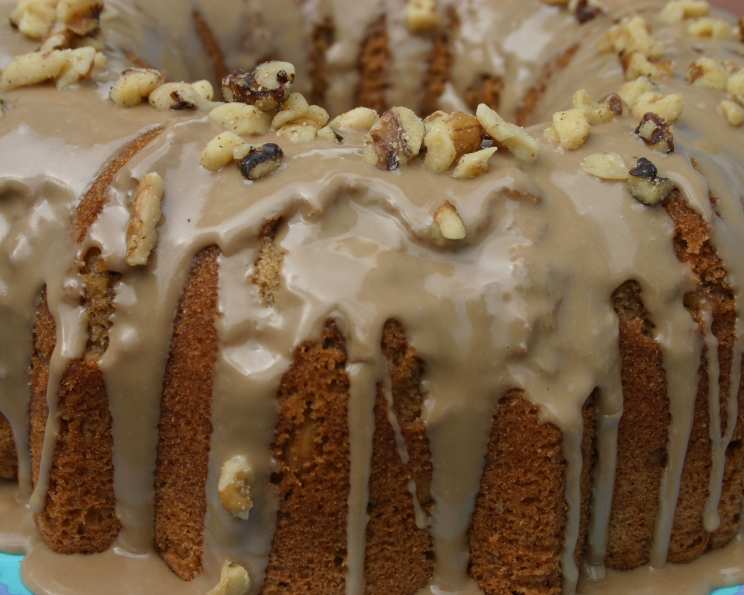
Maple Walnut Pound Cake: A Slice of Nostalgia
The scent of maple syrup always transports me back to my grandmother’s kitchen. She wasn’t much for fancy pastries, but her maple walnut pound cake was legendary. Every Thanksgiving, its aroma filled the house, mingling with the scent of roasting turkey and wood smoke from the fireplace. That cake, with its perfectly crisp edges and moist, nutty interior, was the taste of home, a comforting constant in a world of change. It’s a tradition I cherish and one I am very happy to share with you.
Recipe Overview
- Prep Time: 20 minutes
- Cook Time: 1 hour 15 minutes
- Total Time: 1 hour 35 minutes
- Servings: 12
- Yield: 1 tube cake
- Dietary Type: Not specified
Ingredients
- 1 cup butter or 1 cup margarine, softened
- 1 1⁄2 cups granulated sugar
- 1⁄2 cup brown sugar, packed
- 2 1⁄4 cups flour
- 1 teaspoon baking powder
- 1⁄2 teaspoon salt
- 1⁄4 cup milk
- 1 tablespoon maple flavoring
- 5 eggs
- 1 1⁄2 cups walnuts, chopped
Maple Glaze
- 1 cup powdered sugar
- 1 tablespoon milk (add extra by tsp if needed)
- 1⁄2 teaspoon maple flavoring
- Walnut halves (to garnish)
Equipment Needed
- Mixer (stand or hand-held)
- Mixing bowls
- Measuring cups and spoons
- 9 or 10-inch tube pan
- Cooling rack
Instructions
-
Preheat your oven to 300 degrees Fahrenheit (150 degrees Celsius). Ensure the oven rack is positioned in the lower third of the oven. This helps to prevent the top from browning too quickly while the center bakes.
-
Grease a 9 or 10-inch tube pan thoroughly. You can use shortening, butter, or cooking spray. Dust the greased pan with flour, tapping out any excess. This ensures the cake releases easily after baking.
-
In a mixer bowl, cream together the softened butter (or margarine) and both the granulated sugar and brown sugar until the mixture is light and fluffy. This step is crucial for incorporating air into the batter, which results in a tender cake. The mixture should be pale in color and almost doubled in volume. This typically takes 5-7 minutes.
-
In a separate bowl, whisk together the flour, baking powder, and salt. This ensures that the leavening agent (baking powder) and salt are evenly distributed throughout the dry ingredients.
-
In a measuring cup, combine the milk and maple flavoring.
-
Gradually beat the milk and maple flavoring mixture into the creamed butter and sugar mixture, alternating with the flour mixture. Begin and end with the flour mixture. This helps prevent the batter from curdling and ensures a smooth consistency. Add the wet and dry ingredients in thirds, mixing until just combined after each addition.
-
Beat in the eggs one at a time, mixing well after each addition. Make sure each egg is fully incorporated before adding the next. This helps to create a stable emulsion and contributes to the cake’s structure.
-
Gently fold in the chopped walnuts. Distribute the walnuts evenly throughout the batter. Be careful not to overmix at this stage, as this can develop the gluten in the flour and result in a tough cake.
-
Pour the batter into the prepared tube pan. Spread the batter evenly in the pan.
-
Bake in the preheated oven for 1 hour to 1 hour 15 minutes, or until a toothpick or cake tester inserted into the center comes out clean. Check for doneness after an hour. If the top of the cake is browning too quickly, you can loosely tent it with foil.
-
Once baked, remove the cake from the oven and let it cool in the pan for 15 minutes. This allows the cake to firm up slightly, making it easier to remove from the pan.
-
After 15 minutes, invert the cake onto a cooling rack to cool completely.
-
Prepare the maple glaze: In a small bowl, whisk together the powdered sugar, milk, and maple flavoring until smooth. Add additional milk, a teaspoon at a time, until you reach a thick but pourable consistency.
-
Drizzle the maple glaze over the cooled cake.
-
Garnish with walnut halves before the glaze sets.
Expert Tips & Tricks
- Room Temperature Ingredients: Ensure that your butter and eggs are at room temperature. This helps them emulsify properly, resulting in a smoother batter and a more tender cake.
- Don’t Overmix: Overmixing the batter can develop the gluten in the flour, leading to a tough cake. Mix until just combined after each addition of ingredients.
- Even Baking: If your oven has hot spots, rotate the cake halfway through baking to ensure even browning.
- Glaze Consistency: The consistency of the glaze is key. It should be thick enough to cling to the cake but thin enough to drizzle smoothly. Adjust the amount of milk as needed to achieve the desired consistency.
- Nut Toasting: For an even deeper nutty flavor, lightly toast the walnuts before chopping and adding them to the batter. Spread the walnuts on a baking sheet and bake at 350°F (175°C) for 5-7 minutes, or until fragrant. Let them cool completely before chopping.
Serving & Storage Suggestions
This maple walnut pound cake is delicious served on its own with a cup of coffee or tea. It also pairs well with a scoop of vanilla ice cream or a dollop of whipped cream.
Store the cake in an airtight container at room temperature for up to 3 days, or in the refrigerator for up to a week. For longer storage, you can freeze the cake for up to 2 months. Wrap the cake tightly in plastic wrap and then in foil to prevent freezer burn. Thaw the cake overnight in the refrigerator before serving. To reheat the cake, wrap a slice in foil and warm in a 350°F oven for 5-10 minutes, or until heated through.
Nutritional Information
| Nutrient | Amount per Serving | % Daily Value |
|---|---|---|
| Calories | 524 kcal | N/A |
| Calories from Fat | 245 kcal | N/A |
| Total Fat | 27.3 g | 42% |
| Saturated Fat | 11.4 g | 57% |
| Cholesterol | 119.1 mg | 39% |
| Sodium | 298.7 mg | 12% |
| Total Carbohydrate | 64.4 g | 21% |
| Dietary Fiber | 1.6 g | 6% |
| Sugars | 44.2 g | N/A |
| Protein | 7.7 g | 15% |
Note: Nutritional information is an estimate and may vary based on specific ingredients and serving sizes.
Variations & Substitutions
- Pecan Pound Cake: Substitute pecans for the walnuts for a different nutty flavor.
- Gluten-Free: Use a gluten-free flour blend in place of the all-purpose flour. Be sure to include a binder like xanthan gum to help with the texture.
- Lemon Maple: Add the zest of one lemon to the batter for a bright, citrusy twist.
- Spiced Pound Cake: Add 1/2 teaspoon of ground cinnamon, 1/4 teaspoon of ground nutmeg, and 1/4 teaspoon of ground cloves to the dry ingredients for a warm, spiced flavor.
- Maple Extract Enhancement: For a more intense maple flavor, add an additional 1/2 teaspoon of maple extract to the batter. Be careful not to add too much, as it can become overpowering.
FAQs (Frequently Asked Questions)
Q: Can I use a bundt pan instead of a tube pan?
A: Yes, you can use a bundt pan. Make sure to grease and flour the pan very well to prevent the cake from sticking.
Q: Can I reduce the amount of sugar in the recipe?
A: While you can reduce the sugar slightly, it will affect the texture and sweetness of the cake. Reducing it by more than 1/4 cup is not recommended.
Q: How do I prevent the cake from sticking to the pan?
A: Grease the pan thoroughly with shortening, butter, or cooking spray. Then, dust the greased pan with flour, tapping out any excess.
Q: Can I freeze the baked cake?
A: Yes, you can freeze the baked cake for up to 2 months. Wrap the cake tightly in plastic wrap and then in foil to prevent freezer burn.
Q: My cake is browning too quickly. What should I do?
A: If the top of the cake is browning too quickly, you can loosely tent it with foil during the last 20-30 minutes of baking.
Final Thoughts
This maple walnut pound cake is a classic for a reason. Its simple elegance and comforting flavors make it the perfect treat for any occasion. Whether you’re enjoying it with your morning coffee or serving it as a dessert at a special gathering, this cake is sure to please. I encourage you to give this recipe a try and share your creations with friends and family. It’s a beautiful way to create new memories and share a slice of happiness. Don’t hesitate to experiment with variations and make it your own! Enjoy!