
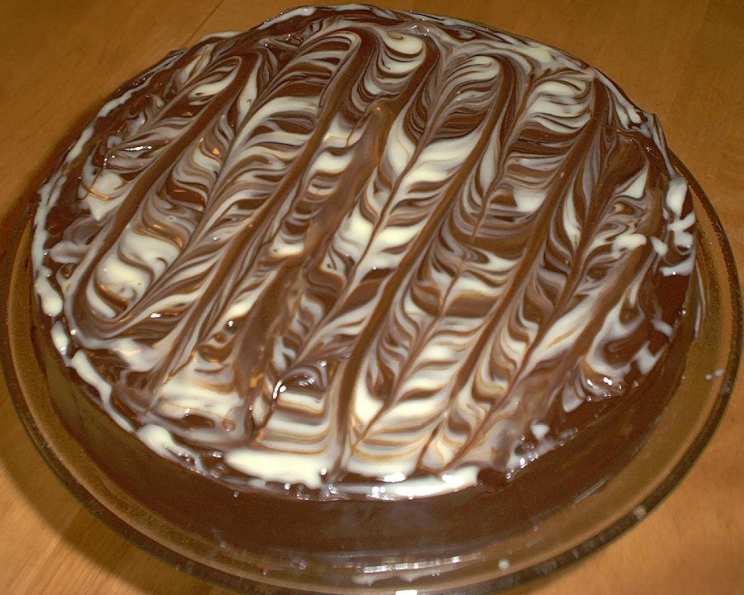
Marbled Chocolate Cheesecake: A Decadent Delight
I remember the first time I saw a marbled chocolate cheesecake. It was at a church potluck, and amongst the sea of casseroles and salads, this cheesecake stood out like a work of art. The swirls of dark and light chocolate were mesmerizing, and the taste was even better – a creamy, rich symphony of flavors that lingered long after the last bite. I was determined to recreate that magic in my own kitchen.
Recipe Overview
- Prep Time: 20 minutes
- Cook Time: 50 minutes
- Total Time: 3 hours 10 minutes (includes chilling time)
- Servings: 8-10
- Yield: 1 Cheesecake
- Dietary Type: Not specified
Ingredients
For the Crust:
- 2 cups chocolate wafer crumbs
- 5 tablespoons melted butter
For the Filling:
- 3 (8 ounce) packages cream cheese, at room temperature
- 1 cup granulated sugar
- 5 large eggs
- 2 ounces semisweet chocolate, melted (2 squares)
For the Frosting:
- 6 ounces semisweet chocolate, melted (6 squares)
- 1/2 cup sour cream
Equipment Needed
- 9-inch springform pan
- Medium bowl
- Large bowl
- Electric mixer (handheld or stand mixer)
- Rubber spatula
- Wire rack
- Serving plate
- Plastic wrap
- Small bowl
- Butter knife
Instructions
-
Prepare the Crust: In a medium bowl, combine the chocolate wafer crumbs and melted butter. Mix thoroughly until the crumbs are evenly moistened and the mixture resembles wet sand.
-
Press the Crust: Press the chocolate crumb mixture firmly and evenly into the bottom of a 9-inch springform pan. Ensure the crust is compact and reaches all edges of the pan.
-
Preheat the Oven: Preheat your oven to 300°F (150°C). This lower temperature helps prevent cracking in the cheesecake.
-
Prepare the Filling: In a large bowl, using an electric mixer, beat together the cream cheese, granulated sugar, and eggs at medium speed until the mixture is smooth, fluffy, and completely lump-free. Over-mixing can incorporate too much air, which can cause the cheesecake to puff up and then collapse, so mix just until combined.
-
Divide the Filling: Spoon half of the cream cheese mixture into the prepared chocolate crumb crust. Spread it evenly with a spatula.
-
Chocolate Infusion: In the same bowl containing the remaining cream cheese mixture, add the melted semisweet chocolate. Stir until the chocolate is fully incorporated and the mixture is uniform in color.
-
Create the Marble: Carefully spoon the chocolate cream cheese mixture over the plain cream cheese batter already in the crust.
-
Marbleizing Technique: Using a butter knife, gently run it through the batter in an “S” curve only once. Be very careful not to touch or scrape the bottom crust while marbling. Over-marbling will muddy the colors together, ruining the desired effect.
-
Bake the Cheesecake: Place the springform pan in the preheated oven and bake for 50 minutes. The cheesecake should be set around the edges but still have a slight jiggle in the center.
-
Cooling Process: Once baked, turn off the oven and crack the oven door slightly. Allow the cheesecake to cool in the oven for an hour. This gradual cooling helps prevent cracks from forming.
-
Cool on a Rack: After cooling in the oven, transfer the pan to a wire rack to cool completely to room temperature.
-
Chill the Cheesecake: Once cooled, transfer the cheesecake to a serving plate (or leave it on the springform pan bottom). Cover it tightly with plastic wrap and chill in the refrigerator for at least 2 hours, or preferably overnight. This chilling period allows the cheesecake to fully set and develop its flavor.
-
Remove from Pan: Before frosting, uncover the cheesecake and carefully remove the side of the springform pan. Run a thin knife around the edge if needed to loosen the cheesecake.
-
Prepare the Frosting: In a small bowl, combine the melted semisweet chocolate and sour cream. Mix until smooth and glossy.
-
Frost the Cheesecake: Spread the chocolate sour cream frosting evenly over the top of the chilled cheesecake.
-
Final Chill: Chill the frosted cheesecake briefly in the refrigerator until the frosting is set, about 15-20 minutes. This will make it easier to slice and serve.
Expert Tips & Tricks
- Room Temperature Ingredients: Ensure that your cream cheese is at room temperature. This is crucial for achieving a smooth and creamy texture in the filling. Cold cream cheese will result in lumps.
- Water Bath (Optional): For an even creamier cheesecake, consider baking it in a water bath. Wrap the bottom of the springform pan tightly in foil to prevent water from seeping in, then place it in a larger baking pan. Pour hot water into the larger pan, filling it about halfway up the sides of the springform pan. This creates a humid environment that helps the cheesecake bake evenly and prevents cracking.
- Preventing Cracks: Avoid opening the oven door frequently during baking. Drastic temperature changes can cause the cheesecake to crack.
- Crust Variations: For a different crust flavor, try using graham cracker crumbs, crushed Oreo cookies (without the filling), or even gingersnap cookies.
Serving & Storage Suggestions
Serve the Marbled Chocolate Cheesecake chilled, and sliced into wedges. It pairs beautifully with fresh berries, whipped cream, or a dusting of cocoa powder.
To store leftovers, cover the cheesecake tightly with plastic wrap and refrigerate. It will keep well for up to 3-4 days. For longer storage, you can freeze the cheesecake. Wrap it tightly in plastic wrap and then in aluminum foil. Frozen cheesecake can last for up to 2 months. Thaw it in the refrigerator overnight before serving. Freezing may slightly alter the texture, but the flavor will remain delicious.
Nutritional Information
| Nutrient | Amount per Serving | % Daily Value |
|---|---|---|
| Calories | 797.2 kcal | N/A |
| Calories from Fat | 556 g | 70% |
| Total Fat | 61.8 g | 95% |
| Saturated Fat | 36.4 g | 182% |
| Cholesterol | 251.7 mg | 83% |
| Sodium | 523.4 mg | 21% |
| Total Carbohydrate | 56.9 g | 18% |
| Dietary Fiber | 5.7 g | 22% |
| Sugars | 34 g | N/A |
| Protein | 16.4 g | 32% |
Please note that these values are estimates and may vary based on specific ingredients and portion sizes.
Variations & Substitutions
- Gluten-Free: Use gluten-free chocolate wafer crumbs for a gluten-free version.
- Dark Chocolate Delight: Use dark chocolate instead of semisweet chocolate for a more intense chocolate flavor.
- Espresso Infusion: Add a tablespoon of espresso powder to the chocolate cream cheese mixture for a mocha flavor.
- Peanut Butter Swirl: Swirl in peanut butter into the chocolate cream cheese batter for a peanut butter cup-inspired cheesecake.
FAQs (Frequently Asked Questions)
Q: Why did my cheesecake crack?
A: Cheesecakes often crack due to rapid temperature changes or overbaking. Cooling it slowly in the oven with the door ajar can help prevent this.
Q: Can I use low-fat cream cheese?
A: While you can use low-fat cream cheese, the texture of the cheesecake will be different. It may not be as creamy and rich.
Q: How do I prevent the crust from getting soggy?
A: Press the crust firmly into the pan and ensure it’s well-compacted. You can also pre-bake the crust for 8-10 minutes at 350°F (175°C) before adding the filling.
Q: Can I make this cheesecake ahead of time?
A: Yes, you can make the cheesecake 1-2 days in advance. Store it covered in the refrigerator. Frost it just before serving.
Q: What is a springform pan?
A: A springform pan has sides that can be detached from the base, making it easy to remove delicate desserts like cheesecake.
Final Thoughts
This Marbled Chocolate Cheesecake is a show-stopping dessert that’s sure to impress your friends and family. Don’t be intimidated by the steps – it’s easier to make than you might think! The rich chocolate flavors and creamy texture are simply irresistible. So, go ahead and give it a try. I’m confident you’ll love it! Pair a slice with a cup of strong black coffee or a glass of chilled dessert wine for the perfect ending to any meal. And, please, let me know how it turns out! I’d love to hear your feedback and any variations you create.