
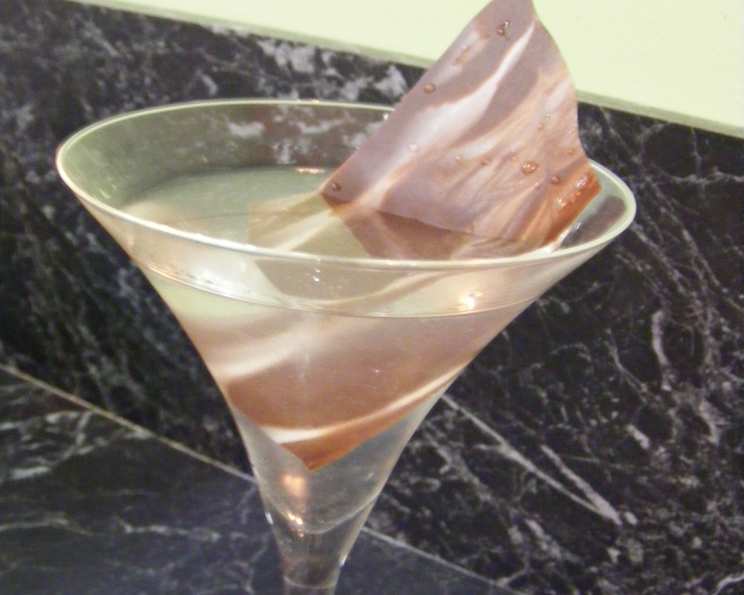
Marbled Chocolate Shard Garnish for Cocktails – Inspired by Pete Evans
The first time I saw marbled chocolate shards adorning a cocktail, it was at a small, dimly lit bar in Melbourne. The smoky aroma of whiskey mingled with the sweet scent of chocolate, creating an intoxicating atmosphere. The bartender, a true artist, carefully placed a jagged piece of this beautiful confection on the rim of my drink, its swirling patterns catching the light like a tiny stained-glass window. It wasn’t just a garnish; it was an experience, elevating the simple cocktail into something truly special. That night sparked my fascination with the artistry of garnishing, and I’ve been experimenting with chocolate shards ever since.
Recipe Overview
- Prep Time: 5 minutes
- Cook Time: 5 minutes
- Total Time: 20 minutes
- Yields: 2 trays
- Dietary Type: Vegetarian
Ingredients
- 100g dark chocolate
- 50g white chocolate
Equipment Needed
- Two baking trays
- Baking paper
- Two heatproof bowls
- Spatula
Instructions
- Begin by melting the dark chocolate and white chocolate in separate heatproof bowls. You can do this using a double boiler method (placing the bowl over a simmering pot of water, ensuring the bottom of the bowl doesn’t touch the water) or in short bursts in the microwave, stirring frequently to prevent burning. It’s crucial to melt the chocolate slowly and evenly to maintain its smooth, glossy texture.
- Line two baking trays with baking paper. This will prevent the chocolate from sticking and make it easier to remove the shards later. Ensure the baking paper is flat and wrinkle-free.
- Drizzle the melted dark chocolate evenly over one of the prepared baking trays. Then, drizzle the melted white chocolate over the dark chocolate. You don’t need to completely cover the dark chocolate; the aim is to create a marbled effect.
- Using a spatula, gently spread the chocolate mixture to a thickness of approximately 1mm. This creates a thin, even layer that will result in delicate shards. As you spread, swirl the dark and white chocolate together to enhance the marbled pattern. Don’t overmix; the goal is to maintain distinct swirls of color.
- Let the chocolate cool slightly at room temperature for a few minutes. While it’s still pliable but starting to set, score it into large squares using a sharp knife or a pizza cutter. This will make it easier to break the chocolate into shards later.
- Transfer the baking trays to the refrigerator to set completely. This usually takes about 10-15 minutes. The chocolate should be firm to the touch before you attempt to break it into shards.
- Once the chocolate is fully set, remove the trays from the refrigerator. Carefully break the scored chocolate into irregular shards along the scored lines. If the chocolate is too hard to break easily, let it sit at room temperature for a few minutes.
Expert Tips & Tricks
- Tempering the chocolate: For extra glossy and stable chocolate shards, consider tempering the chocolate. Tempering involves heating and cooling the chocolate to specific temperatures to align the cocoa butter crystals, resulting in a smooth, shiny finish and a satisfying snap. While not essential for this recipe, it elevates the presentation and prevents the chocolate from blooming (developing a white, chalky surface).
- Achieving the perfect marble: The key to a beautiful marbled effect is in the drizzling and swirling. Don’t be afraid to experiment with different patterns and techniques. You can use a toothpick or a skewer to create more intricate swirls.
- Adding flavor: Infuse your chocolate with subtle flavors to complement your cocktails. Add a pinch of sea salt to the dark chocolate for a salty-sweet contrast, or mix in a few drops of peppermint extract to the white chocolate for a refreshing twist.
- Adjusting thickness: While the recipe calls for a 1mm thickness, you can adjust this based on your preference. Thicker chocolate will result in sturdier shards, while thinner chocolate will be more delicate. Just be mindful of the setting time, as thicker chocolate will take longer to set.
- Preventing chocolate seizing: Be extremely careful when melting chocolate to avoid seizing. Seizing happens when even a tiny drop of water gets into the melted chocolate, causing it to turn grainy and clumpy. Use completely dry bowls and utensils.
Serving & Storage Suggestions
These marbled chocolate shards are perfect for garnishing a wide variety of cocktails. They add a touch of elegance and visual appeal to martinis, old fashioneds, and other mixed drinks. They also make a delightful accompaniment to coffee or tea.
Store the chocolate shards in an airtight container in a cool, dry place, away from direct sunlight and heat. They will last for several weeks. Avoid storing them in the refrigerator for extended periods, as this can cause them to bloom. If blooming occurs, the chocolate is still safe to eat, but the appearance may be affected. You can store them in the freezer for longer storage.
Nutritional Information
Note: Nutritional information is an estimate and may vary based on specific ingredients used.
| Nutrient | Amount per Serving | % Daily Value |
|---|---|---|
| Calories | 150 kcal | 8% |
| Total Fat | 10g | 15% |
| Saturated Fat | 6g | 30% |
| Cholesterol | 2mg | 1% |
| Sodium | 5mg | 0% |
| Total Carbs | 15g | 5% |
| Dietary Fiber | 1g | 4% |
| Sugars | 10g | – |
| Protein | 2g | 4% |
Variations & Substitutions
- Vegan Chocolate: Use vegan dark chocolate and white chocolate alternatives for a dairy-free garnish. There are many excellent vegan chocolate options available that melt beautifully and deliver a rich, satisfying flavor.
- Different Chocolates: Experiment with milk chocolate, ruby chocolate, or even flavored chocolates like orange or caramel for a different taste and visual appeal.
- Nutty Crunch: Sprinkle chopped nuts, such as almonds, pecans, or pistachios, over the chocolate before it sets for added texture and flavor.
- Edible Glitter: For a touch of sparkle, dust the chocolate shards with edible glitter before serving.
- Spice Infusion: Add a pinch of chili flakes or cinnamon to the dark chocolate for a warm, spicy kick.
FAQs (Frequently Asked Questions)
Q: Can I use chocolate chips instead of baking chocolate?
A: While you can use chocolate chips, baking chocolate melts more smoothly and evenly, resulting in a better texture and appearance. If using chocolate chips, melt them slowly and stir frequently to prevent burning.
Q: How do I prevent the chocolate from blooming?
A: Blooming occurs when the cocoa butter separates from the chocolate. To prevent this, avoid temperature fluctuations and store the chocolate in a cool, dry place. Tempering the chocolate also helps prevent blooming.
Q: Can I make these shards ahead of time?
A: Yes, these shards can be made several days in advance. Store them in an airtight container in a cool, dry place.
Q: What if my chocolate seizes?
A: If your chocolate seizes, try adding a teaspoon of vegetable oil or shortening and stirring vigorously. This can sometimes help to restore the smooth texture. However, prevention is key, so be careful to avoid getting any water into the chocolate.
Q: How can I make the shards more stable at room temperature?
A: Tempering the chocolate will make the shards more stable at room temperature. Otherwise, it’s best to keep them refrigerated until just before serving.
Final Thoughts
Crafting these marbled chocolate shards is more than just following a recipe; it’s about embracing the joy of culinary artistry. The simple act of swirling two types of chocolate together can transform into a stunning visual element that elevates any cocktail or dessert. I encourage you to experiment with different flavors, textures, and presentations to create your own signature chocolate shards. Whether you’re hosting a sophisticated gathering or simply treating yourself, these beautiful garnishes are sure to impress. Share your creations and inspire others to explore the world of edible art!