
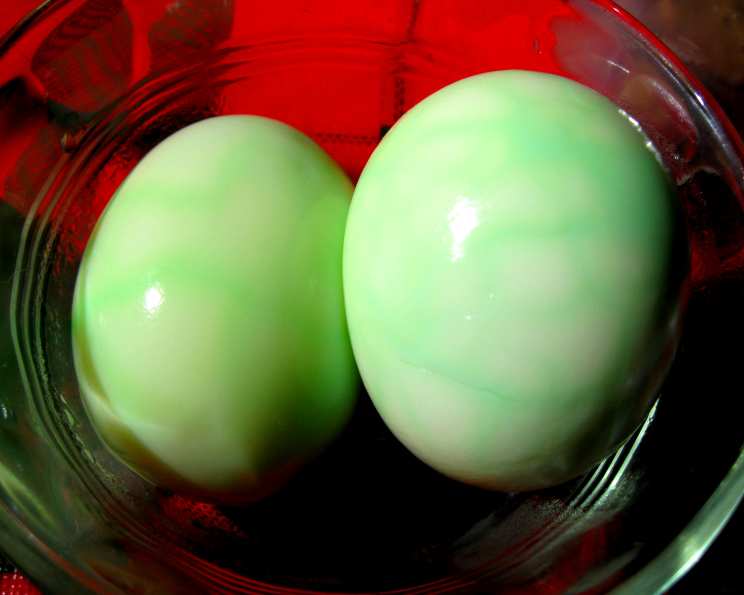
Marbled Eggs: An Unexpected Easter Delight
I remember the first time I saw marbled eggs. It wasn’t Easter, but a whimsical springtime brunch at a friend’s place. They were nestled amongst vibrant salads and fluffy pancakes, their intricate patterns hinting at something magical. I was instantly captivated! The subtle, earthy aroma mingling with the gentle pop of color made them irresistible. Turns out, the secret was a simple dyeing technique that transformed ordinary hard-boiled eggs into miniature works of art. This recipe is a fun project for the entire family.
Recipe Overview
- Prep Time: 15 minutes
- Cook Time: 45 minutes
- Total Time: 2 hours 30 minutes (plus refrigeration)
- Servings: 6
- Yield: 6 marbled eggs
- Dietary Type: Vegetarian
Ingredients
- 6 eggs, uncooked
- 3 tablespoons green food coloring
Equipment Needed
- Saucepan
- Slotted spoon
- Small bowl
Instructions
- Begin by gently placing the eggs in a saucepan.
- Cover the eggs completely with cold water. Ensure the water level is at least an inch above the eggs.
- Bring the water to a rapid boil over high heat. Once boiling, immediately cover the saucepan with a lid.
- Remove the saucepan from the heat and let the eggs sit, covered, for exactly 15 minutes. This allows the eggs to cook through without turning rubbery.
- Carefully drain the hot water from the saucepan, using a slotted spoon to prevent the eggs from cracking against each other or the sink.
- Refill the saucepan with cold water. Let the eggs cool in the cold water for approximately 30 minutes. This helps to stop the cooking process and makes them easier to handle.
- After cooling, gently roll each egg on a counter or other hard surface. Apply even pressure to create cracks all over the shell. The key is to create a network of fine cracks without peeling the shell off. This is where the “marbling” effect will come from.
- Return the cracked eggs to the saucepan.
- Cover the eggs again with water, ensuring they are fully submerged.
- Add 3 tablespoons of green food coloring to the water.
- Stir the water gently to distribute the food coloring evenly.
- Bring the water to a boil again over medium heat.
- Once boiling, reduce the heat to low and simmer gently for 30 minutes. This allows the dye to seep into the cracks and create the marbled effect.
- Turn off the heat and let the eggs cool completely in the colored water for 2-3 hours. The longer they sit, the more vibrant the marbling will be.
- After cooling, transfer the eggs and colored water to the refrigerator. Refrigerate for at least 2 hours to further enhance the color and set the dye.
- Finally, remove the eggs from the refrigerator. Peel the shells carefully to reveal the beautiful marbled pattern.
- Slice and enjoy!
Expert Tips & Tricks
- Gentle Cracking is Key: The more fine cracks you create, the more intricate the marbling effect will be. However, avoid peeling the shell off completely, as this will result in a blotchy, uneven color.
- Experiment with Colors: While this recipe calls for green food coloring, you can use other colors or even combine multiple colors for a truly unique effect. Consider using natural dyes like beet juice (for pink), turmeric (for yellow), or red cabbage (for blue). Be mindful of the different intensities and simmer times that may be needed for natural dyes.
- Vinegar for Deeper Color: A tablespoon of white vinegar added to the dye water can help the color penetrate the eggshell more effectively, resulting in a more vibrant and long lasting hue.
- Preventing Cracks During Boiling: Add a teaspoon of salt to the water before boiling. This can help prevent the shells from cracking during the initial cooking phase.
- Age Matters: Slightly older eggs (about a week old) are easier to peel than very fresh eggs.
Serving & Storage Suggestions
Marbled eggs are a stunning addition to any brunch spread, Easter basket, or picnic. Serve them halved on a platter, sprinkled with a pinch of sea salt and black pepper. They also make a beautiful addition to salads or deviled egg recipes.
Store peeled marbled eggs in an airtight container in the refrigerator for up to 3-4 days. Unpeeled eggs can be stored in the refrigerator for up to a week. Due to potential food safety concerns, it is not recommended to freeze hard-boiled eggs, as the texture can become rubbery.
Nutritional Information
| Nutrient | Amount per Serving | % Daily Value |
|---|---|---|
| Calories | 220.5 kcal | N/A |
| Calories from Fat | 134g | 61% |
| Total Fat | 14.9 g | 22% |
| Saturated Fat | 4.7 g | 23% |
| Cholesterol | 634.5 mg | 211% |
| Sodium | 210 mg | 8% |
| Total Carbohydrate | 1.2 g | 0% |
| Dietary Fiber | 0 g | 0% |
| Sugars | 1.2 g | 4% |
| Protein | 18.9 g | 37% |
Nutritional information is an estimate and may vary based on specific ingredients and preparation methods.
Variations & Substitutions
- Natural Dyes: As mentioned earlier, experiment with natural food colorings like beet juice, turmeric, or red cabbage for an all-natural approach.
- Different Colors: Don’t limit yourself to green! Use a variety of food colorings to create a rainbow effect.
- Spice Infusion: Add spices like star anise, cinnamon sticks, or peppercorns to the dye water for a subtle flavor infusion. Be sure these spices are food-safe, and use them sparingly.
- Tea-Stained Eggs: Use strong brewed tea (like black tea or chai) instead of food coloring for a more subtle, earthy marbling effect.
FAQs (Frequently Asked Questions)
Q: Can I use brown eggs instead of white eggs?
A: Yes, you can use brown eggs, but the marbling effect will be less visible due to the darker base color. The dye will be more subtle.
Q: How long can I keep the eggs in the colored water?
A: For the most vibrant marbling, it’s best to let the eggs cool in the colored water for 2-3 hours, followed by at least 2 hours in the refrigerator. You can leave them in longer (even overnight), but the color might become too intense.
Q: What if the color isn’t as vibrant as I want it to be?
A: Make sure you are using enough food coloring. You can also try adding a tablespoon of white vinegar to the dye water, which helps the color penetrate the eggshell. Also, ensure the simmer time is at least 30 minutes.
Q: Can I reuse the colored water?
A: No, it is not recommended to reuse the colored water, as it can harbor bacteria and may not produce consistent results.
Q: Are these eggs safe to eat?
A: Yes, as long as you follow the instructions carefully and use food-grade coloring, these eggs are safe to eat. Ensure the eggs are properly cooked and stored in the refrigerator. Discard any eggs that have been left at room temperature for more than two hours.
Final Thoughts
Marbled eggs are more than just a pretty dish; they’re a celebration of creativity and a testament to the magic that can happen when you play with your food. Don’t be afraid to experiment with different colors, patterns, and techniques to create your own unique masterpieces. Gather your family, put on some music, and turn egg-dyeing into a fun and memorable tradition. And if you have any feedback or questions, don’t hesitate to share them – I’d love to hear about your marbled egg adventures!