
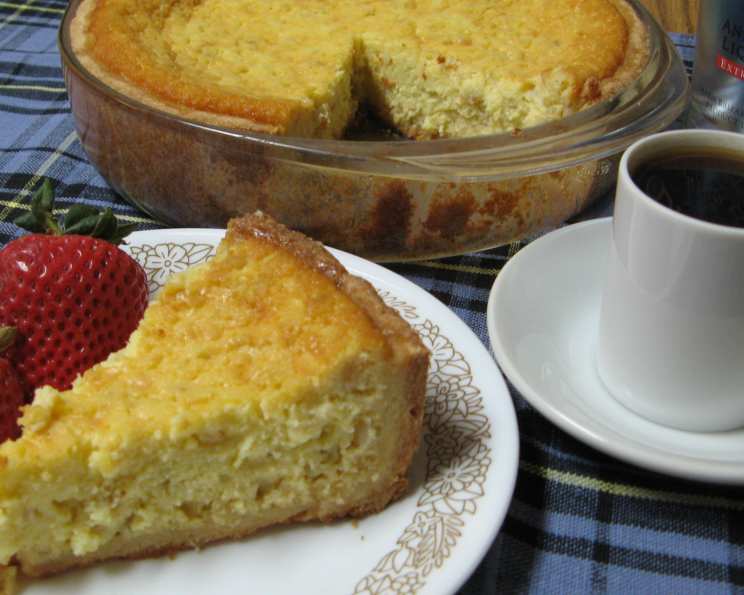
Maria’s Easter Pie: A Slice of Family Tradition
The scent alone transports me back to childhood Easters. It wasn’t the chocolate bunnies or colorful eggs that truly defined the holiday; it was the Pastiera di Grano, or wheat pie, lovingly crafted by my grandmother, Maria. The golden crust, the sweet, creamy filling, and the subtle hint of citrus – it was a symphony of flavors that spoke of springtime and family gatherings. Even now, decades later, the aroma of this pie baking in my own kitchen fills my heart with a warmth and nostalgia that no other dessert can replicate. It’s more than just a recipe; it’s a legacy.
Recipe Overview
- Prep Time: 27 hours (includes soaking and chilling time)
- Cook Time: 45 minutes – 1 hour
- Total Time: 27 hours 45 minutes – 28 hours
- Servings: 16 (2 pies, 8 servings per pie)
- Yield: 2 pies
- Dietary Type: Not specified (contains dairy, gluten, and eggs)
Ingredients
For the Crust:
- ½ – ¾ cup butter
- 3 eggs or 2 extra large egg yolks
- 2 ½ – 3 cups all-purpose flour
- 1 cup sugar
- ½ – 1 teaspoon freshly grated lemon rind
For the Cream:
- 18 ounces whole milk
- 3 large egg yolks
- 2 tablespoons sugar
- 2 tablespoons all-purpose flour
- 2 tablespoons freshly grated lemon rind
- ½ cup finely minced candied citron peel (well rinsed and drained before mincing) (optional)
For the Wheat:
- 2 cups cooked wheat (about ½-¾ pound of dry wheat should = 2 cups cooked) or 1 ½ – 2 cups cooked drained arborio rice
- ½ cup whole milk
- 4 tablespoons butter
For the Ricotta Filling:
- 8 large eggs
- 2 ½ cups sugar (cut sugar by ½ cup if using the citron)
- 2 teaspoons freshly grated lemon rind
- 1 lb whole milk ricotta cheese (drained if very wet)
Equipment Needed
- Two 9 x 2 inch round cake pans (Pyrex recommended)
- Double boiler
- Large bowl
- Saucepan
- Wooden spoon
- Plastic wrap
- Rolling pin
- Wire rack
Instructions
-
Preparing the Wheat (Using Dry Wheat): If “soaked” or “precooked” wheat is unavailable, begin with dry wheat. Cover the dry wheat with cold water (water should be about 2 inches over the wheat) and boil it for 15 minutes or until the wheat berries crack open.
-
Soaking the Wheat: Remove pan from heat and allow the wheat to soak for a full 24 hours.
-
Draining the Wheat: After soaking, drain the wheat well before using.
-
Preparing the Wheat (Using Soaked/Precooked Wheat): If using “soaked”/”precooked” wheat, add the wheat to a pan of boiling water and cook it for about 5-10 minutes (most of the wheat berries should be open, and they should be chewy but tender).
-
Draining and Cooling the Wheat: Drain the wheat well, let it cool, and set aside.
-
Making the Crust: In a bowl, mix together the flour, sugar, and lemon peel.
-
Incorporating the Butter: Work the butter into the flour using your fingers (until it is the size of peas). The key here is to keep the butter cold for a flaky crust.
-
Adding the Eggs: Add the eggs one at a time, mixing with a wooden spoon.
-
Kneading the Dough: Knead the dough lightly until it holds together well and clears the bowl. Be careful not to over-knead.
-
Chilling the Dough: Form the dough into a ball, wrap in plastic wrap, and chill it for about ½ – 1 hour before using.
-
Preparing the Cream: Fill the bottom of a double boiler with enough water so that its insert doesn’t quite touch the water; bring the water to a boil.
-
Mixing the Cream Ingredients: In the insert of the double boiler, mix together the whole milk, egg yolks, sugar, flour, lemon peel, and citron (if using).
-
Cooking the Cream: Cook the “cream,” stirring constantly until it has thickened and is the consistency of a thick pudding (about 20-30 minutes). Be patient and stir continuously to prevent scorching.
-
Cooling the Cream: Remove the insert from the boiling water and set aside to allow the “cream” to cool, stir occasionally to keep a skin from forming. You can speed up the cooling process by placing the insert pan into a bowl of very cold water, don’t forget to stir.
-
Preparing the Wheat Mixture: Add the (cooked, soaked, well drained) wheat to a saucepan with the milk and butter.
-
Cooking the Wheat Mixture: Cook the wheat mixture, stirring occasionally until the butter melts, and the mixture starts to boil; boil for 1 minute.
-
Cooling the Wheat Mixture: Remove from heat and let cool.
-
Preparing the Pans: On a lightly floured board, roll out the chilled dough to about 1/8 inch thick and line the bottom and sides of two lightly buttered 9-inch glass cake pans.
-
Creating the Overhang: Leave a ½ inch overhang of dough if you are going to use the lattice top. If not using the lattice, trim the overhang to ¼ inch.
-
Making the Lattice Strips (Optional): Re-roll scraps and cut into ½ inch wide strips to use as a lattice top for the pie. The lattice can be omitted if you prefer a solid crust.
-
Preheating the Oven: Preheat oven to 350°F.
-
Making the Ricotta Filling: Mix ricotta, eggs, sugar, and lemon peel together in a large bowl.
-
Blending the Ricotta Filling: Beat the ricotta mixture by hand, with a wooden spoon, until smooth and creamy.
-
Combining the Mixtures: Add the “cream” mixture and the wheat mixture to the ricotta filling, stirring until all is well blended.
-
Filling the Pans: Pour or ladle the filling into prepared pans (to within ¼ inch of the top of the pan).
-
Creating the Lattice Top (Optional): Place the strips of dough across the filling, spaced about 1 inch apart (at right angles) forming a lattice top.
-
Finishing the Crust: Fold the ½ inch overhang over the edges of the lattice and flute well. If not making the lattice top, fold the ¼ inch overhang on to itself, and lightly flute.
-
Baking the Pies: Bake the pies in a preheated 350°F oven for about 45 minutes to 1 hour, or until the bottom of the crust is light brown, the center is set, and the top of the pies are golden. Checking the bottom crust is key to preventing a soggy bottom.
-
Cooling in the Oven: Turn off the oven and let the pies cool for an hour in the oven with the oven door slightly (about 2 inches) ajar. This gradual cooling helps prevent the filling from cracking.
-
Cooling on a Rack: Remove pies from oven and place on a wire rack.
-
Chilling the Pies: When completely cooled, cover loosely with plastic wrap and chill until serving.
-
Serving: If you like, you can give the pie tops a light sprinkle of powdered sugar before serving. Its best to served this pie directly from the pan, as trying to plate the whole pie is more trouble than its worth, and causes breakage.
Expert Tips & Tricks
- Citrus Zest Enhancement: To maximize the citrus flavor, gently massage the lemon zest with the sugar before adding other ingredients. This releases the oils and intensifies the aroma.
- Preventing a Soggy Bottom: Blind baking the crust for 10-15 minutes before adding the filling can help prevent a soggy bottom. Use pie weights or dried beans to keep the crust from puffing up.
- Cream Consistency: If the cream doesn’t thicken enough, you can add a cornstarch slurry (1 tablespoon cornstarch mixed with 2 tablespoons cold milk) in the last 5 minutes of cooking.
- Ricotta Choice: Opt for whole milk ricotta for the richest flavor and texture. Drain the ricotta thoroughly to prevent a watery filling.
- Lattice Alternative: If you’re short on time, skip the lattice and simply cover the pie with a solid crust. Cut a few slits in the top to allow steam to escape.
Serving & Storage Suggestions
Serve Pastiera di Grano chilled, straight from the pan. A light dusting of powdered sugar adds a touch of elegance. This pie is best enjoyed cold, allowing the flavors to meld together.
Store leftover pie in the refrigerator, covered, for up to 3-4 days. While it can be frozen, the texture may change slightly upon thawing. To freeze, wrap tightly in plastic wrap and then foil. Thaw overnight in the refrigerator before serving.
Nutritional Information
| Nutrient | Amount per Serving | % Daily Value |
|---|---|---|
| Calories | 532 kcal | N/A |
| Total Fat | 18.4g | 28% |
| Saturated Fat | 10.1g | 50% |
| Cholesterol | 203.9mg | 67% |
| Sodium | 169.3mg | 7% |
| Total Carbohydrate | 80.1g | 26% |
| Dietary Fiber | 3.3g | 13% |
| Sugars | 47.7g | N/A |
| Protein | 13.8g | 27% |
Note: Nutritional information is an estimate and may vary based on specific ingredients and portion sizes.
Variations & Substitutions
- Gluten-Free Pastiera: Use a gluten-free flour blend to make a gluten-free crust.
- Dairy-Free Option: Substitute plant-based milk (almond, soy, or oat milk) for the cow’s milk in both the cream and wheat mixtures. Use a dairy-free butter alternative for the crust and wheat mixture and ensure a dairy-free ricotta substitute.
- Ricotta Alternative: While traditional, you can experiment with different types of ricotta cheese, such as sheep’s milk ricotta, for a slightly different flavor profile.
- Citron Variations: If you’re not a fan of citron, you can omit it altogether or substitute it with other candied fruits like orange peel or ginger.
- Lemon or Orange: While lemon is traditional, experiment with orange zest instead for a slightly different citrus note.
FAQs (Frequently Asked Questions)
Q: Why is my Pastiera cracking on top?
A: This is often caused by cooling the pie too quickly. Allow the pie to cool gradually in the oven with the door ajar to prevent cracking.
Q: Can I use pre-made pie crust to save time?
A: While it’s not traditional, you can use a high-quality pre-made pie crust. However, the homemade crust truly elevates the flavor of the pie.
Q: Can I make this pie ahead of time?
A: Absolutely! In fact, Pastiera tastes even better after it has had a day or two to allow the flavors to meld. Make it 1-2 days in advance and store it in the refrigerator.
Q: What if I can’t find cooked wheat?
A: Arborio rice makes a good substitute. Cook and drain it well before using it in the recipe.
Q: How do I know when the pie is done?
A: The pie is done when the bottom crust is light brown, the center is set (it should jiggle only slightly), and the top is golden brown.
Final Thoughts
Maria’s Pastiera di Grano is more than just a dessert; it’s a connection to my past, a symbol of family, and a celebration of spring. I encourage you to try this recipe and experience the magic for yourself. Don’t be intimidated by the multiple steps; each one is a labor of love that contributes to the pie’s unique flavor and texture. Feel free to share your own variations and feedback. This pie pairs beautifully with a glass of Vin Santo or a strong espresso – perfect complements to its sweet and citrusy notes. Happy baking!