
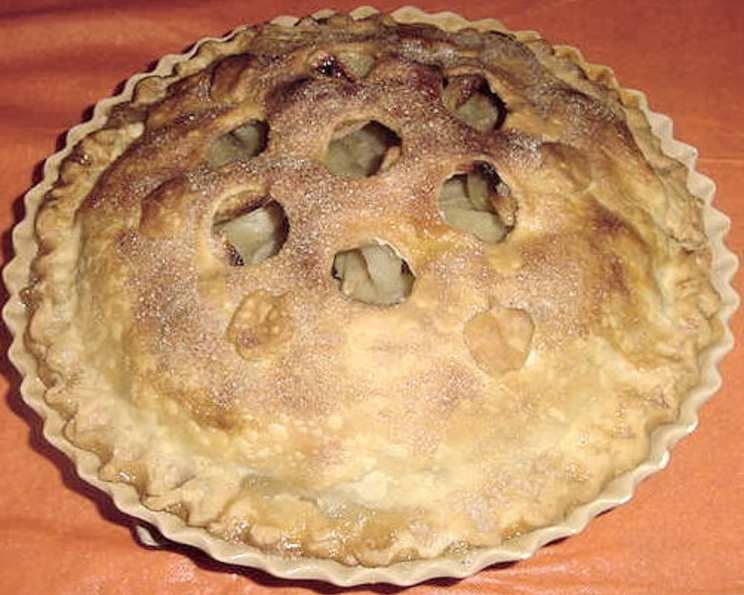
Mark’s Favorite Classic Double-Crust Apple Pie
The aroma of a baking apple pie has always been synonymous with home for me. As a child, my grandmother, a woman whose hands seemed permanently dusted with flour, would orchestrate the most magnificent pies during apple season. The entire house would fill with the sweet, spicy scent, a fragrant promise of warmth and comfort that lingered long after the last slice was devoured. Now, I strive to recreate that comforting embrace, that perfect symphony of tart and sweet, with every apple pie I bake.
Recipe Overview
- Prep Time: 1 hour 30 minutes (includes chilling time)
- Cook Time: 1 hour
- Total Time: 3 hours 30 minutes
- Servings: 8
- Yield: 1 pie
- Dietary Type: Vegetarian
Ingredients
Crust:
- 2 1/2 cups all-purpose flour
- 1/2 teaspoon salt
- 10 tablespoons chilled unsalted butter, cut into 1/2 inch pieces
- 1/2 cup chilled vegetable shortening, cut into 1/2 inch pieces
- 4 tablespoons ice water (about)
Filling:
- Vegetable oil cooking spray
- 1 3/4 lbs sweet apples, such as Spartan or Golden Delicious, peeled, cored, thinly sliced (about 5 1/2 cups)
- 1 3/4 lbs tart apples, such as Granny Smith or Pippin, peeled, cored, thinly sliced (about 5 1/2 cups)
- 3/4 cup sugar, plus 1 tablespoon sugar
- 1 teaspoon fresh lemon juice
- 1/2 teaspoon ground cinnamon, plus 1 pinch ground cinnamon
- 1/2 teaspoon vanilla extract
- 1 tablespoon all-purpose flour
- 3 tablespoons unsalted butter, diced
- 1 tablespoon whole milk
Equipment Needed
- Large mixing bowl
- 9-inch-diameter deep-dish glass pie dish
- Plastic wrap
- Rolling pin
- Small bottle cap (optional, for decoration)
- Baking sheet
Instructions
-
Prepare the Crust: In a large bowl, whisk together the flour and salt until well combined. This ensures even distribution of the salt, which is crucial for flavor.
-
Incorporate the Fats: Add the chilled butter and shortening to the flour mixture. Using your fingertips or a pastry blender, rub the fats into the flour until the mixture resembles a coarse meal. The key here is to work quickly and keep the ingredients cold; this creates pockets of fat that will melt during baking, resulting in a flaky crust.
-
Add Water and Form the Dough: Gradually sprinkle in 3 tablespoons of ice water, tossing the mixture with a fork to combine. Add more water, a teaspoon at a time, if the dough seems dry. The goal is to form moist clumps without overworking the gluten in the flour.
-
Divide and Chill: Gather the dough into a ball and divide it in half. Flatten each half into a disk, wrap them tightly in plastic wrap, and chill in the refrigerator for at least 1 hour. This chilling time is essential for allowing the gluten to relax and the fats to solidify, both of which contribute to a tender and flaky crust. You can prepare the dough up to 1 day in advance; just soften it slightly at room temperature before rolling.
-
Preheat Oven and Prepare Pie Dish: Preheat your oven to 400°F (200°C). Lightly spray a 9-inch-diameter deep-dish glass pie dish with vegetable oil cooking spray. This helps prevent the pie from sticking.
-
Make the Filling: In a large bowl, stir together the sweet apples, tart apples, 3/4 cup sugar, lemon juice, 1/2 teaspoon cinnamon, and vanilla extract. The lemon juice brightens the flavors and prevents the apples from browning.
-
Let the Filling Rest: Let the apple mixture stand for about 15 minutes, allowing the juices to release. This step helps to thicken the filling and prevent a soggy bottom crust.
-
Add Flour to the Filling: Mix the 1 tablespoon flour into the apple mixture. The flour will help absorb excess moisture during baking.
-
Roll Out the Bottom Crust: On a lightly floured surface, roll out one of the dough disks into a 12-inch round. Carefully place the dough into the prepared pie dish, gently pressing it into the bottom and up the sides.
-
Fill and Dot with Butter: Spoon the apple filling into the pie crust. Dot the top of the filling with the diced butter. These butter pats melt during baking, enriching the filling and adding flavor.
-
Roll Out the Top Crust: Roll out the second dough disk into a 13-inch round.
-
Decorate (Optional): Using a small bottle cap, cut out ten 1/2-inch-diameter circles from the dough for decoration; discard circles. You can get creative here and use other shapes or designs if you prefer.
-
Cover and Seal: Drape the top crust over the filling. Seal the top and bottom crust edges together, trimming the overhang to 1/2 inch. Fold the overhang under and crimp the edges decoratively. A fork can also be used to press the edges together for a simple, yet effective seal.
-
Glaze and Sprinkle: Brush the top of the pie with milk. In a small bowl, combine the remaining 1 tablespoon sugar and a large pinch of cinnamon. Sprinkle this mixture over the pie. The milk helps with browning, and the sugar-cinnamon mixture adds a sweet and spicy finish.
-
Bake: Transfer the pie to a baking sheet. Place the baking sheet in the oven and immediately reduce the temperature to 375°F (190°C). Bake the pie until the crust is golden brown, the apples are tender, and the filling is bubbling thickly, about 1 hour. If the crust starts to brown too quickly, cover the edges with foil.
-
Cool: Cool the pie for at least 30 minutes before serving. This allows the filling to set slightly and prevents it from being too runny.
Expert Tips & Tricks
-
Keep it Cold: The key to a flaky crust is keeping the ingredients cold. Use ice water and chilled butter and shortening. If your kitchen is warm, consider chilling the dough bowl and rolling pin as well.
-
Don’t Overwork the Dough: Overworking the dough develops the gluten, resulting in a tough crust. Mix the ingredients until just combined and avoid excessive handling.
-
Blind Baking: For an extra-crisp bottom crust, consider blind baking the bottom crust before adding the filling. This involves lining the crust with parchment paper and filling it with pie weights or dried beans to prevent it from puffing up during baking.
-
Adjust Sweetness: Taste your apples before making the filling and adjust the amount of sugar accordingly. If your apples are very sweet, you may need to reduce the amount of sugar.
-
Prevent a Soggy Bottom: Besides letting the filling rest and adding flour, you can also brush the bottom crust with egg white before adding the filling. This creates a moisture barrier.
Serving & Storage Suggestions
Serve the pie warm or at room temperature, preferably with a scoop of vanilla ice cream or a dollop of whipped cream. To store leftover pie, cover it loosely and keep it at room temperature for up to 2 days or in the refrigerator for up to 4 days. To reheat, warm individual slices in the microwave or the entire pie in a preheated oven at 350°F (175°C) until heated through. The pie can also be frozen, well-wrapped, for up to 2 months. Thaw overnight in the refrigerator before reheating.
Nutritional Information
| Nutrient | Amount per Serving | % Daily Value |
|---|---|---|
| Calories | 450 kcal | 23% |
| Total Fat | 25g | 38% |
| Saturated Fat | 15g | 75% |
| Cholesterol | 50mg | 17% |
| Sodium | 150mg | 7% |
| Total Carbohydrate | 50g | 17% |
| Dietary Fiber | 5g | 20% |
| Sugars | 30g | – |
| Protein | 5g | 10% |
Nutritional information is an estimate and may vary based on specific ingredients and preparation methods.
Variations & Substitutions
-
Gluten-Free Crust: Use a gluten-free all-purpose flour blend to make a gluten-free crust. You may need to add a binder, such as xanthan gum, to help with the texture.
-
Vegan Crust: Substitute the butter with a vegan butter alternative or solid coconut oil. Ensure the shortening is also vegan-friendly.
-
Different Apples: Experiment with different apple varieties to create unique flavor combinations. Honeycrisp, Fuji, and Braeburn are also good choices.
-
Spiced Filling: Add other spices to the filling, such as nutmeg, allspice, or ginger.
-
Nut Topping: Sprinkle chopped nuts, such as pecans or walnuts, over the pie before baking for added texture and flavor.
FAQs (Frequently Asked Questions)
Q: Why is my pie crust tough?
A: Overworking the dough develops the gluten, resulting in a tough crust. Mix the ingredients until just combined and avoid excessive handling.
Q: How do I prevent a soggy bottom crust?
A: Let the filling rest before adding it to the crust, add flour to the filling to absorb excess moisture, and consider blind baking the bottom crust.
Q: Can I use pre-made pie crust?
A: Yes, you can use pre-made pie crust to save time. However, homemade crust generally tastes better and has a flakier texture.
Q: How do I know when the pie is done?
A: The crust should be golden brown, the apples should be tender, and the filling should be bubbling thickly.
Q: Can I make this pie ahead of time?
A: Yes, you can make the pie a day ahead of time and store it at room temperature or in the refrigerator.
Final Thoughts
This classic double-crust apple pie is more than just a dessert; it’s a celebration of flavors and textures, a comforting reminder of simpler times. I encourage you to try this recipe and share your own apple pie memories with loved ones. Feel free to experiment with different apple varieties and spices to create your own signature version. And please, share your feedback and photos – I’d love to see your creations! Perhaps pair it with a scoop of homemade vanilla ice cream or a warm cup of spiced cider for the ultimate autumnal treat. Happy baking!