
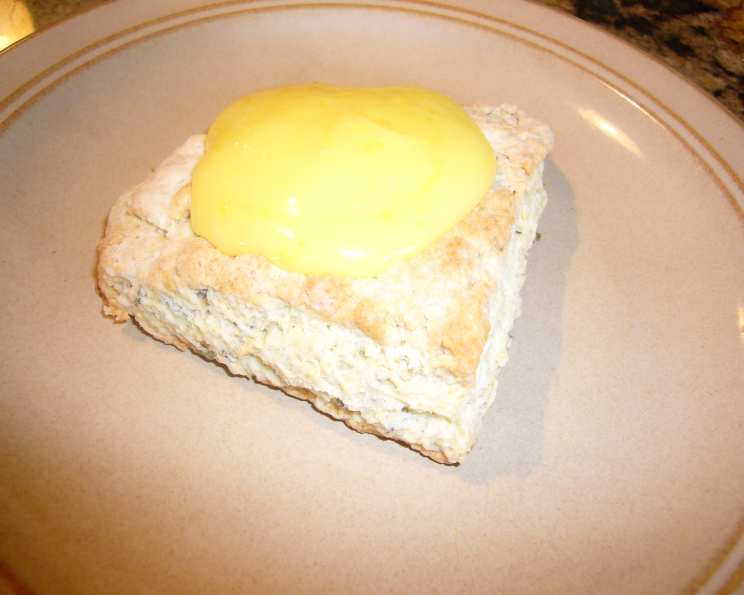
Martha Stewart’s Ca. 1995 Best Lemon Curd: A Culinary Time Capsule
I remember the first time I tasted truly exceptional lemon curd. It wasn’t from a jar, nor was it at some fancy bakery. It was at a potluck hosted by my great aunt, Beatrice. She was a woman who measured ingredients with her heart and soul, and her lemon curd, spread generously on homemade scones, tasted like sunshine and pure comfort. This recipe, Martha Stewart’s from way back in 1995, reminds me of Aunt Bea’s. It’s a testament to the fact that sometimes, the simplest, most meticulously crafted recipes are the most divine. I hope it brings as much joy to your kitchen as it has to mine.
Recipe Overview
- Prep Time: 20 minutes
- Cook Time: 15 minutes
- Total Time: 35 minutes
- Yields: 1 1/2 cups
- Dietary Type: Vegetarian
Ingredients
- 6 egg yolks
- 1 cup granulated sugar
- 1/2 cup fresh lemon juice, strained
- 1/2 cup unsalted butter, COLD and cut into small pieces
- 1 tablespoon lemon rind, grated
Equipment Needed
- Medium-size heavy saucepan
- Fine-mesh sieve or strainer
- Wooden spoon
- Heat-proof 4-cup measuring cup or bowl
- Whisk
Instructions
- Begin by beating the egg yolks in a bowl until they are well blended and a rich, lemon-yellow color. This step is crucial for achieving a smooth, luxurious texture in your final curd.
- Strain the beaten egg yolks through a fine-mesh sieve into a medium-size heavy saucepan. This removes any bits of shell or the stringy albumen, resulting in an exceptionally smooth base for the curd. The heavy saucepan is also important, as it helps to distribute heat evenly and prevent scorching or curdling.
- Add the sugar and strained lemon juice to the saucepan with the strained egg yolks. Stir to combine the ingredients thoroughly.
- Cook the mixture over low heat, stirring constantly, for approximately 10-15 minutes. This is the most crucial step; patience is key. DO NOT increase the heat to speed up the process, as this will almost certainly cause the eggs to curdle. The mixture should be gently heated to allow the yolks to thicken without scrambling.
- Continue to stir constantly until the mixture is thick enough to coat the back of a wooden spoon. To test for doneness, dip the back of the spoon into the curd and run your finger through the coating. If the line remains distinct and doesn’t immediately run back together, the curd is ready.
- Remove the saucepan from the heat immediately.
- Pour the cooked curd through another sieve into a heat-proof 4-cup measuring cup or bowl. This second straining will remove any “scrambled egg bits” that may have formed during cooking, ensuring an incredibly smooth final product.
- Add the cold butter pieces to the strained curd in the measuring cup. The cold butter will rapidly cool down the mixture, preventing it from continuing to cook and potentially curdling further. It also enriches the flavor and adds a beautiful sheen to the curd.
- Stir the mixture until the butter is completely melted and well-blended into the curd.
- Add the grated lemon rind to the curd and continue stirring until it is evenly distributed. Adding the zest at this stage preserves its bright, fresh flavor, as cooking it with the other ingredients can sometimes result in a slightly bitter taste.
- Transfer the finished lemon curd to your desired storage container(s). You can use one large container or several smaller jars, depending on your needs.
- Refrigerate immediately.
Expert Tips & Tricks
- Use fresh, high-quality lemons for the best flavor. Meyer lemons, if available, will provide a slightly sweeter and less acidic curd.
- Don’t skip the straining steps! They are essential for achieving a truly smooth and professional-quality lemon curd.
- If you’re concerned about curdling, you can cook the curd in a double boiler. This will provide a more gentle and even heat.
- Be patient! Cooking the curd over low heat and stirring constantly is crucial for preventing curdling.
- To check for doneness, use the back of a wooden spoon. The curd should coat the spoon and a line drawn through it should hold its shape.
- If your curd does happen to curdle, don’t despair! You can try blending it briefly with an immersion blender to smooth it out. However, straining it is always preferable.
- For a richer curd, you can use brown butter instead of regular unsalted butter. Brown the butter in a saucepan over medium heat until it is fragrant and nutty, then let it cool slightly before adding it to the curd.
Serving & Storage Suggestions
This lemon curd is incredibly versatile and can be used in a variety of ways. It’s delicious spread on scones, toast, or muffins. It can also be used as a filling for tarts, pies, cakes, and pastries. Try using it as a topping for yogurt, ice cream, or pancakes. Or, simply enjoy it by the spoonful straight from the jar!
Storage: Lemon curd must be refrigerated. It will keep for up to 2 weeks in an airtight container in the refrigerator.
Freezing: While technically possible, freezing and thawing lemon curd can sometimes affect the texture, making it slightly grainy. If you do freeze it, be sure to thaw it slowly in the refrigerator.
Room Temperature: Do not leave lemon curd at room temperature for more than 2 hours, as it is perishable and can spoil quickly.
Nutritional Information
| Nutrient | Amount per Serving | % Daily Value |
|---|---|---|
| Calories | 1275.4 kcal | N/A |
| Calories from Fat | N/A | 55% |
| Total Fat | 77.8 g | 119% |
| Saturated Fat | 44.8 g | 223% |
| Cholesterol | 826.7 mg | 275% |
| Sodium | 40.1 mg | 1% |
| Total Carbohydrate | 141.8 g | 47% |
| Dietary Fiber | 0.7 g | 2% |
| Sugars | 135.7 g | N/A |
| Protein | 10.7 g | 21% |
Please note that these values are estimates and may vary based on specific ingredients and preparation methods.
Variations & Substitutions
- Lime Curd: Substitute lime juice for lemon juice and increase the grated lime zest to 2 tablespoons.
- Orange Curd: Use orange juice instead of lemon juice and decrease the sugar to 2/3 cup. Add 1 tablespoon of orange zest.
- Grapefruit Curd: Use grapefruit juice in place of lemon juice and use the same amount of sugar and zest as the lemon curd recipe.
- Dairy-Free Curd: This is tricky, but can be achieved with plant-based butter alternatives and careful attention to heat. The results will vary.
FAQs (Frequently Asked Questions)
Q: Why is straining the egg yolks so important?
A: Straining the egg yolks removes any bits of shell or albumen, which can create a grainy texture in the final curd. It ensures a smooth and velvety consistency.
Q: Can I use bottled lemon juice instead of fresh?
A: While fresh lemon juice is always preferable for the best flavor, bottled lemon juice can be used in a pinch. However, the flavor may not be as bright or vibrant.
Q: How do I know when the curd is thick enough?
A: The curd is ready when it coats the back of a wooden spoon. To test, dip the spoon into the curd and run your finger through the coating. If the line remains distinct and doesn’t immediately run back together, the curd is done.
Q: What if my curd curdles?
A: If your curd curdles, don’t panic! You can try blending it briefly with an immersion blender to smooth it out. Straining it is also another effective method.
Q: Can I freeze lemon curd?
A: While you can freeze lemon curd, the texture may be slightly affected after thawing, becoming a bit grainy. Thaw slowly in the refrigerator for best results.
Final Thoughts
This lemon curd recipe, a gem from Martha Stewart’s archives, is more than just a collection of ingredients and instructions; it’s a journey to a simpler time, a reminder of the power of carefully crafted flavors, and a celebration of the joy that homemade treats can bring. I urge you to try this recipe. It may take a little extra time and attention, but I believe that extra effort translates directly to the end result. And when you take that first bite of silky, tangy, sunshine-yellow curd, I think you’ll agree. Share your creations and feedback – I’d love to hear about your lemon curd adventures! Why not pair it with a delicate Earl Grey tea or a glass of crisp Prosecco? Happy baking!