
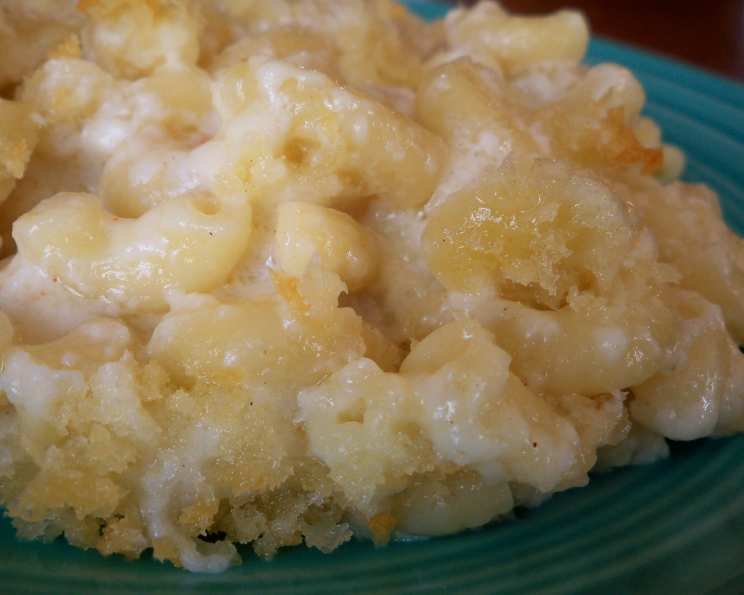
The Ultimate Comfort: Mastering Martha Stewart’s Macaroni and Cheese
Macaroni and cheese. Just the name evokes warmth, nostalgia, and a profound sense of comfort. I remember countless winter evenings as a child, huddled around our kitchen table, the aroma of bubbling cheese filling the air as my grandmother pulled a steaming casserole dish from the oven. The first bite was always a revelation – creamy, cheesy, and utterly satisfying. It wasn’t just a meal; it was a hug on a plate, a reminder of love and simpler times. While my grandmother’s recipe remains a cherished family secret, Martha Stewart’s version captures that same essence, elevating a classic with its perfectly balanced flavors and textures.
Recipe Overview
- Prep Time: 15 minutes
- Cook Time: 1 hour 20 minutes (large dishes) / 55 minutes (small dishes)
- Total Time: 1 hour 35 minutes (large dishes) / 1 hour 10 minutes (small dishes)
- Servings: 8
- Yield: Two 2-quart or eight 12- to 16-oz baking dishes
- Dietary Type: Vegetarian
Ingredients
- 1 lb short pasta (such as cavatappi or macaroni)
- 6 tablespoons butter
- 1⁄4 cup all-purpose flour
- 4 cups milk
- 1⁄8 teaspoon cayenne pepper
- 1⁄8 teaspoon ground nutmeg
- 3 cups shredded sharp white cheddar cheese (12 oz)
- 1 cup finely grated parmesan cheese (2 oz)
- 3 cups very coarse fresh breadcrumbs
Equipment Needed
- Large pot
- Medium saucepan
- Whisk
- Two 2-quart or eight 12- to 16-oz baking dishes
- Baking sheet
- Plastic wrap
- Aluminum foil
Instructions
-
Begin by preheating your culinary stage. Preheat your oven to 375°F (190°C).
-
Next, orchestrate the pasta. In a large pot, bring water to a rolling boil. Add the pasta and cook it for 1 to 2 minutes less than the package instructions specify for al dente. This is crucial as the pasta will continue to cook in the oven. Drain the pasta, rinse it with cool water to stop the cooking process, and return it to the pot.
-
Prepare the béchamel base, the heart of our mac and cheese. In a medium saucepan, melt 4 tablespoons of butter over medium-high heat. Once melted, add the flour and cook, whisking constantly, for 1 minute. This creates a roux, which will thicken our cheese sauce beautifully.
-
Infuse the sauce with warmth and depth. Gradually add the milk to the roux, whisking continuously to prevent lumps. Stir in the cayenne pepper, nutmeg, and 2 teaspoons of salt. Bring the mixture to a simmer, still whisking, and cook until it is thick enough to coat the back of a spoon – this should take about 2 to 3 minutes.
-
Incorporate the cheese, the stars of the show. Remove the saucepan from the heat and whisk in the shredded white cheddar cheese and grated parmesan cheese until completely smooth and melted. The sauce should be rich, creamy, and irresistibly cheesy.
-
Unite the pasta and sauce. Pour the cheese sauce over the drained pasta in the pot and toss gently but thoroughly to ensure that every strand is coated in cheesy goodness.
-
Assemble the baking dishes. Divide the mac and cheese evenly among the two 2-quart baking dishes (or eight individual 12- to 16-oz baking dishes).
-
Craft the crunchy topping. In a separate small bowl, melt the remaining 2 tablespoons of butter. Toss the melted butter with the coarse fresh breadcrumbs until evenly coated.
-
Top and prepare for baking. Sprinkle the buttered breadcrumbs evenly over the mac and cheese in the baking dishes. At this point, you can cover the dishes tightly with plastic wrap and freeze them for up to 3 months. If freezing, make sure to use freezer-safe baking dishes.
-
Bake to golden perfection. If baking from frozen, place the frozen dishes on a baking sheet (this protects your oven from any potential spills); remove the plastic wrap. Cover the dishes with aluminum foil to prevent the breadcrumbs from burning and to ensure the mac and cheese heats through evenly. Bake for 60-70 minutes for the larger dishes, or 40-50 minutes for the smaller individual dishes, until bubbling hot.
-
Achieve the perfect crust. Remove the foil and continue baking for another 5 to 10 minutes, or until the breadcrumbs are golden brown and the mac and cheese is bubbling enthusiastically.
-
Let cool slightly before serving to allow the cheese sauce to thicken a bit more.
Expert Tips & Tricks
-
Cheese Choice Matters: While sharp white cheddar provides a classic flavor, feel free to experiment with other cheeses like Gruyere, Fontina, or even a touch of smoked Gouda for a deeper, more complex flavor profile. Just remember to keep the ratios balanced to maintain the overall creaminess.
-
Breadcrumb Boost: For an extra layer of flavor and texture in the breadcrumb topping, try adding a pinch of garlic powder, dried herbs (such as thyme or rosemary), or even some grated parmesan cheese to the breadcrumbs before tossing them with the melted butter.
-
Preventing a Dry Dish: The key to a creamy mac and cheese is ensuring that the sauce is thick enough before baking. If the sauce seems too thin, continue simmering it for a few more minutes until it reaches the desired consistency. Additionally, avoid overbaking the mac and cheese, as this can cause it to dry out.
-
Make-Ahead Marvel: This recipe is perfect for making ahead of time. Assemble the mac and cheese in the baking dishes, top with the breadcrumbs, and refrigerate (covered) for up to 24 hours before baking. You may need to add a few extra minutes to the baking time if baking from cold.
Serving & Storage Suggestions
Serve this decadent mac and cheese hot from the oven. It pairs perfectly with a crisp green salad, roasted vegetables, or even a simple tomato soup.
Leftovers can be stored in an airtight container in the refrigerator for up to 3 days. To reheat, simply microwave in 30-second intervals until heated through, or bake in a preheated oven at 350°F (175°C) until warmed. If the mac and cheese seems dry after reheating, add a splash of milk or cream to restore its creaminess. Frozen portions will keep up to 3 months. Reheat directly from frozen at 350F, covered with foil, until hot (about 60 to 90 minutes).
Nutritional Information
| Nutrient | Amount per Serving | % Daily Value |
|---|---|---|
| Calories | 765 kcal | N/A |
| Calories from Fat | 304 g | 40% |
| Total Fat | 33.8 g | 51% |
| Saturated Fat | 20 g | 100% |
| Cholesterol | 95.5 mg | 31% |
| Sodium | 890.1 mg | 37% |
| Total Carbohydrate | 81.5 g | 27% |
| Dietary Fiber | 3.8 g | 15% |
| Sugars | 4.4 g | N/A |
| Protein | 32.7 g | 65% |
Note: Percent Daily Values are based on a 2,000 calorie diet.
Variations & Substitutions
-
Gluten-Free Goodness: For a gluten-free version, use gluten-free pasta and a gluten-free all-purpose flour blend in the sauce. Ensure your breadcrumbs are also gluten-free.
-
Spice It Up: Add a pinch of red pepper flakes to the cheese sauce for a touch of heat, or stir in some chopped jalapeños for a more pronounced spicy kick.
-
Veggie Boost: Incorporate some finely chopped vegetables, such as broccoli florets, cauliflower, or spinach, into the mac and cheese for added nutrients and flavor.
-
Creamy Dream: Substitute half of the milk with heavy cream for an even richer and more decadent mac and cheese.
FAQs (Frequently Asked Questions)
Q: Can I use pre-shredded cheese?
A: While convenient, pre-shredded cheese often contains cellulose, which can prevent it from melting as smoothly. Shredding your own cheese will result in a creamier sauce.
Q: How do I prevent the breadcrumbs from burning?
A: Covering the baking dishes with foil during the majority of the baking time helps to prevent the breadcrumbs from burning. Remove the foil only during the last few minutes to allow them to brown.
Q: Can I make this recipe in a slow cooker?
A: While possible, the texture may be slightly different. Cook the pasta separately, then combine all ingredients in the slow cooker on low for 2-3 hours, stirring occasionally.
Q: What’s the best way to reheat leftover mac and cheese?
A: For best results, reheat in the oven at 350°F (175°C) with a splash of milk or cream to restore moisture. Microwaving is also an option, but stir frequently to prevent it from drying out.
Q: Can I use different types of pasta?
A: Absolutely! Feel free to experiment with different short pasta shapes, such as penne, shells, or rotini. Just ensure that the pasta is cooked al dente before adding it to the sauce.
Final Thoughts
Martha Stewart’s Macaroni and Cheese is more than just a recipe; it’s an invitation to create a moment of pure, unadulterated comfort. With its creamy cheese sauce, perfectly cooked pasta, and crunchy breadcrumb topping, this dish is guaranteed to please even the most discerning palate. So, gather your ingredients, preheat your oven, and prepare to experience the magic of homemade mac and cheese. Don’t be afraid to experiment with variations and substitutions to make it your own. And most importantly, share it with the people you love. After all, the best meals are those that are enjoyed together.