
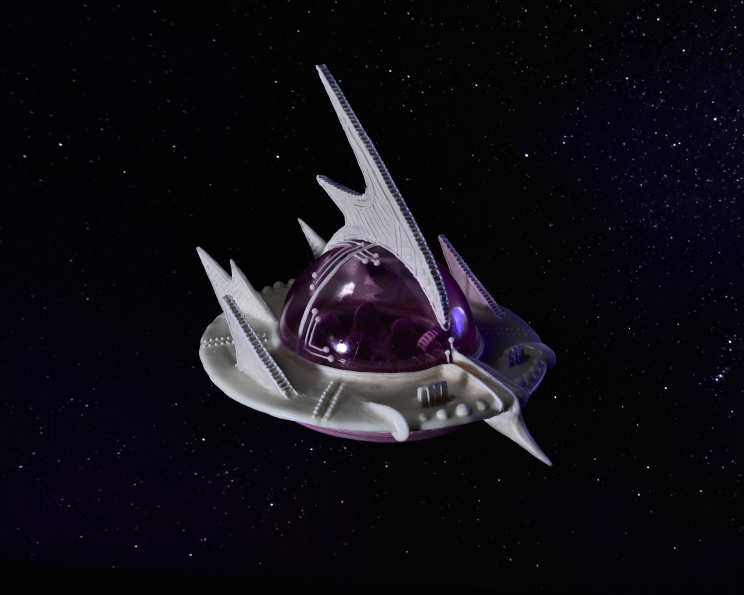
Martian Dream Car: An Edible Interstellar Adventure
The year I turned ten, my grandfather, a retired engineer with a sweet tooth and an even sweeter imagination, decided my birthday cake needed to be more than just a cake. It needed to fly. He spent weeks in his workshop, emerging with sketches of what he called the “Cosmic Cruiser,” a whimsical, candy-encrusted spaceship. The actual cake was… well, let’s just say it resembled a lopsided asteroid more than a sleek spacecraft. But the sugar glass dome, painstakingly crafted and perched precariously on top, glimmered with otherworldly promise. It was then I realized the magic a single, shimmering detail could bring to a dish, a memory I fondly recall with every crack of perfectly-made sugar. This “Martian Dream Car” captures that same spirit of childlike wonder, blending the nostalgia of sugar cookies with the futuristic allure of space travel.
Recipe Overview:
- Prep Time: Unknown
- Cook Time: 9-11 minutes
- Total Time: 11 hours (estimated, includes chilling and setting time)
- Servings: 4 (estimated)
- Yield: 1 Car
- Dietary Type: Not specified, contains dairy, eggs, and sugar
Ingredients:
-
Pink Sugar Cookie:
- 1/4 teaspoon salt
- 1 cup softened butter
- 1 cup sugar
- 1 large egg
- 1 tablespoon milk
- 3 cups all-purpose flour
- Pink food coloring
- Powdered sugar, for rolling out dough
-
Royal Icing:
- 3 large egg whites
- 4 cups confectioners’ sugar
- Food coloring
-
Isomalt Windshield:
- 2 cups sugar substitute (isomalt)
Equipment Needed:
- Stand mixer
- Parchment paper
- Baking sheet
- Card stock for stencils
- Paper towels
- Piping bag
- Latex balloons
- Smaller glass or ramekin
- Food-safe dremel for carving details
- Hot knife
- Protective clothing
Instructions:
-
Prepare the Sugar Cookie Dough: In a stand mixer, combine the softened butter, sugar, salt, egg, and milk. Beat until light and fluffy. Gradually add the all-purpose flour until a dough ball forms. Divide the dough into two balls, wrap in plastic wrap, and chill until firm enough to roll out (this will likely take several hours).
-
Bake the Sugar Cookies: Preheat your oven to 375°F (190°C). On a lightly floured surface (using powdered sugar to prevent sticking), roll out one ball of dough onto a parchment-lined baking sheet.
-
Cut out the Cookie Shapes: Create stencils from card stock to guide your cuts. Use these stencils to cut out the various car components (body, wheels, fins, etc.) from the rolled-out dough. Save the scraps for a second batch. Be creative with the shapes!
-
Bake: Bake the cut-out cookies for 9 to 11 minutes, or until the edges just begin to turn golden brown.
-
Smooth the Cookies: Immediately remove the baking sheet from the oven. Place another piece of parchment paper over the freshly baked cookies. Use a second, slightly smaller baking sheet to gently press down on the cookies, smoothing their surfaces. This step helps create a more even base for decorating.
-
Cool: Allow the cookies to cool completely on the baking sheet. Once cool, transfer them to paper towels to absorb any excess butter. This prevents oily spots from showing through the royal icing.
-
Prepare the Royal Icing: In a clean bowl, beat the egg whites until frothy. Gradually add the confectioners’ sugar, one cup at a time, beating well after each addition, until you achieve a stiff, glossy icing. Divide the icing into separate bowls and tint each with your desired food coloring. Transfer the icing to piping bags fitted with small tips.
-
Assemble the Car: Use the royal icing to “glue” the cookie pieces together, creating the structure of the car. Allow the icing to dry completely before proceeding.
-
Decorate: Once the car is assembled, use the remaining royal icing to add interior and exterior embellishments, like headlights, tail lights, racing stripes, or even flames! Get creative with your designs.
-
Prepare the Water Balloon Mold: Fill a latex helium balloon with water to the size you want your windshield dome to be. Important: Release all the air from the balloon completely. The water inside will help distribute the heat evenly and prevent the balloon from popping during the isomalt process. Tie off the balloon, blot it dry with a paper towel, and place it right-side up on a smaller glass or ramekin set on a large sheet of parchment paper.
-
Melt the Isomalt: In a saucepan on the stove, heat the isomalt over low to medium heat until it is completely liquid. This will take approximately 10-15 minutes. Stir frequently to prevent burning. Add food coloring to achieve your desired windshield tint. Allow the isomalt to rest until all bubbles have dissipated and it has cooled down slightly.
-
Pour the Isomalt Windshield: This step requires extreme caution. Cover every inch of your body with protective clothing (long sleeves, gloves, eye protection). Ensure no children or pets are nearby. Carefully pour the isomalt syrup over the water-filled balloon, ensuring you cover the entire surface you want to become the windshield. Let the isomalt set completely for at least half an hour.
-
Remove the Balloon: Once the isomalt is completely set, hold the balloon over a sink. Use a sharp blade or pin to carefully create a small hole in the balloon. Allow the water to drain out slowly, being careful not to get the isomalt wet (water will dissolve the isomalt). Once the balloon is empty, carefully peel it away from the isomalt dome.
-
Trim the Windshield: Use a hot knife or heated blade to carefully trim off any drips or uneven edges from the isomalt dome. Create a smooth bottom edge so it can be easily attached to the car.
-
Torch the Windshield (Optional): If the surface of the isomalt windshield has any fogging, gently pass a torch flame over those spots for just a second. This will melt the surface and restore its clarity. Be very careful not to overheat the isomalt, or it will melt.
-
Attach the Windshield: Use royal icing to attach the isomalt windshield to the cookie car. Ensure the windshield is securely locked into place. Let the icing dry completely before handling the finished “Martian Dream Car.”
Expert Tips & Tricks:
- Chilling the sugar cookie dough thoroughly is crucial to prevent it from spreading during baking. If you’re short on time, you can chill it for at least 30 minutes in the freezer.
- Use gel food coloring instead of liquid food coloring for a more vibrant and concentrated color in both the sugar cookie dough and the royal icing.
- If your royal icing is too thin, add more confectioners’ sugar, a tablespoon at a time, until it reaches the desired consistency. If it’s too thick, add a few drops of water.
- When working with isomalt, always have a bowl of ice water nearby in case of burns. Quickly submerge the affected area in ice water to cool it down.
- To create a marbled effect in your isomalt windshield, swirl different colors of melted isomalt together before pouring it over the balloon.
Serving & Storage Suggestions:
The “Martian Dream Car” is best served as a decorative piece or a whimsical dessert centerpiece. Due to the delicate nature of the sugar glass and the potential for the cookies to soften, it is best consumed within a few days of assembly. Store the assembled car in a cool, dry place away from direct sunlight and humidity. Do not refrigerate, as this can cause the sugar glass to become sticky and dissolve. It is not recommended to freeze this project.
Nutritional Information:
Note: This is an estimated nutritional breakdown, and actual values may vary.
| Nutrient | Amount per Serving | % Daily Value |
|---|---|---|
| Calories | 1748 kcal | N/A |
| Total Fat | 48.3g | 74% |
| Saturated Fat | 29.8g | 148% |
| Cholesterol | 169.1mg | 56% |
| Sodium | 616mg | 25% |
| Total Carbohydrate | 316.6g | 105% |
| Dietary Fiber | 2.5g | 10% |
| Sugars | 235.6g | 942% |
| Protein | 16.4g | 32% |
Variations & Substitutions:
- For a gluten-free version, substitute the all-purpose flour with a gluten-free flour blend. Be sure to add a binder like xanthan gum to help with the structure of the cookies.
- You can use different extracts (vanilla, almond, lemon) to flavor the sugar cookie dough.
- Experiment with different food coloring combinations to create unique and vibrant car designs.
- Instead of isomalt, you could potentially try using melted hard candies for the windshield, although the clarity may not be as good.
FAQs (Frequently Asked Questions):
Q: Is working with isomalt dangerous?
A: Yes, working with hot isomalt can be dangerous as it can cause severe burns. Always wear protective clothing, and work in a well-ventilated area, keeping children and pets away.
Q: Can I make the sugar cookies ahead of time?
A: Absolutely! The sugar cookies can be baked and stored in an airtight container for up to a week before assembling the car.
Q: My royal icing is too runny. How do I fix it?
A: Gradually add more confectioners’ sugar, one tablespoon at a time, until it reaches the desired consistency.
Q: Can I use a regular balloon instead of a helium balloon?
A: No, you need to use a helium balloon filled with water, as the water helps distribute the heat and prevents the balloon from popping during the isomalt process. A regular balloon will likely melt or pop from the heat.
Q: The isomalt is sticking to the saucepan. What should I do?
A: Ensure you are stirring the isomalt frequently and using a low to medium heat. If it starts to stick, remove the saucepan from the heat and stir vigorously. If necessary, add a tablespoon of water to help dissolve the stuck isomalt. Be careful, as this will create steam.
Final Thoughts:
Creating this “Martian Dream Car” is a labor of love, a whimsical journey into the realms of baking, candy crafting, and pure imagination. While the isomalt windshield requires careful handling, the end result – a shimmering, edible spaceship – is well worth the effort. I encourage you to embrace the challenge, let your creativity soar, and craft a car that reflects your own unique vision. Share your creations, your triumphs, and even your “asteroid-shaped” misadventures. This recipe is more than just instructions; it’s an invitation to create unforgettable, edible memories. So buckle up, preheat your oven, and let your culinary adventure begin!