
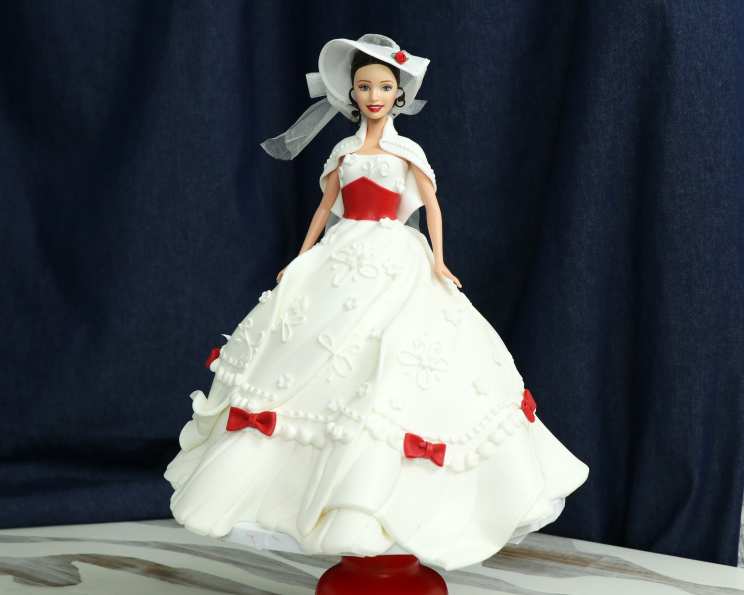
Practically Perfect: Crafting a Mary Poppins Doll Cake
I remember the first time I saw Mary Poppins. I was a tiny thing, mesmerized by the dancing penguins and, perhaps even more so, by the idea that you could pull practically anything out of a carpet bag. That sense of wonderment has never really left me, and it’s why, even now, the thought of creating a Mary Poppins doll cake fills me with such joy. It’s not just a cake; it’s a little piece of magic, ready to be shared.
Recipe Overview
- Prep Time: 1 hour
- Cook Time: 30-35 minutes
- Total Time: 2 hours
- Servings: 20
- Yields: 1 cake
- Dietary Type: Not specified
Ingredients
- 2 cake mixes (16 ounces each), plus required ingredients (eggs, oil, water, etc., as per box instructions)
- 24 ounces white fondant
- Red food coloring
- 35 ounces classic buttercream frosting for the icing
Equipment Needed
- Wilton doll cake pan
- Serrated knife
- Offset spatula
- Rolling pin
- Pizza cutter or sharp knife
- Veining sculpting tools
- Cookie cutter (for cape collar)
- Piping bag
- Wilton #5 round tip
- Wilton #2 round tip
Instructions
-
Prepare and Bake the Cakes: Following the instructions on the box, prepare both 16-ounce cake mixes. Pour the batter into a Wilton doll cake pan. Bake according to the cake mix instructions, or until a toothpick inserted into the center comes out clean. This usually takes around 30-35 minutes at 350°F (175°C), but always check for doneness with a toothpick.
-
Cool and Level the Cakes: Once the cakes are baked, let them cool in the pan for about 10 minutes before inverting them onto a wire rack to cool completely. Using a serrated knife, carefully slice each cake into three equal layers. This will give you six layers in total. Make sure the layers are as even as possible for a stable cake.
-
Assemble the Cake: Place one cake layer on your serving plate or cake board. Spread a generous layer of buttercream frosting over the top. Repeat with the remaining layers, stacking them on top of each other and frosting between each layer.
-
Crumb Coat: Apply a thin layer of buttercream frosting all over the outside of the stacked cake. This is your crumb coat and its purpose is to trap any loose crumbs. Place the cake in the fridge for 30 minutes to allow the crumb coat to firm up.
-
Final Frosting: Remove the cake from the fridge and apply a second, thicker coat of buttercream frosting. Smooth it out as much as possible using an offset spatula.
-
Prepare the Doll Space: Cut a hole into the top layer of the cake, making it large enough to fit a Barbie doll’s legs comfortably. You want the doll to stand securely in the cake without damaging the dress.
-
Cover in Fondant: Roll out the white fondant into a 14-inch circle. Carefully lift the fondant and drape it over the doll cake. Gently smooth the fondant over the cake, working from the top down.
-
Enhance the Folds: Enhance the folds at the bottom of the cake skirt by gently pressing the fondant with your fingers to create a realistic fabric drape.
-
Insert the Doll: Place the Barbie doll into the hole in the middle of the cake. Ensure the doll is clean and dry before inserting her.
-
Fondant Waist Wrap: Wrap a strip of white fondant around the doll’s waist to create a base for her bodice.
-
Create the Skirt Panels: Roll out more white fondant. Cut out fabric pattern using a pizza cutter or sharp knife.
-
Attach the Skirt Panels: Place the fondant panel on the bottom of the cake at a 45-degree angle.
-
Create Fabric Folds: Fold the back of the fondant over to create a fabric-like fold. You can use a small amount of water to help the fondant adhere to itself.
-
Add Fabric Texture: Create fabric texture at the bottom of the dress using veining sculpting tools. This will add depth and realism to the skirt.
-
Repeat the Skirt: Repeat the process all around the entire cake, overlapping the fondant panels slightly to create a full skirt.
-
Create the Bodice: Cut out a long rectangle of white fondant for the doll’s top. Attach the rectangle to the front of the doll, wrapping it around her torso.
-
Blend the Bodice: Blend the top fondant into the rest of the dress by smoothing the edges with your fingers or a fondant smoother.
-
Create the Belt: Roll out red fondant and cut out a long trapezoid shape. Wrap the trapezoid shape around the doll’s waist to create a belt.
-
Make the Cape Collar: Roll out white fondant and cut out a circle using a cookie cutter. Fold over one of the edges to create a collar.
-
Attach the Cape: Wrap the circle around the doll’s shoulders to create a cape. Secure it with a small amount of water or edible glue.
-
Piping Details: Fit a piping bag with a Wilton #5 round tip and fill it with royal icing. Pipe out a border along the bottom edge of the skirt.
-
Smaller Piping Border: Fit another piping bag with a Wilton #2 round tip and fill it with royal icing. Pipe out a smaller border on top of the larger border.
-
Embroidery Details: Add embroidery details to the dress using the royal icing and the Wilton #2 tip. You can pipe small dots, lines, or swirls to create a delicate pattern.
-
Add Fondant Bows: Add fondant bows onto the border of the gown. You can make these bows ahead of time and attach them with a small amount of water or edible glue.
-
Finish the Doll: Complete the doll by adding the Mary Poppins hat. You can either purchase a small hat or create one out of fondant.
Expert Tips & Tricks
- Fondant Consistency: The key to working with fondant is to keep it pliable. If it becomes too dry, knead in a little vegetable shortening or shortening-based butter cream. If it’s too sticky, add a little powdered sugar.
- Coloring Fondant: Use gel food coloring instead of liquid food coloring to avoid altering the consistency of the fondant. Knead the color in thoroughly until it is evenly distributed.
- Preventing Fondant Tears: When draping the fondant over the cake, work quickly and gently to avoid tears. If tears do occur, patch them with small pieces of fondant and smooth the seams.
- Royal Icing Consistency: Adjust the consistency of your royal icing based on the piping you are doing. For fine details, use a slightly thicker icing. For filling in areas, use a slightly thinner icing.
- Cake Stability: To ensure the cake is stable, consider using dowels inside the cake to support the weight of the upper layers and the doll.
Serving & Storage Suggestions
Serve the Mary Poppins doll cake at room temperature. To store leftovers, wrap them tightly in plastic wrap and store in the refrigerator for up to 3 days. The fondant may become slightly sticky in the refrigerator, so allow the cake to come to room temperature before serving. It is not recommended to freeze this cake, as the fondant and buttercream can become affected.
Nutritional Information
(Please note: Nutritional information is an estimate and will vary based on specific ingredients and brands used.)
| Nutrient | Amount per Serving | % Daily Value |
|---|---|---|
| Calories | 450 kcal | 23% |
| Total Fat | 20g | 31% |
| Saturated Fat | 12g | 60% |
| Cholesterol | 60mg | 20% |
| Sodium | 200mg | 8% |
| Total Carbohydrate | 65g | 22% |
| Dietary Fiber | 1g | 4% |
| Sugars | 50g | |
| Protein | 3g | 6% |
Variations & Substitutions
- Gluten-Free Cake: Use a gluten-free cake mix to make this cake gluten-free. Be sure to also use gluten-free fondant and royal icing.
- Dairy-Free Buttercream: Substitute a dairy-free butter alternative and dairy-free milk in your buttercream recipe to make it dairy-free.
- Different Doll: While this recipe is designed for a Barbie doll, you could adapt it for other dolls with similar proportions.
- Flavor Variations: Experiment with different cake flavors, such as vanilla, chocolate, or strawberry. You can also add flavor extracts to the buttercream frosting.
FAQs (Frequently Asked Questions)
Q: Can I make the fondant and buttercream ahead of time?
A: Yes, both the fondant and buttercream can be made 1-2 days in advance. Store the fondant wrapped tightly in plastic wrap at room temperature, and the buttercream in an airtight container in the refrigerator.
Q: How do I prevent the fondant from cracking?
A: Keep the fondant pliable by kneading it frequently and preventing it from drying out. If it does crack, you can patch it with a small amount of fresh fondant.
Q: What is the best way to smooth the fondant?
A: Use a fondant smoother to gently smooth out any imperfections in the fondant. You can also use a small amount of vegetable shortening to help smooth the surface.
Q: Can I use store-bought frosting instead of making my own?
A: Yes, you can use store-bought frosting, but homemade buttercream will generally provide a better flavor and texture.
Q: How long will the cake last?
A: The cake will last for up to 3 days in the refrigerator, but it is best consumed within 1-2 days for optimal freshness.
Final Thoughts
Creating this Mary Poppins doll cake is more than just baking; it’s an act of bringing a beloved story to life. Don’t be intimidated by the steps – each one is a chance to add your own personal touch and sprinkle of magic. Whether you’re making this cake for a birthday, a special occasion, or simply for the joy of creating, I encourage you to dive in and let your imagination soar. And when you’re finished, don’t forget to share your creation – and the story behind it – with others. After all, a spoonful of sugar… and a slice of cake… can make almost anything possible.