
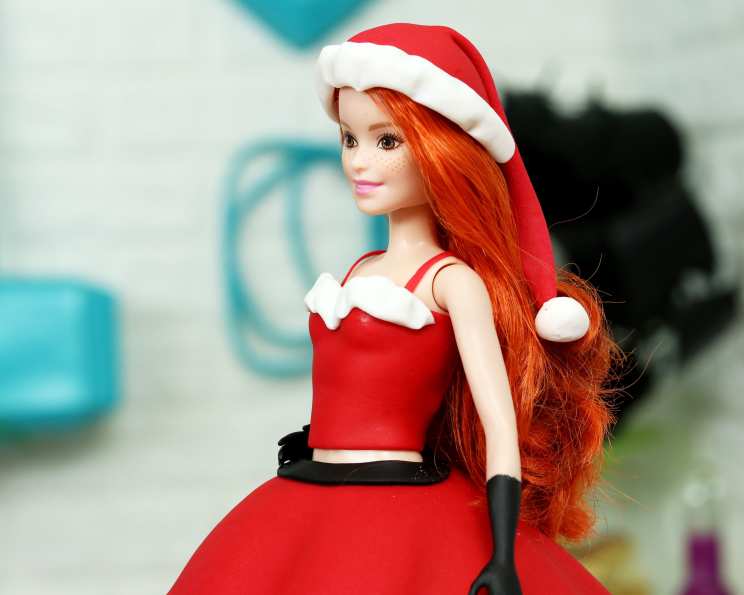
Grool Holiday Glam: Baking a Mean Girls Doll Cake
My high school was, thankfully, nothing like North Shore High. No Plastics ruled the cafeteria, no Burn Book circulated (at least not that I knew of!), and Christmas talent shows were…well, slightly less dramatic. But the second I heard the opening chords of “Jingle Bell Rock,” complete with that iconic, slightly-off, boob-grab choreography, I was instantly transported back to a world of teenage angst, questionable fashion choices, and surprisingly quotable dialogue. And now, I’m channeling that nostalgia into edible form with this fabulous Mean Girls Doll Cake! It’s the perfect dessert to bring a little bit of fetch to your next holiday gathering.
Recipe Overview
- Prep Time: 1 hour
- Cook Time: 30-40 minutes
- Total Time: 3-4 hours (including cooling and decorating)
- Servings: 10-12
- Yields: 1 cake
- Dietary Type: Not Gluten-Free
Ingredients
- For the Cake:
- 2 strawberry cake mixes (16 ounces each) plus the ingredients required per the box instructions (usually eggs, oil, and water)
- For the Fondant:
- 24 ounces red fondant
- 10 ounces white fondant
- 10 ounces pink fondant
- 5 ounces black fondant
Equipment Needed
- Wilton Doll Cake Pan
- Mixing Bowls
- Electric Mixer
- Offset Spatula
- Rolling Pin
- Round Cookie Cutter
- Sculpting Tool
- Small Paint Brush
- Barbie Doll (or similar fashion doll)
Instructions
- Prepare the Cake Batter: Prepare both strawberry cake mixes according to the package directions.
- Bake the Cakes: Pour the batter into a well-greased Wilton doll cake pan. Bake according to the cake mix instructions, usually around 30-40 minutes, or until a toothpick inserted into the center comes out clean. Let the cakes cool in the pan for 10 minutes before inverting them onto a wire rack to cool completely.
- Level the Cakes: Once the cakes are completely cool, use a serrated knife to slice each cake into three equal layers. This will give you six layers in total.
- Assemble the Cake: Place one cake layer on your serving plate or cake board. Spread a generous layer of buttercream frosting (not included in the ingredient list, use your favorite recipe or store-bought). Repeat with the remaining cake layers and buttercream, stacking them on top of each other.
- Crumb Coat: Apply a thin layer of buttercream over the entire cake. This is the crumb coat and its purpose is to trap any loose crumbs. Refrigerate the cake for at least 30 minutes to allow the crumb coat to set.
- Second Buttercream Layer: Apply a second, thicker layer of buttercream over the crumb-coated cake. Use an offset spatula to smooth the buttercream and create a smooth surface for the fondant.
- Create the Doll Hole: Using a sharp knife or a round cookie cutter, cut a hole into the top layer of the cake, big enough to fit a Barbie doll’s legs.
- Insert the Doll: Wrap the doll’s legs tightly with plastic wrap to protect it from the cake. Then, carefully insert the Barbie doll into the hole in the middle of the cake, ensuring she is securely positioned.
- Red Fondant Base: Take a piece of red fondant and mold it around the doll’s waist, blending it into the rest of the cake to create a smooth transition from the cake to the doll. This will form the base of her dress.
- Roll and Cut the Dress: Roll out a large piece of red fondant to about ¼ inch thickness. Cut it into a 14-inch circle. You can use a pizza cutter or a sharp knife for this.
- Prepare the Circle: Cut a straight line from the center of the red fondant circle to the edge. This will allow you to wrap the fondant around the cake.
- Doll Waist Opening: Use a round cookie cutter to remove a circle from the center of the red fondant large enough to accommodate the doll’s waist.
- Wrap the Dress: Carefully wrap the red fondant around the cake, making sure that the seam is placed at the back of the dress. Gently press the fondant against the buttercream, smoothing out any wrinkles.
- Enhance the Folds: Use your fingers to enhance the folds at the bottom of the cake, creating a more realistic dress appearance.
- Seal the Seam: Use a small amount of water to seal the back of the dress where the red fondant overlaps.
- Chest Piece: Roll out some more red fondant and cut a rectangle that will wrap around the doll’s chest, leaving her belly button exposed, as in the iconic “Jingle Bell Rock” performance. Attach the rectangle to the doll using a tiny amount of water.
- Black Belt: Roll out the black fondant into a thin strip. Wrap this strip around the doll’s waist to create a belt. Attach it with a dab of water.
- White Border: Measure 1.5 inches from the bottom of the red fondant dress. Roll out the white fondant and cut a 1.5-inch strip. Wrap this strip around the bottom of the cake to create a border. Attach it with water.
- Texture the Border: Use a sculpting tool to add texture to the white fondant border, mimicking a furry trim.
- Straps: Roll out the red fondant and cut two thin strips. Attach these strips to the doll’s chest to create the straps of the dress.
- Neckline Detail: Add a small strip of white fondant to the neckline of the dress to create the top detail. Attach it with water.
- Gloves: Use the black fondant and a small paint brush to carefully paint the arms and hands of the doll black, creating the illusion of gloves. You can also use black edible food coloring if you prefer.
- Christmas Hat: Roll out a triangle of pink fondant and wrap it around the doll’s head to create a Christmas hat.
- Hat Rim: Add a strip of white fondant around the base of the pink fondant hat to create the rim. Attach it with water.
Expert Tips & Tricks
- Fondant Consistency: If your fondant is too stiff, knead in a small amount of vegetable shortening to make it more pliable. If it’s too sticky, add a little bit of powdered sugar.
- Preventing Fondant Tears: Roll out the fondant on a lightly greased surface (using shortening) to prevent it from sticking and tearing.
- Smooth Finish: Use a fondant smoother to achieve a perfectly smooth finish on the dress.
- Cake Leveling: For perfectly even cake layers, use a cake leveler or a long serrated knife and a ruler.
- Buttercream Stabilization: If you live in a warm climate, consider using a stabilized buttercream recipe that won’t melt easily.
- Doll Protection: To prevent any transfer of color from the fondant to the doll, wrap the doll’s torso in plastic wrap before dressing her with the fondant.
Serving & Storage Suggestions
Serve the Mean Girls Doll Cake immediately or store it in an airtight container in the refrigerator for up to 3 days. Because fondant can become sticky in humid conditions, it’s best to serve the cake soon after assembly. Do not freeze this cake, as the fondant will not thaw well.
Nutritional Information
Please note that the following nutritional information is an estimate and can vary depending on the specific ingredients used.
| Nutrient | Amount per Serving | % Daily Value |
|---|---|---|
| Calories | 450 kcal | 23% |
| Total Fat | 18g | 28% |
| Saturated Fat | 9g | 45% |
| Cholesterol | 75mg | 25% |
| Sodium | 350mg | 15% |
| Total Carbohydrate | 70g | 23% |
| Dietary Fiber | 1g | 4% |
| Sugars | 50g | – |
| Protein | 4g | 8% |
Variations & Substitutions
- Cake Flavor: While this recipe calls for strawberry cake, feel free to use any flavor you like. Vanilla, chocolate, or even funfetti would all work well.
- Fondant Colors: Get creative with the fondant colors! You could make a pink dress or even a black dress for a more edgy look.
- Dietary Restrictions: To make this cake gluten-free, use a gluten-free cake mix and gluten-free fondant.
- Buttercream Alternatives: If you’re not a fan of buttercream, you can use ganache or any other frosting of your choice.
FAQs (Frequently Asked Questions)
Q: Can I use a different sized doll?
A: Yes, but you will need to adjust the size of the cake layers and the fondant accordingly. Be sure to measure carefully to ensure the dress fits properly.
Q: Can I make the fondant from scratch?
A: Absolutely! There are many homemade fondant recipes available online. However, using store-bought fondant is a great time-saver.
Q: How do I prevent the fondant from cracking?
A: Over-kneading the fondant can cause it to crack. Work the fondant gently until it’s pliable, but avoid overworking it. Also, make sure the fondant isn’t too dry; add a tiny bit of shortening if needed.
Q: Can I make this cake a day ahead of time?
A: Yes, you can bake the cake layers and prepare the buttercream a day in advance. Store them separately until you’re ready to assemble the cake. It is best to decorate it closer to the serving date.
Q: What if my fondant seam is visible?
A: Use a fondant smoother to gently blend the seam together. You can also hide the seam with additional fondant details, such as a bow or some decorative trim.
Final Thoughts
So, there you have it – a totally fetch Mean Girls Doll Cake that’s guaranteed to be the highlight of any party! Don’t be afraid to get creative with the colors and details, and most importantly, have fun! And remember, even if your cake isn’t perfect, it’s still going to be grool. Now go forth and bake something truly memorable – and maybe, just maybe, it will be so good, it will make everyone say “That’s so fetch!”