
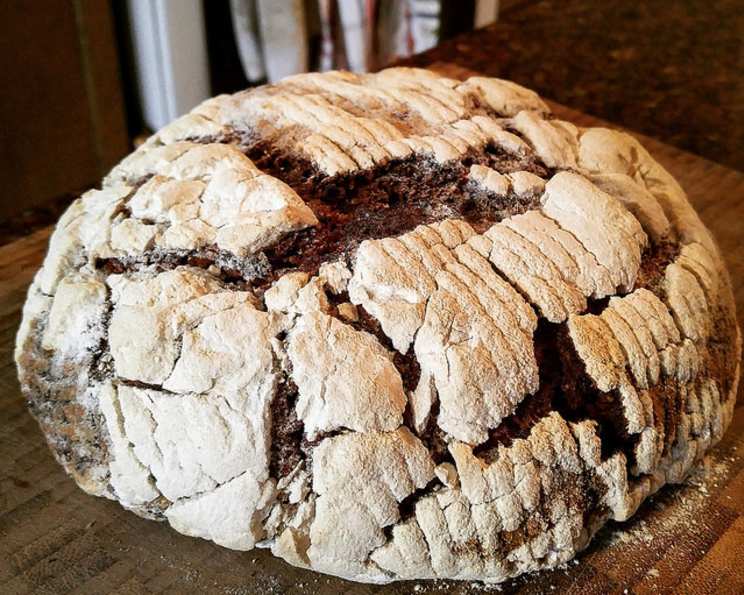
A Taste of the Past: Baking Medieval Horsebread
There’s something profoundly satisfying about connecting with history through food. I remember when I first stumbled upon a reference to “horsebread” – it evoked images of sturdy peasants, windswept fields, and a life powered by simple, wholesome fare. Intrigued, I delved into the historical recipes, discovering a bread far more interesting than the name implied. It wasn’t for horses, as I initially feared, but a hearty, nutrient-rich loaf consumed by the working class. The idea of recreating this tangible link to the past, of kneading dough with the same grains that sustained people centuries ago, sparked a fascination that continues to this day.
Recipe Overview
- Prep Time: 121 hours 10 minutes
- Cook Time: 1 hour 10 minutes
- Total Time: 122 hours 20 minutes
- Yields: 1 boule
- Serves: 20
- Dietary Type: Vegetarian (Can be Vegan depending on sourdough starter)
Ingredients
- 50 g pot barley
- Water (for soaking barley and peas)
- 100 g dried yellow split peas
- 200 g active sourdough starter
- 250 g whole wheat bread flour
- 200 g multigrain flour
- 50 g chickpea flour
- 10 g salt
Equipment Needed
- Jar (for sprouting barley)
- Medium-sized bowl
- Food processor
- Dough hook (optional, for stand mixer)
- Tea towel
- Basket, bowl, or banneton
- Large baking tray or pizza stone
- Parchment paper
- Rimless baking sheet or pizza peel
- Sharp knife
- Wire rack
Instructions
-
Begin by preparing the pot barley. Place the barley in a jar and cover generously with water. Seal the jar and let it stand for 24 hours. This allows the barley to begin its sprouting process, unlocking nutrients and adding a subtle sweetness to the final bread.
-
After the initial soaking, drain the barley, being sure to save the liquid. Rinse the barley thoroughly and place it back in the jar. Cover the jar with a towel and let it stand, turned upside down, overnight. This encourages drainage and air circulation. Repeat the rinse/drain process three more times, each time saving the barley water. This water will be used to hydrate the dough, adding a unique flavor and nutritional boost.
-
Next, prepare the dried yellow split peas. Wash the split peas and place them in a medium-sized bowl. Cover them with plenty of water and leave them overnight to soak. Soaking softens the peas, making them easier to process and integrate into the dough.
-
The following day, it’s time to create the dough. In a large bowl, mix together the active sourdough starter, whole wheat bread flour, multigrain flour, chickpea flour, salt, and 350 mL of the reserved barley water (drained from step 2). Mix until a thick, wet dough forms. Cover the bowl and leave it in the fridge overnight.
-
The next day, allow the dough to stand at room temperature for one hour to warm up before proceeding. This allows the gluten to relax and makes the dough easier to work with.
-
Drain the split peas. Add them to a food processor along with the sprouted barley. Pulse the mixture to coarsely chop it. Set this aside; it will be incorporated into the dough later.
-
Now comes the kneading. Knead the rested dough for 10 minutes with a dough hook attachment on a stand mixer, or for 20 minutes by hand. Add additional flour, a tablespoon at a time, as necessary to achieve a dough that is slightly sticky, but not wet. You want a dough that is manageable but still retains some moisture.
-
Once the dough has developed some strength, knead in the chopped split pea and barley mixture. Ensure it is evenly distributed throughout the dough. This addition will add significant texture and flavor to the loaf.
-
Form the dough into a ball and place it on a heavily floured tea towel. This will prevent the dough from sticking during its final rise.
-
Place the towel-wrapped loaf in a basket, bowl, or banneton. This will help the loaf maintain its shape as it rises. Leave the dough to rise for a full 24 hours at a cool room temperature. Do not attempt to shorten this step. This is a heavy loaf and requires a long rise for optimal texture and flavor development.
-
When the final rise is almost complete, preheat your oven. Place a large baking tray or pizza stone in the oven and heat it to 450F (ideally using convection). This high initial temperature will give the loaf a good rise.
-
Gently turn the loaf out onto a parchment-lined rimless baking sheet or pizza peel. Score the top of the loaf with a sharp knife. This allows the loaf to expand during baking and prevents it from cracking unevenly.
-
Transfer the loaf to the hot pan or baking stone in the preheated oven.
-
Bake for 10 minutes at 450F, then reduce the oven temperature to 425F (again, preferably using convection) and bake for another hour. The long baking time ensures that the dense loaf is fully cooked through.
-
Finally, turn the loaf out onto a wire rack to cool completely before slicing and serving. This is essential for preventing a gummy texture.
Expert Tips & Tricks
- Sprout the barley for a deeper flavor: While soaking the barley is essential, taking the time to sprout it further (beyond the recipe’s instructions) will enhance its natural sweetness and nutritional value. Continue the rinsing and draining process for an additional day or two, until small sprouts appear.
- Hydration is key: The dough should be quite wet, but not soupy. The barley water contributes both flavor and moisture. If the dough seems too dry, add a little more barley water, a tablespoon at a time.
- Adjust flour based on humidity: The amount of flour needed during kneading can vary depending on the humidity in your kitchen. Start with less flour than you think you need, and add more gradually until the dough reaches the desired consistency.
- Use a Dutch oven for added crust: Baking this bread in a Dutch oven can help create a beautiful, crispy crust. Preheat the Dutch oven along with the baking tray or pizza stone, and carefully transfer the loaf into the hot Dutch oven after scoring.
- Don’t skip the long rise: This step is crucial for developing the complex flavors and airy texture characteristic of sourdough bread. A long, slow rise allows the wild yeasts and bacteria in the sourdough starter to work their magic.
Serving & Storage Suggestions
Medieval Horsebread is best enjoyed sliced thickly and served with hearty stews, soups, or cheeses. Its robust flavor also pairs well with smoked meats and savory spreads. To store, wrap the cooled loaf tightly in a clean kitchen towel or place it in a bread bag. It will keep at room temperature for up to 3 days, or in the refrigerator for up to a week. For longer storage, slice the bread and freeze it in an airtight container for up to 3 months. Reheat frozen slices in a toaster or oven until warmed through.
Nutritional Information
| Nutrient | Amount per Serving | % Daily Value |
|---|---|---|
| Calories | 114.3 kcal | N/A |
| Calories from Fat | 6 g | 5% |
| Total Fat | 0.7 g | 1% |
| Saturated Fat | 0.1 g | 0% |
| Cholesterol | 0 mg | 0% |
| Sodium | 196.8 mg | 8% |
| Total Carbohydrate | 23 g | 7% |
| Dietary Fiber | 3.4 g | 13% |
| Sugars | 0.8 g | 3% |
| Protein | 4.7 g | 9% |
Variations & Substitutions
- Gluten-Free Horsebread: While traditional horsebread relies on wheat flour, you can adapt the recipe using a blend of gluten-free flours like brown rice flour, tapioca starch, and sorghum flour. You may need to adjust the hydration levels to achieve the desired dough consistency. Consider adding a binder like xanthan gum to improve the texture.
- Spelt Flour Variation: Substitute the whole wheat and multigrain flours with spelt flour for a slightly sweeter and nuttier flavor profile.
- Seed Enrichment: Incorporate a mix of seeds like flax, sunflower, and pumpkin seeds into the dough for added texture and nutritional value.
- Regional Adaptation: Experiment with different types of legumes based on your regional availability. Fava beans or lentils could be interesting substitutes for the split peas.
FAQs (Frequently Asked Questions)
Q: Why is it called “horsebread” if it’s not for horses?
A: The term “horsebread” likely refers to the coarser grains used in the bread, which were considered less refined than those used in bread for the upper classes. It was a staple for laborers, similar to what might be fed to working animals.
Q: Can I use a different type of starter?
A: Yes, you can use any active sourdough starter, but keep in mind that different starters can have varying levels of acidity and activity, which may affect the final flavor and texture of the bread.
Q: Is the long rise absolutely necessary?
A: Yes, the long rise is crucial for developing the complex flavors and airy texture of this bread. It also allows the heavy grains to fully hydrate and soften.
Q: Can I speed up the sprouting process for the barley?
A: While you can try to speed up the sprouting process by keeping the barley in a warmer environment, it’s important to monitor it closely to prevent mold growth.
Q: What if I don’t have barley water?
A: If you don’t have barley water, you can substitute it with regular water, but the flavor of the bread will be slightly different.
Final Thoughts
Baking Medieval Horsebread is more than just following a recipe; it’s a journey back in time. It’s a chance to connect with our ancestors and appreciate the simple, wholesome ingredients that sustained them. I encourage you to try this recipe and experience the satisfaction of creating a truly unique and historical loaf. Don’t be afraid to experiment with variations and substitutions to make it your own. Share your creations and experiences with others, and let’s keep the tradition of this hearty bread alive for generations to come. Perhaps enjoy a slice with a hearty stew or a strong, dark ale – a fitting tribute to the past.