
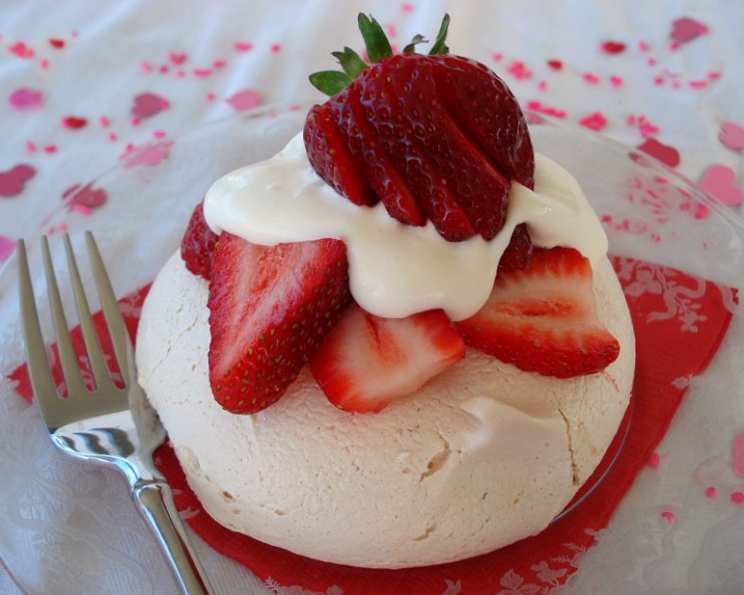
Meringue Shells: A Delicate Dessert
The scent of gently baked meringue always takes me back to my grandmother’s kitchen. I remember standing on a stool, mesmerized as she transformed simple egg whites and sugar into these ethereal clouds. The anticipation of that first delicate crunch, followed by the sweet, airy interior, was almost unbearable. These meringue shells aren’t just a dessert; they’re a vessel for cherished memories and endless possibilities.
Recipe Overview
- Prep Time: 15 minutes
- Cook Time: 45 minutes
- Total Time: 1 hour
- Servings: 8
- Yield: 8 shells
- Dietary Type: Gluten-Free, Dairy-Free
Ingredients
- 3 large egg whites
- 1/8 teaspoon salt
- 1 teaspoon vanilla extract
- 1 teaspoon white vinegar
- 1 cup granulated sugar
Equipment Needed
- Electric mixer (stand or hand mixer)
- Baking sheet
- Parchment paper
- Measuring cups and spoons
Instructions
-
Preheat your oven to 300 degrees Fahrenheit (150 degrees Celsius). Line a baking sheet with parchment paper. This will prevent the meringue shells from sticking and make cleanup a breeze.
-
In a large, clean mixing bowl, combine the egg whites, salt, vanilla extract, and white vinegar. It’s crucial that your bowl and beaters are completely clean and free of any grease or oil, as this can prevent the egg whites from whipping properly.
-
Begin beating the egg whites on medium speed until soft peaks form. Soft peaks are when the whites hold their shape but the tips droop slightly when you lift the beater.
-
Gradually add the granulated sugar, about 1/3 cup at a time, while continuing to beat on medium-high speed. It’s essential to add the sugar slowly to allow it to dissolve completely into the egg whites.
-
Continue beating the mixture until stiff, glossy peaks form. Stiff peaks are when the whites stand straight up when you lift the beater and have a glossy sheen. This may take several minutes, so be patient and don’t rush the process. The mixture should be thick and hold its shape well.
-
Once the meringue has reached stiff peaks, it’s time to form the shells. Transfer the meringue to a piping bag fitted with a large round tip (optional, you can also just use a spoon).
-
Pipe or spoon the meringue onto the prepared baking sheet, dividing it into 8 equal circles. Each circle should be about 3-4 inches in diameter.
-
Using the back of a spoon, gently hollow out the centers of each meringue circle, creating a slight indentation. Then, build up the edges of each circle to form a stand-up ridge around the outside of the meringue shells. This will create a “well” to hold your filling.
-
Place the baking sheet in the preheated oven and bake for 45 minutes. The meringues should be firm to the touch and lightly golden on the outside.
-
Once baked, turn off the oven and let the meringue shells cool completely in the oven with the door slightly ajar. This slow cooling process helps to prevent cracking. Don’t be tempted to remove them from the oven too soon, as the sudden temperature change can cause them to collapse.
-
Once the meringue shells are completely cool, gently peel them off the parchment paper. They should be crisp and dry.
-
To serve, fill the meringue shells with your favorite toppings. A classic combination is vanilla ice cream and sweetened sliced strawberries, but feel free to get creative!
Expert Tips & Tricks
- Perfect Peaks: Ensuring your egg whites reach stiff peaks is crucial for a successful meringue. Make sure your bowl and beaters are impeccably clean. A tiny bit of grease can prevent proper whipping.
- Slow and Steady: Adding the sugar slowly is key to achieving a smooth and stable meringue. Don’t dump it all in at once!
- Gentle Cooling: The slow cooling process in the oven is essential for preventing cracks. Resist the urge to rush it.
- Flavor Infusion: Experiment with adding extracts like almond, lemon, or peppermint to the meringue for different flavor profiles.
- Preventing Weeping: If you find your meringues “weeping” (releasing liquid), it’s usually due to under-whipping the egg whites or baking them in a humid environment. Ensure your egg whites are properly whipped to stiff peaks and try baking on a less humid day.
Serving & Storage Suggestions
Meringue shells are best served shortly after filling to maintain their crisp texture. However, the shells themselves can be stored in an airtight container at room temperature for up to 3 days. Avoid storing them in the refrigerator, as the moisture can cause them to become sticky and lose their crispness. Filled meringue shells should be consumed immediately.
To serve, get creative with your fillings! Ice cream, whipped cream, fresh fruit, chocolate sauce, or even lemon curd are all delicious options. Dust the shells with powdered sugar for an elegant presentation.
Nutritional Information
| Nutrient | Amount per Serving | % Daily Value |
|---|---|---|
| Calories | 105 kcal | 5% |
| Total Fat | 0 g | 0% |
| Saturated Fat | 0 g | 0% |
| Cholesterol | 0 mg | 0% |
| Sodium | 57 mg | 2% |
| Total Carbohydrate | 25 g | 8% |
| Dietary Fiber | 0 g | 0% |
| Sugars | 25 g | 100% |
| Protein | 1 g | 2% |
Note: Nutritional information is an estimate and may vary based on specific ingredients and portion sizes.
Variations & Substitutions
- Lemon Meringue Shells: Add 1 teaspoon of lemon zest to the meringue mixture for a bright, citrusy flavor.
- Chocolate Meringue Shells: Fold in 2 tablespoons of unsweetened cocoa powder into the meringue mixture before piping.
- Mini Meringue Kisses: Instead of large shells, pipe small “kisses” onto the baking sheet for a bite-sized treat. Reduce the baking time accordingly.
- Meringue Nests: Create nests by piping a circle and then building up the sides to resemble a bird’s nest. Fill with whipped cream and berries.
- Vegan Meringue (Aquafaba): While this recipe is not vegan, you can experiment using aquafaba (the liquid from canned chickpeas) as an egg white substitute for a vegan alternative. Search for specific aquafaba meringue recipes for detailed instructions.
FAQs (Frequently Asked Questions)
Q: Why are my meringue shells cracking?
A: Cracking can be caused by temperature fluctuations. Make sure to cool the meringue shells slowly in the oven with the door ajar to prevent sudden temperature changes.
Q: My meringue is sticky, what went wrong?
A: Sticky meringue is usually due to high humidity or under-whipped egg whites. Try baking on a less humid day and ensure your egg whites are whipped to stiff peaks.
Q: Can I make meringue shells ahead of time?
A: Yes, you can make the meringue shells ahead of time and store them in an airtight container at room temperature for up to 3 days.
Q: Can I freeze meringue shells?
A: Freezing meringue shells is not recommended, as they can become soggy upon thawing.
Q: What’s the best way to fill the meringue shells?
A: The best way to fill meringue shells is just before serving to prevent them from becoming soggy.
Final Thoughts
These meringue shells are more than just a dessert; they’re an invitation to create something beautiful and delicious. Don’t be intimidated by the seemingly delicate nature of meringue – with a few simple steps and a little patience, you can create these ethereal treats in your own kitchen. Experiment with different fillings, flavors, and presentations to make them your own. I encourage you to try this recipe and share your creations. Pair these delightful shells with a glass of chilled sparkling wine or a warm cup of coffee for the perfect ending to any meal. Happy baking!