
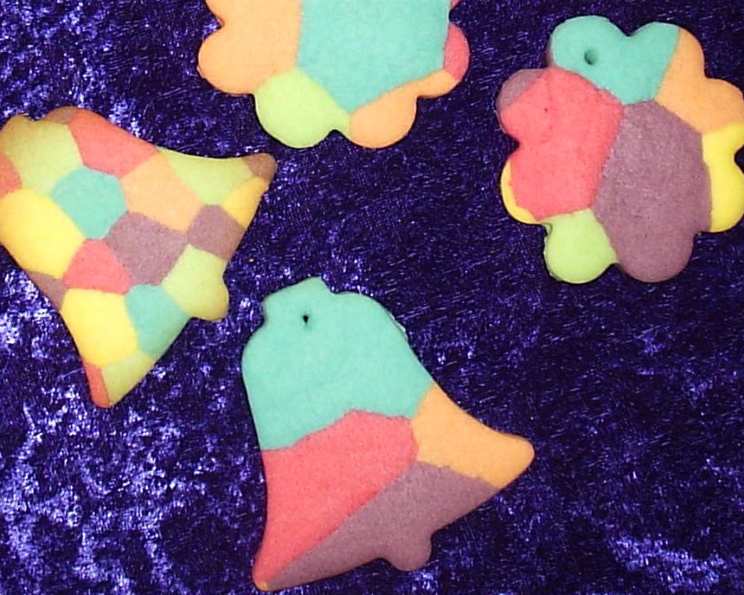
Merry Maker Christmas Sugar Cookies
The scent of baking sugar cookies always transports me back to my grandmother’s kitchen. Every December, her house transformed into a winter wonderland, with strings of popcorn garland, a towering tree adorned with vintage ornaments, and the undeniable aroma of vanilla and butter wafting from the oven. We’d spend hours together, flour dusting our aprons, carefully swirling food coloring into batches of dough destined to become colorful, whimsical Christmas cookies. These Merry Maker Christmas Sugar Cookies capture that exact sense of festive joy and childlike wonder, with a vibrant twist!
Recipe Overview
- Prep Time: 30 minutes
- Cook Time: 7-8 minutes
- Total Time: 2 hours 38 minutes (includes chilling)
- Yields: 48 cookies
- Dietary Type: Vegetarian
Ingredients
- 1 ½ cups sifted confectioners’ sugar
- 1 cup butter (I use half butter and half margarine) or 1 cup margarine (I use half butter and half margarine)
- 1 large egg
- 1 teaspoon vanilla extract
- ½ teaspoon almond extract
- 2 ½ cups flour
- 1 teaspoon baking soda
- 1 teaspoon cream of tartar
- Food coloring (either liquid or paste)
Equipment Needed
- Mixing bowls
- Measuring cups and spoons
- Electric mixer
- Plastic wrap
- Rolling pin
- Cookie cutters
- Baking sheets
- Parchment paper or silicone baking mats
- Cooling rack
Instructions
-
In a large mixing bowl, cream together the confectioners’ sugar and butter (or margarine) until light and fluffy. It’s essential to use softened butter for the best texture, but ensure it’s not melted. If using a combination of butter and margarine, ensure both are at the same consistency.
-
Add the egg, vanilla extract, and almond extract to the creamed mixture. Mix thoroughly until well combined. This step incorporates air into the dough, which contributes to the cookies’ tender texture.
-
In a separate bowl, whisk together the flour, baking soda, and cream of tartar. This ensures that the leavening agents are evenly distributed throughout the dry ingredients.
-
Gradually add the dry ingredients to the wet ingredients, mixing until just combined. Be careful not to overmix, as this can result in tough cookies. The dough should be smooth and slightly sticky.
-
Divide the dough into several portions, depending on how many colors you want to create. Three or four different colors usually provides a good variety.
-
Tint each portion of the dough with a different color of food coloring. Use either liquid or paste food coloring. Gel paste food coloring is recommended because it is more concentrated and won’t alter the consistency of the dough as much as liquid food coloring. Ensure the colors are vibrant and distinct to create a visually appealing cookie.
-
Wrap each portion of colored dough tightly in plastic wrap and refrigerate for at least two to three hours, or preferably overnight. This chilling period is crucial. It allows the gluten in the flour to relax, preventing the cookies from spreading too much during baking, and it makes the dough easier to handle.
-
Once the dough is thoroughly chilled, preheat your oven to 375°F (190°C). Lightly grease your cookie sheets or line them with parchment paper or silicone baking mats. This will prevent the cookies from sticking and ensure even baking.
-
Take one color of dough at a time from the refrigerator (keep the rest chilled). Roll the dough into small balls, about ½ inch in diameter. Repeat with the other colors.
-
Place an assortment of different colored dough balls next to each other, making sure that no two balls of the same color are touching.
-
Gently roll the assorted balls together with a rolling pin until the dough is about 1/8-inch thick. Aim for an even thickness to ensure uniform baking.
-
Cut the dough into desired shapes using cookie cutters. Work quickly to prevent the dough from warming up too much. If the dough becomes too soft and sticky, return it to the refrigerator for a few minutes to firm up.
-
Carefully transfer the cut-out cookies to the prepared baking sheets, leaving a small space between each cookie.
-
Bake for 7-8 minutes, or until the edges are lightly golden brown. Watch the cookies closely, as they can burn easily.
-
Remove the baking sheets from the oven and let the cookies cool on the sheets for a few minutes before transferring them to a wire rack to cool completely.
Expert Tips & Tricks
- Don’t overbake: Overbaked cookies will be dry and crumbly. Remove them from the oven as soon as the edges begin to turn golden brown.
- Chilling is key: Don’t skip the chilling time! It’s crucial for preventing the cookies from spreading and ensuring a tender texture.
- Work in batches: Keep the dough chilled until you’re ready to roll it out. This will make it much easier to handle.
- Reroll with caution: If you reroll the dough scraps too many times, the colors may become muddy. Try to minimize rerolling or only reroll a few balls at a time to maintain color separation.
- Use quality extracts: Using pure vanilla and almond extracts will enhance the flavor of the cookies.
- For more vibrant colors: Use gel food coloring. It provides more intense color without adding excess liquid to the dough.
Serving & Storage Suggestions
These Merry Maker Christmas Sugar Cookies are perfect for serving at holiday gatherings, gifting to friends and neighbors, or simply enjoying with a cup of hot cocoa. To store, place the cooled cookies in an airtight container at room temperature. They will stay fresh for up to 5 days. For longer storage, you can freeze the cookies for up to 2 months. Thaw them completely at room temperature before serving. The unfrosted cookies freeze best. You can also freeze the dough after coloring, tightly wrapped.
Nutritional Information
| Nutrient | Amount per Serving | % Daily Value |
|---|---|---|
| Calories | 74.3 kcal | N/A |
| Calories from Fat | N/A | 49% |
| Total Fat | 4 g | 6% |
| Saturated Fat | 2.5 g | 12% |
| Cholesterol | 14.6 mg | 4% |
| Sodium | 55.1 mg | 2% |
| Total Carbohydrate | 8.8 g | 2% |
| Dietary Fiber | 0.2 g | 0% |
| Sugars | 3.7 g | 14% |
| Protein | 0.8 g | 1% |
Note: Nutritional information is an estimate and may vary based on specific ingredients and portion sizes.
Variations & Substitutions
- Gluten-Free: Substitute the all-purpose flour with a gluten-free blend. Be sure to add a binder like xanthan gum to help hold the dough together.
- Vegan: Replace the butter with a vegan butter substitute and the egg with an egg replacer like flaxseed meal or applesauce.
- Spice it up: Add a pinch of cinnamon, nutmeg, or cardamom to the dry ingredients for a warmer, spicier flavor.
- Citrus Zest: Incorporate lemon, orange, or lime zest into the dough for a bright, refreshing twist.
- Chocolate Chips: Gently fold miniature chocolate chips into one or more of the colored doughs.
FAQs (Frequently Asked Questions)
Q: Can I make the dough ahead of time?
A: Absolutely! In fact, it’s recommended. The dough can be made up to 2 days in advance and stored in the refrigerator, tightly wrapped.
Q: Why are my cookies spreading too much?
A: This is usually caused by not chilling the dough long enough or using butter that is too soft. Make sure to chill the dough for at least 2-3 hours and use softened, but not melted, butter.
Q: Can I use different extracts?
A: Yes, feel free to experiment with other extracts like lemon, orange, or peppermint.
Q: How do I prevent the colors from blending too much when rolling the dough together?
A: Avoid overworking the dough when rolling it out. Roll gently and quickly. If the colors start to blend too much, stop and return the dough to the refrigerator for a few minutes to firm up.
Q: Can I freeze the baked cookies?
A: Yes, these cookies freeze well. Store them in an airtight container in the freezer for up to 2 months.
Final Thoughts
These Merry Maker Christmas Sugar Cookies are more than just a recipe; they’re an invitation to create memories and spread holiday cheer. So gather your loved ones, turn on some festive music, and get ready to embark on a colorful baking adventure. Don’t be afraid to get creative with your colors and shapes, and most importantly, have fun! These cookies are sure to bring a smile to everyone’s face and become a cherished holiday tradition for years to come.