
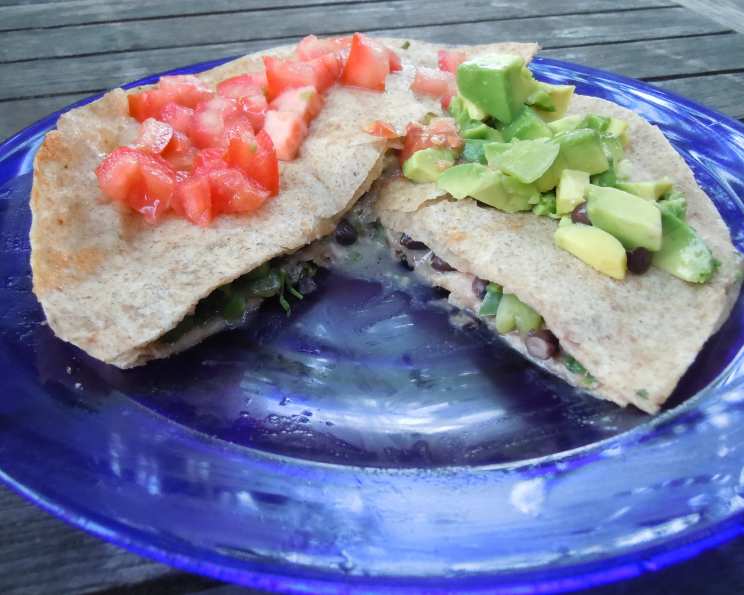
Mexican Grilled Cheese Sandwich (Quesadilla!)
There’s something magical about the simple pleasure of melted cheese between toasted bread. But growing up in Southern California, my grilled cheese aspirations always leaned south of the border. Forget cheddar and white bread – I craved the vibrant flavors of Mexico, the comforting warmth of a corn tortilla, and the satisfying stretch of perfectly melted cheese. For me, it wasn’t just a grilled cheese; it was a quesadilla, a symbol of home, family, and simple, delicious happiness. This recipe takes that classic comfort and elevates it with fresh, flavorful ingredients.
Recipe Overview
- Prep Time: 15 minutes
- Cook Time: 8 minutes
- Total Time: 23 minutes
- Servings: 4
- Dietary Type: Vegetarian
Ingredients
- 8 small whole wheat tortillas
- 1 cup black beans, rinsed and drained
- ½ cup red, green, or yellow bell pepper, diced
- 3 green onions, chopped
- 2 tablespoons cilantro or 2 tablespoons parsley, chopped
- 2 cups jalapeño havarti cheese, diced
Equipment Needed
- Skillet
Instructions
-
Begin by preparing your fillings. Rinse and drain the black beans to remove any excess sodium. Dice the bell pepper into small pieces, ensuring even cooking and distribution of flavor. Chop the green onions and cilantro (or parsley) into smaller pieces as well. Dice the jalapeño havarti cheese into small cubes.
-
Lay out four of the whole wheat tortillas on a clean work surface. These will be the base for your quesadillas.
-
Evenly distribute the black beans, diced bell pepper, chopped green onions, and cilantro (or parsley) over the four tortillas. Be sure to spread the ingredients evenly, leaving a small border around the edge of each tortilla to allow for sealing.
-
Sprinkle the diced jalapeño havarti cheese generously over the vegetable mixture on each tortilla. Ensure the cheese is evenly distributed to ensure consistent melting.
-
Top each filled tortilla with one of the remaining four whole wheat tortillas, creating a sealed sandwich. Gently press down on each quesadilla to help the fillings adhere and to flatten them slightly for even cooking.
-
Heat a skillet over medium heat. You may wish to add a tiny spray of cooking oil to prevent sticking, but it is typically not necessary if using a non-stick skillet.
-
Carefully place one or two quesadillas (depending on the size of your skillet) into the heated skillet.
-
Cook the tortilla sandwiches for approximately 4 minutes on each side, or until the cheese is melted and the tortillas are browned and slightly crispy. Keep a close eye on them to prevent burning. Adjust the heat if needed to ensure even browning without burning the tortillas before the cheese melts completely.
-
Remove the cooked quesadillas from the skillet and place them on a cutting board. Repeat the cooking process with the remaining quesadillas.
-
Using a sharp knife or pizza cutter, slice each quesadilla into wedges (typically four or six wedges per quesadilla) and serve immediately.
Expert Tips & Tricks
-
Cheese Choice is Key: While this recipe calls for jalapeño havarti, feel free to experiment with other cheeses. Monterey Jack, Oaxaca, or even a sharp cheddar mixed with a pinch of cayenne pepper can provide interesting flavor profiles.
-
Prevent Soggy Tortillas: If you’re using very juicy ingredients (like freshly diced tomatoes), consider briefly sautéing them beforehand to remove some of the excess moisture. This will help prevent the quesadillas from becoming soggy.
-
Spice it Up (or Down): Adjust the amount of jalapeño in the havarti, or add a pinch of your favorite chili powder to the black bean mixture, for more heat. If you prefer a milder flavor, use a mild cheddar or Monterey Jack cheese and omit the jalapeño.
-
Make Ahead: The filling can be prepared a day in advance and stored in the refrigerator. This will save you time when assembling the quesadillas. Just be sure to keep the cheese separate until you’re ready to assemble.
-
Even Cooking is Essential: If your skillet has hot spots, rotate the quesadillas periodically to ensure they cook evenly.
Serving & Storage Suggestions
Serve your Mexican Grilled Cheese Sandwiches immediately while the cheese is still gooey and the tortillas are warm and crispy. These are delicious on their own or served with a side of salsa, guacamole, or sour cream.
Leftover quesadillas can be stored in an airtight container in the refrigerator for up to 3 days. To reheat, you can use a skillet (best for maintaining crispiness), a microwave (quick but may make the tortillas a bit soft), or an oven (for larger batches, preheat to 350°F and bake for about 10 minutes, or until heated through). They generally do not freeze well because the vegetables tend to become mushy upon thawing.
Nutritional Information
| Nutrient | Amount per Serving | % Daily Value |
|---|---|---|
| Calories | 400 kcal (estimated) | 20% |
| Total Fat | 20g | 31% |
| Saturated Fat | 10g | 50% |
| Cholesterol | 50mg | 17% |
| Sodium | 600mg | 26% |
| Total Carbohydrate | 40g | 13% |
| Dietary Fiber | 8g | 32% |
| Sugars | 4g | N/A |
| Protein | 20g | 40% |
Note: Nutritional information is an estimate and may vary based on specific ingredients and portion sizes.
Variations & Substitutions
-
Gluten-Free: Use gluten-free tortillas to make this recipe suitable for those with gluten sensitivities.
-
Vegan: Substitute the jalapeño havarti cheese with a vegan cheese alternative that melts well. Ensure the tortillas are also vegan-friendly (some may contain lard).
-
Spicy Chorizo Quesadillas: Add cooked chorizo to the filling for a meaty, spicy twist.
-
Chicken or Beef: Shredded cooked chicken or seasoned ground beef can be added to the filling for extra protein.
-
Vegetarian Variations: Consider adding other vegetables, such as corn, zucchini, or mushrooms. Sautéing them beforehand can enhance their flavor and texture.
-
Different Cheese: Try using pepper jack, asadero, or even a blend of Mexican cheeses for a different flavor profile.
FAQs (Frequently Asked Questions)
Q: Can I use flour tortillas instead of whole wheat?
A: Absolutely! Flour tortillas will give you a slightly softer texture and different flavor. Choose whichever you prefer.
Q: Can I prepare these in a panini press?
A: Yes, a panini press will work perfectly for cooking these quesadillas. Just be sure not to overfill them, or they may be difficult to press.
Q: How do I prevent the cheese from oozing out of the sides?
A: Don’t overfill the quesadillas, and make sure the cheese is evenly distributed. Press down gently on the filled tortillas before cooking to help seal the edges.
Q: Can I add salsa to the filling?
A: Adding salsa directly to the filling can make the quesadilla soggy. It’s best to serve salsa on the side as a dipping sauce.
Q: What can I serve with these quesadillas?
A: These are great with a side of guacamole, sour cream, pico de gallo, or a fresh salad. A cold Mexican beer or a refreshing margarita would also be a perfect complement.
Final Thoughts
This Mexican Grilled Cheese Sandwich (Quesadilla!) is more than just a quick and easy meal; it’s a celebration of simple, fresh ingredients and vibrant flavors. I encourage you to experiment with the fillings, find your favorite cheese combination, and make this recipe your own. Don’t be afraid to share your creations with friends and family – and let me know what variations you come up with! ¡Buen provecho!