
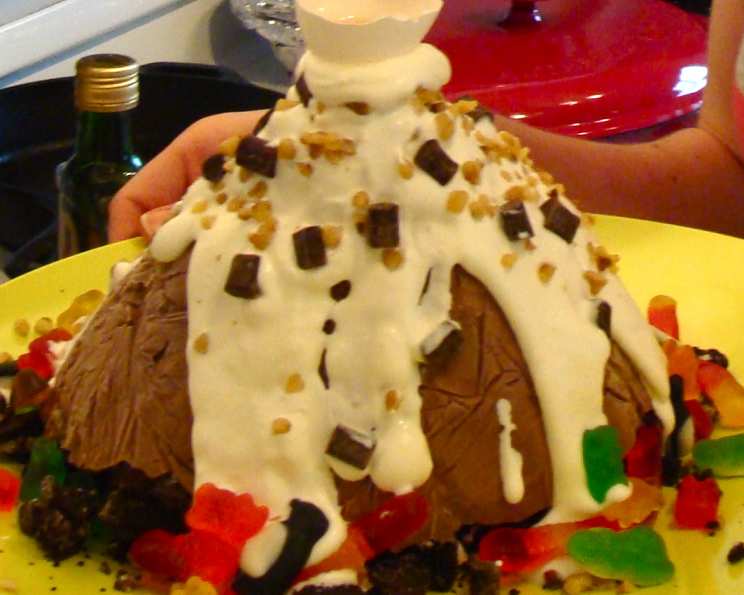
Michael’s Fabulous Chocolate Mountain Ice Cream Cake
I remember the first time I laid eyes on this cake. It wasn’t at a fancy bakery or a Michelin-starred restaurant, but at my best friend Michael’s tenth birthday party. The sheer audacity of a dessert shaped like a mountain, dripping with whipped cream and studded with candy, was mesmerizing. It felt less like a cake and more like an edible sculpture, a testament to childhood wonder and a complete disregard for dietary restrictions. And the taste? Pure, unadulterated joy.
Recipe Overview
- Prep Time: 30 minutes
- Cook Time: 0 minutes
- Total Time: 1 hour 30 minutes (plus freezing time)
- Servings: 10-12
- Yields: 1 cake
- Dietary Type: Not Gluten-Free (can be modified, see variations)
Ingredients
- 2 liters chocolate ice cream (or any other flavor)
- ¼ cup milk, approximately
- ½ cup whipping cream
- ¼ cup crushed walnuts
- 2 tablespoons semisweet chocolate chunks
- 16 Oreo cookies
- ½ cup assorted candy
Equipment Needed
- 1 12 x 9-inch aluminum lasagna pan
- Plastic wrap
- Pastry cutter or sturdy spoon
- Mixing bowl
- Electric mixer or whisk
Instructions
-
First, you’ll need to shape your lasagna pan into a cone. This will be the form for your magnificent mountain. Don’t be afraid to get creative! You’ll probably need to do some cutting and shaping. Use duct tape on the outside to securely seal the cone. Be careful when handling the aluminum to avoid cuts!
-
Line the inside of the cone-shaped pan with plastic wrap. This is crucial for easy removal later. Make sure the plastic wrap completely covers the inside surface.
-
Now, let’s prepare the ice cream. Spoon about half of the chocolate ice cream into a mixing bowl.
-
Add about 2 tablespoons of milk to the ice cream. Using a pastry cutter or a sturdy spoon, mash the ice cream and milk together until you achieve a thick milkshake-like consistency. You want it soft enough to pour, but not too runny.
-
Repeat steps 3 and 4 with the remaining ice cream, adding milk as needed to reach the desired consistency.
-
Pour the ice cream “batter” into your prepared cone-shaped cake pan. Make sure it’s evenly distributed.
-
Place the cone-shaped pan in the freezer, lodging it safely so it doesn’t tip over.
-
Mash up the Oreo cookies into coarse crumbs. You can use a food processor for a finer crumb, or simply place them in a ziplock bag and crush them with a rolling pin.
-
Pat the crushed Oreo cookies onto the open end of your cake in the cone. This will form the base of your mountain, so press them firmly into the ice cream to ensure they adhere properly.
-
Allow the cake to freeze for at least 1 hour. Freezing for no more than 6-8 hours is recommended, or the ice cream will become rock solid.
-
When the cake is ready to be served, it’s time to whip the cream. In a clean mixing bowl, pour the whipping cream. Use an electric mixer or a whisk to whip the cream until stiff peaks form. Be careful not to overwhip, or it will turn into butter!
-
Carefully remove the cake from the freezer. Gently pull on the plastic wrap to lift the cake out of the cone-shaped pan and place it on a serving platter.
-
Generously pour the whipped cream over the “peak” of the mountain, letting it cascade down the sides. This is your snowy mountain top!
-
Sprinkle the mountain peak with chocolate chunks and crushed walnuts.
-
Finally, place gummy candies artistically around the base of the mountain. Get creative with the arrangement!
-
Serve immediately and prepare for gasps of amazement!
-
Optional: For an extra touch of drama, carefully place a warm eggshell half on the peak of the cake. Fill it with about 1 tablespoon of brandy and light it for a flaming mountain ice cream cake. Exercise extreme caution when using an open flame, especially around children.
Expert Tips & Tricks
- To prevent the ice cream from melting too quickly while you’re working with it, keep it in the freezer until the last possible moment.
- If you find the ice cream is too hard to mash, let it sit at room temperature for a few minutes to soften slightly.
- Don’t overfill the cone-shaped pan with ice cream, as it will expand as it freezes.
- For a more intense chocolate flavor, use dark chocolate ice cream and dark chocolate chunks.
- If you don’t have an aluminum lasagna pan, you can use a sturdy cardboard box lined with plastic wrap.
- If you don’t have a pastry cutter, use the back of a large spoon to break the ice cream.
Serving & Storage Suggestions
Serve Michael’s Fabulous Chocolate Mountain Ice Cream Cake immediately after assembling. It’s best enjoyed fresh, as the ice cream will start to melt quickly at room temperature. If you have leftovers (unlikely!), store them in an airtight container in the freezer. Be aware that the texture of the ice cream may change slightly after refreezing. It’s not recommended to keep it at room temperature for more than 30 minutes.
Nutritional Information
Please note that this is an estimated nutritional breakdown and may vary based on specific ingredient brands and quantities.
| Nutrient | Amount per Serving | % Daily Value |
|---|---|---|
| Calories | 450 kcal | 23% |
| Total Fat | 25g | 38% |
| Saturated Fat | 15g | 75% |
| Cholesterol | 60mg | 20% |
| Sodium | 200mg | 8% |
| Total Carbohydrate | 55g | 18% |
| Dietary Fiber | 2g | 8% |
| Sugars | 40g | N/A |
| Protein | 5g | 10% |
Variations & Substitutions
- Gluten-Free Version: As noted previously, the original recipe is not gluten-free due to the Oreo cookies. To make a gluten-free version, substitute the Oreos with crushed gluten-free cookies, crushed sweetened rice cakes, or simply omit the cookie base altogether.
- Dairy-Free Version: Use non-dairy ice cream (such as coconut milk or soy-based) and non-dairy whipped topping. Ensure all other ingredients are also dairy-free.
- Flavor Variations: Experiment with different ice cream flavors, such as vanilla, strawberry, coffee, or mint chocolate chip. You can also mix different types of candy and nuts.
- Seasonal Adaptations: Decorate with seasonal candies and fruits to create a festive cake for any occasion. For example, use candy corn and pumpkin candies for Halloween, or cranberries and sugared rosemary sprigs for Christmas.
FAQs (Frequently Asked Questions)
Q: Can I make the cone shape in advance?
A: Yes, you can prepare the cone shape ahead of time and store it until you’re ready to assemble the cake. Just make sure it’s securely sealed and lined with plastic wrap.
Q: What if I don’t have an aluminum lasagna pan?
A: You can use any large, sturdy container to create the cone shape. A cardboard box works well, but be sure to line it thoroughly with plastic wrap to prevent leaks and ensure easy removal.
Q: How can I prevent the ice cream from melting too quickly while I’m working with it?
A: Keep the ice cream in the freezer until the last possible moment. Also, work quickly and efficiently to minimize the amount of time it’s exposed to room temperature.
Q: Can I use store-bought whipped cream instead of making my own?
A: Absolutely! Store-bought whipped cream is a convenient alternative. Just be sure to choose a good quality brand that holds its shape well.
Q: How long will the cake last in the freezer?
A: The cake can be stored in the freezer for up to a week, but the texture of the ice cream may change after refreezing. For best results, consume it within a few days.
Final Thoughts
Michael’s Fabulous Chocolate Mountain Ice Cream Cake is more than just a dessert; it’s an experience. It’s a conversation starter, a showstopper, and a guaranteed crowd-pleaser. Don’t be intimidated by the unusual shape – it’s surprisingly simple to make. Gather your ingredients, unleash your inner artist, and get ready to create a mountain of deliciousness that will leave everyone in awe. And most importantly, have fun with it! I encourage you to try this recipe and make it your own with creative variations. Don’t forget to share your masterpiece with friends and family! Perhaps pair it with a rich coffee or a sweet dessert wine for the perfect finale to a special meal.