
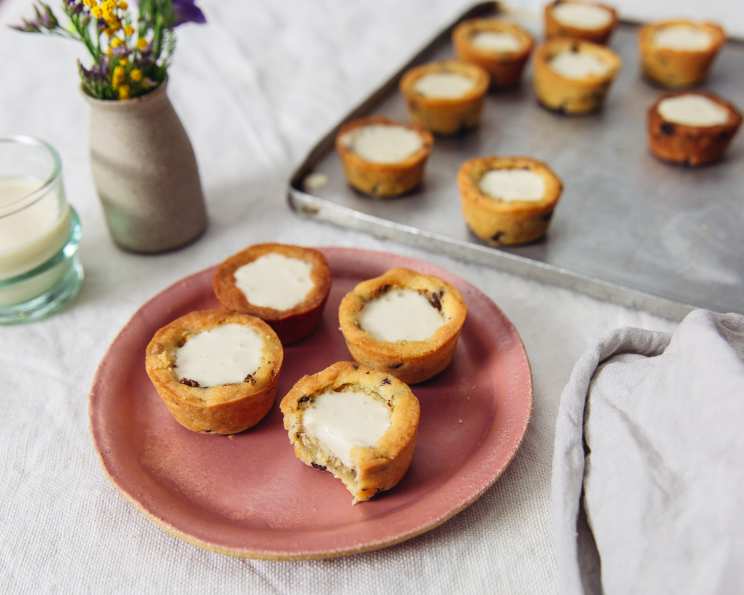
Milk & Cookie Cups: A Sweet Nostalgia Trip
There’s something undeniably comforting about the scent of warm cookies wafting from the oven, a memory etched in my childhood. I recall countless afternoons spent perched on a stool, watching my grandmother meticulously fold chocolate chips into her signature dough. And the ritual, of course, was never complete without a glass of ice-cold milk for dunking. These Milk & Cookie Cups are a whimsical nod to those simple pleasures, a way to recapture that pure, unadulterated joy in a single, delectable bite. It’s the perfect marriage of two classics, a miniature masterpiece that’s surprisingly easy to create.
Recipe Overview
- Prep Time: 20 minutes
- Cook Time: 13 minutes
- Total Time: 2 hours 33 minutes
- Servings: 24
- Yield: 24 milk & cookie cups
- Dietary Type: Not specified (contains dairy, gluten, and eggs)
Ingredients
For the Panna Cotta Filling:
- 2 tablespoons water
- 1 1/4 teaspoons gelatin powder, (1/2 of a sachet or 1/4 ounce)
- 3/4 cup whole milk
- 2 tablespoons granulated sugar
- 1/2 cup heavy cream
For the Cookie Cups:
- 1/2 cup (1 stick) unsalted butter, softened
- 1/2 cup granulated sugar
- 1 large egg
- 1/2 teaspoon vanilla extract
- 1/4 teaspoon salt
- 1/4 teaspoon baking powder
- 1 1/2 cups all-purpose flour
- 1/4 cup mini chocolate chips
Equipment Needed
- Small bowl
- Medium pot
- Large bowl
- Ice bath
- 24-cup mini muffin pan
- Electric mixer (optional, for creaming butter and sugar)
- Wooden spoon or pestle
- Small spatula or butter knife
- Wire rack
- Jug
Instructions
-
Begin by preparing the panna cotta filling. Pour the water into a small bowl. Sprinkle the gelatin powder evenly over the water and let it sit undisturbed for about 5 minutes to “bloom”. This allows the gelatin to soften and dissolve properly, ensuring a smooth final texture.
-
In a medium pot, combine the whole milk and granulated sugar. Heat the mixture over medium heat, stirring constantly, until it is gently steaming. Avoid boiling, as this can scald the milk and affect the taste.
-
Reduce the heat to low. Pour the bloomed gelatin mixture into the pot, stirring continuously until the gelatin has completely dissolved. Ensure there are no visible granules of gelatin remaining.
-
Remove the pot from the heat and stir in the heavy cream. This will cool the mixture slightly and add richness.
-
Strain the panna cotta mixture into a bowl that is resting in an ice bath. This crucial step helps to cool the mixture quickly and evenly, preventing skin from forming on the surface. Stir the mixture occasionally while it cools.
-
Let the panna cotta mixture sit in the ice bath for 1-2 hours, stirring occasionally, until it has thickened to a consistency that is still pourable. It should resemble a thick, slightly wobbly cream. If the mixture isn’t thickening sufficiently, you can chill it in the refrigerator for an additional 30-60 minutes to speed up the process. Be careful not to let it set completely solid at this stage.
-
While the panna cotta is chilling, preheat your oven to 350 degrees F (175 degrees C). Lightly spray a non-stick 24-cup mini muffin pan with cooking oil or cooking spray. This will prevent the cookie cups from sticking and make them easier to remove.
-
Now, prepare the cookie cups. In a large bowl, cream together the softened butter and granulated sugar until the mixture is light and fluffy. This step is essential for creating a tender cookie texture. An electric mixer can be helpful, but you can also do this by hand with a sturdy spoon.
-
Add the egg, vanilla extract, salt, and baking powder to the creamed butter mixture. Mix well to combine all the ingredients. The baking powder will help the cookie cups rise slightly and become airy.
-
Gradually add the all-purpose flour to the wet ingredients, stirring until a thick dough forms. Be careful not to overmix the dough, as this can result in tough cookie cups.
-
Fold in the mini chocolate chips until they are evenly distributed throughout the dough.
-
Divide the cookie dough evenly between the wells in the mini muffin pan. Aim for approximately 1 level tablespoon of dough per well.
-
Use your fingertips to gently press the cookie dough into each well, shaping it into a cup shape. Make sure the dough covers the bottom and sides of each well.
-
Place the muffin pan in the freezer for 10-15 minutes. This chilling step helps the cookie cups hold their shape during baking and prevents them from spreading too much.
-
Bake the cookie cups in the preheated oven for 10 minutes. The dough should still be a bit soft in the center, but the edges should be starting to set. It’s normal for the cups to rise and lose some of their “cup” shape during baking.
-
While the cookies are still soft and warm from the oven, use the end of a wooden spoon (or the end of a pestle from a pestle & mortar) to gently push a large indent back into the center of each cup. This will create a deeper well to hold the panna cotta filling.
-
Return the muffin pan to the oven for an additional 3 minutes to set the shape.
-
Let the cookie cups cool in the pan for a few minutes before carefully removing them using a small spatula or butter knife. Place the cooled cookie cups on a wire rack to cool completely.
-
Once the panna cotta filling has thickened to a pourable consistency, transfer it to a jug for easy pouring.
-
Carefully fill each cooled cookie cup with the panna cotta filling, filling them to the brim.
-
Place the filled cookie cups onto a tray or large plate and transfer them to the refrigerator to chill for at least one hour, or until the panna cotta has completely set.
-
Store the finished Milk & Cookie Cups in the refrigerator until ready to serve.
Expert Tips & Tricks
- For a richer cookie flavor, use brown butter. Simply melt the butter in a saucepan over medium heat, swirling occasionally, until it turns golden brown and smells nutty. Let it cool slightly before using in the recipe.
- If your cookie dough is too sticky to work with, add a tablespoon of flour at a time until it reaches a manageable consistency.
- To prevent the panna cotta from forming a skin while cooling, press a piece of plastic wrap directly onto the surface of the mixture.
- For perfectly uniform cookie cups, use a cookie scoop to portion the dough into the muffin pan.
Serving & Storage Suggestions
Serve these delightful Milk & Cookie Cups chilled, straight from the refrigerator. They make a perfect dessert for parties, picnics, or a special treat for yourself. Garnish with a dusting of cocoa powder, a sprinkle of mini chocolate chips, or a fresh berry for an extra touch of elegance.
Store leftover Milk & Cookie Cups in an airtight container in the refrigerator for up to 3 days. Due to the panna cotta filling, they are not suitable for freezing.
Nutritional Information
| Nutrient | Amount per Serving | % Daily Value* |
|---|---|---|
| Calories | 116.6 kcal | N/A |
| Calories from Fat | N/A | 52% |
| Total Fat | 6.7 g | 10% |
| Saturated Fat | 4.1 g | 20% |
| Cholesterol | 25.5 mg | 8% |
| Sodium | 37.3 mg | 1% |
| Total Carbohydrate | 12.9 g | 4% |
| Dietary Fiber | 0.3 g | 1% |
| Sugars | 6.6 g | N/A |
| Protein | 1.6 g | 3% |
*Percent Daily Values are based on a 2,000 calorie diet. Your daily values may be higher or lower depending on your calorie needs.
Variations & Substitutions
- Gluten-Free: Substitute the all-purpose flour with a gluten-free flour blend. Be sure to choose a blend that is formulated for baking and contains xanthan gum for binding.
- Dairy-Free: Replace the whole milk and heavy cream in the panna cotta with coconut milk or other non-dairy alternatives. Keep in mind that the flavor and texture may be slightly different.
- Different Flavors: Experiment with different extracts in the cookie dough, such as almond, lemon, or peppermint. You can also add spices like cinnamon or nutmeg for a warm and cozy flavor.
- Chocolate Panna Cotta: Add melted chocolate to the panna cotta mixture for a decadent chocolatey twist.
- Seasonal Fruit: Top the panna cotta with fresh seasonal fruit for a burst of flavor and color. Berries, peaches, and cherries all work well.
FAQs (Frequently Asked Questions)
Q: Can I make the panna cotta filling ahead of time?
A: Absolutely! In fact, it’s recommended. The panna cotta needs at least an hour to set, so making it a day in advance can save you time on the day you plan to serve the cups. Just store it covered in the refrigerator.
Q: My cookie cups are sticking to the muffin tin. What can I do?
A: Make sure you’ve thoroughly greased the muffin tin with cooking spray or butter. If they’re still sticking, try running a thin knife or spatula around the edges of the cups to loosen them before removing.
Q: Can I use a different type of cookie dough for the cups?
A: Yes, feel free to experiment with your favorite cookie dough recipe. Sugar cookie dough, peanut butter cookie dough, or even gingerbread cookie dough would all be delicious options. Just be sure the dough is firm enough to hold its shape when baked.
Q: My panna cotta is too runny and won’t set. What did I do wrong?
A: It’s possible that you didn’t use enough gelatin or that the gelatin wasn’t properly bloomed. Make sure to measure the gelatin accurately and allow it to bloom in cold water for at least 5 minutes before adding it to the warm milk.
Q: Can I add alcohol to the panna cotta?
A: Yes, you can add a tablespoon or two of your favorite liqueur to the panna cotta mixture for an extra layer of flavor. Vanilla extract, amaretto, or coffee liqueur would all be delicious choices. Add the liqueur after removing the mixture from the heat.
Final Thoughts
These Milk & Cookie Cups are more than just a dessert; they’re a little bite of happiness. With their creamy panna cotta filling nestled inside a crisp and buttery cookie cup, they’re sure to bring a smile to your face. Don’t be afraid to get creative and experiment with different flavors and variations. Whether you’re making them for a special occasion or simply as a sweet treat for yourself, I encourage you to give this recipe a try. And don’t forget to share your creations with me – I can’t wait to see what delicious twists you come up with! Pair them with a simple cup of coffee or tea for the perfect ending to any meal. Enjoy!