
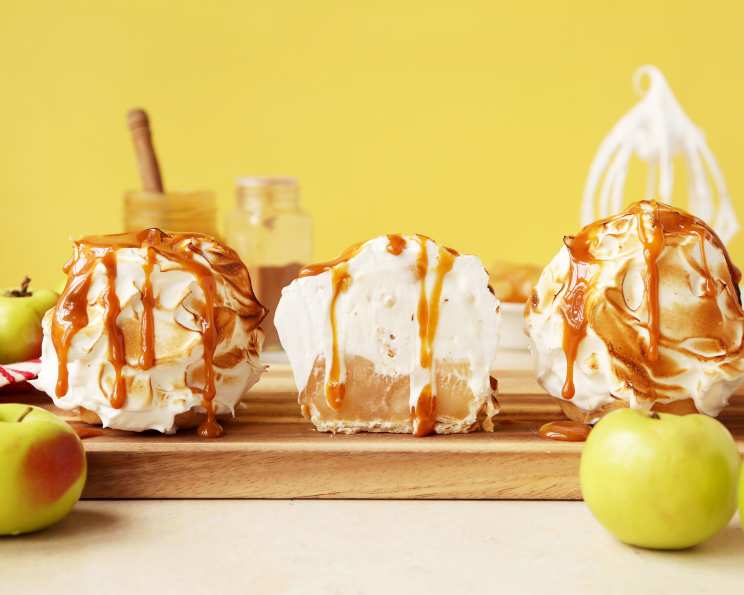
Mini Apple Pie Baked Alaskas: A Sweet Slice of Nostalgia
The first time I tasted Baked Alaska, I was at a county fair, mesmerized by the flames dancing across the meringue, promising a magical treat. The contrast of the warm, toasted meringue with the icy center was pure delight. Decades later, I wanted to recreate that magic but with a twist of autumnal flavors. That’s when the idea of Mini Apple Pie Baked Alaskas was born – a fusion of classic apple pie warmth and Baked Alaska’s theatrical chill, bringing together comforting memories and a touch of sophisticated fun.
Recipe Overview
- Prep Time: 45 minutes
- Cook Time: 18-20 minutes
- Total Time: 2 hours 20 minutes (includes chilling time)
- Servings: 6
- Yield: 6 baked Alaskas
- Dietary Type: Not specified
Ingredients
- 1 package store-bought refrigerated pie dough
- 1 large egg
- 1 (21 ounce) can apple pie filling
- 1 1⁄2 quarts apple pie ice cream
- 1 cup (about 6 large eggs) egg white, room temperature
- 1⁄4 teaspoon cream of tartar
- 1 cup granulated sugar
- 1⁄4 cup salted caramel, for drizzling (optional)
Equipment Needed
- Jumbo muffin pan
- Rolling pin
- 6-inch circle cutter (or knife)
- Fork
- Small bowl
- Whisk
- Small baking sheet
- Ice cream scoop
- Mixer (stand or hand-held)
- Small straightedge spatula or butter knife
- Kitchen blowtorch (optional)
- Broiler (optional)
Instructions
-
Begin by preheating your oven to 375 degrees Fahrenheit (190 degrees Celsius). Generously grease a jumbo muffin pan with cooking spray. Set it aside. This will ensure that your mini pie crusts release easily once baked.
-
Unroll your store-bought refrigerated pie dough on a lightly floured surface. Using a 6-inch circle cutter (or carefully using a knife), cut out six circles. If the dough becomes too warm and sticky, pop it back into the refrigerator for a few minutes to firm up.
-
Carefully place each circle into the prepared muffin pan, gently pushing the dough down into each cavity as best you can to conform to the shape of the muffin tin. Using a fork, poke holes at the bottom of each crust to release air during baking and prevent them from puffing up unevenly.
-
In a small bowl, whisk together the egg with a splash of water to create an egg wash. Brush the crusts evenly with the egg wash. This will give them a beautiful golden-brown color and a slight sheen.
-
Bake the crusts until they are golden brown, which should take about 18 to 20 minutes. Keep a close eye on them, as baking times can vary slightly depending on your oven. Remove from the oven and let them cool completely. The crusts must be completely cool before adding the filling to prevent the ice cream from melting prematurely.
-
Once the crusts are cool, carefully transfer them onto a small baking sheet. Fill each crust generously with the apple pie filling. Spread it evenly to ensure each bite is packed with apple goodness. Place the baking sheet with the filled crusts in the freezer to firm up for at least 30 minutes. This step helps to prevent the crusts from becoming soggy when you add the ice cream.
-
Remove the tart shells from the freezer and top each with a heaping scoop of apple pie ice cream. Gently press the ice cream down slightly to ensure it adheres well to the apple pie filling. Return the baking sheet to the freezer and chill for another 1 hour. The colder the ice cream, the better it will hold its shape when you torch or broil the meringue.
-
While the tarts are chilling, prepare the meringue topping. In a clean, grease-free bowl, beat the egg whites with the cream of tartar on high speed until foamy and frothy. The cream of tartar helps stabilize the egg whites and gives the meringue a better texture.
-
Continue beating on high speed as you slowly pour in the granulated sugar, a little at a time. Keep beating until the egg whites have doubled in volume and have formed stiff, glossy peaks, about 8 minutes. The meringue should be firm enough to hold its shape when you lift the beaters.
-
Remove the tarts from the freezer and, using a small straightedge spatula or butter knife, completely cover each with the meringue. Don’t aim for a perfectly smooth surface, as you would when frosting a cake. Instead, feel free to create swirls or small peaks with your spatula or knife. This will give the meringue a more rustic and visually appealing look. Return the covered tarts to the freezer and chill for another hour.
-
Right before serving, remove the frozen tarts from the freezer. Using a small kitchen blowtorch, carefully toast the meringue, holding the flame a few inches away and moving it around to ensure even browning. If you don’t have a blowtorch, you can place the baked Alaskas under a preheated broiler for a few seconds, watching them very closely to prevent burning.
-
Drizzle each Mini Apple Pie Baked Alaska with salted caramel (if using) and serve immediately. The contrast of flavors and temperatures makes this dessert an unforgettable experience.
Expert Tips & Tricks
- Room temperature egg whites whip up much faster and create a more voluminous meringue.
- Ensure your mixing bowl and beaters are completely clean and free of any grease or oil, as this can prevent the egg whites from whipping properly.
- If your meringue seems too soft, you can add a tablespoon or two of powdered sugar to help stiffen it up.
- To prevent the bottom of the crust from becoming soggy, you can brush it with melted chocolate before adding the apple pie filling. The chocolate will act as a barrier against the moisture.
- If you don’t have apple pie ice cream, vanilla ice cream with a sprinkle of cinnamon and a drizzle of apple cider reduction makes a great substitute.
Serving & Storage Suggestions
Serve your Mini Apple Pie Baked Alaskas immediately after torching or broiling to enjoy the perfect contrast between the warm meringue and the cold ice cream. They are best enjoyed fresh, as the meringue will soften over time.
If you have any leftovers (though it’s unlikely!), store them in the freezer in an airtight container. However, be aware that the meringue may lose some of its crispness. They are not recommended for refrigeration, as the ice cream will melt.
Nutritional Information
| Nutrient | Amount per Serving | % Daily Value |
|---|---|---|
| Calories | 535.5 kcal | N/A |
| Calories from Fat | 139 g | 26% |
| Total Fat | 15.5 g | 23% |
| Saturated Fat | 9.2 g | 46% |
| Cholesterol | 89.1 mg | 29% |
| Sodium | 232.1 mg | 9% |
| Total Carbohydrate | 91 g | 30% |
| Dietary Fiber | 1.9 g | 7% |
| Sugars | 75.4 g | 301% |
| Protein | 10.2 g | 20% |
Note: Nutritional information is an estimate and can vary based on specific ingredients and portion sizes.
Variations & Substitutions
- For a gluten-free version, use gluten-free pie crust dough.
- Experiment with different ice cream flavors! Try caramel swirl, cinnamon, or even a scoop of vanilla with chopped pecans.
- Use different fruit fillings like cherry, blueberry, or peach to customize the dessert to your liking.
- For a vegan option, substitute the pie dough with a vegan alternative, use vegan ice cream, and use aquafaba (chickpea brine) whipped with cream of tartar and sugar for the meringue.
FAQs (Frequently Asked Questions)
Q: Can I make these ahead of time?
A: Yes, you can prepare the tarts up to the point of torching or broiling and keep them frozen. Just torch or broil them right before serving.
Q: Is it necessary to use a blowtorch?
A: No, you can use a broiler instead, but watch carefully to prevent burning. The blowtorch provides more control and a more even browning.
Q: Can I use homemade pie crust?
A: Absolutely! Homemade pie crust will add an extra layer of flavor and texture to the dessert.
Q: What if my ice cream melts too quickly?
A: Make sure your freezer is set to a low temperature and work quickly when assembling the tarts. Freeze the components for longer periods to ensure they are very cold.
Q: Can I skip the caramel drizzle?
A: Of course! The caramel drizzle is optional. You can also use other toppings like chopped nuts, chocolate shavings, or a sprinkle of cinnamon.
Final Thoughts
Creating these Mini Apple Pie Baked Alaskas is more than just baking; it’s about crafting a memory, a moment of pure joy. Don’t be intimidated by the steps – embrace the process and the delightful surprises that may arise. I hope this recipe inspires you to get creative in the kitchen and share the magic of this dessert with those you love. Feel free to experiment with different flavors and toppings, and most importantly, have fun! Let me know how your Mini Apple Pie Baked Alaskas turn out – I’m always eager to hear your feedback and see your culinary creations!