
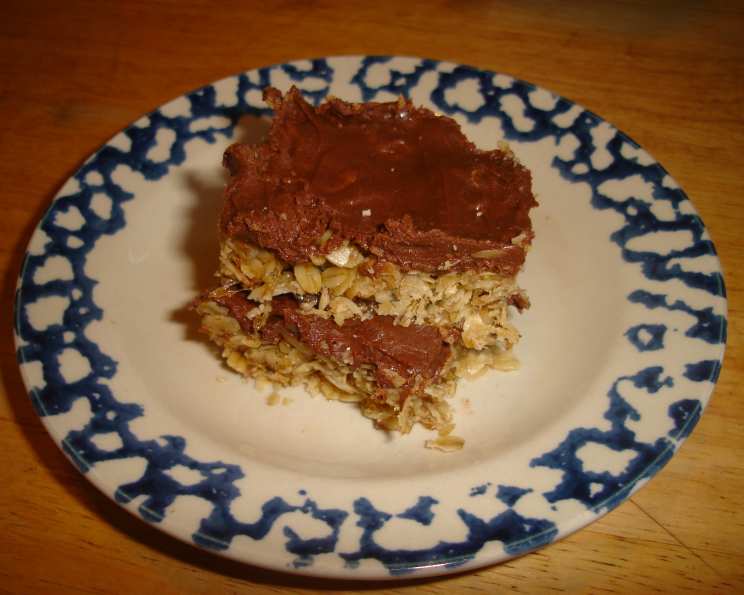
Grandma’s Minnesota Bars: A Slice of Sweet Nostalgia
The scent alone transports me back to childhood Christmases. Grandma’s care packages, meticulously packed and shipped across state lines, were the highlight of the holiday season, and nestled amongst the sweaters and handwritten cards was always a foil-wrapped stack of these incredible Minnesota Bars. They were a symphony of textures – the chewy, oaty base, the rich, decadent chocolate-peanut butter topping – and a taste of pure, unconditional love from a thousand miles away. Even though the miles separated us, these bars were the glue that kept our family close.
Recipe Overview
- Prep Time: 15 minutes
- Cook Time: 12-15 minutes
- Total Time: Approximately 1 hour (including cooling time)
- Yield: 16-24 bars (depending on cut size)
- Dietary Type: Vegetarian
Ingredients
For the Crust:
- 2/3 cup canola oil
- 1 cup packed brown sugar
- 1/2 cup corn syrup
- 4 cups oatmeal (old-fashioned or quick oats)
For the Topping:
- 1 cup chocolate chips (semi-sweet or milk chocolate)
- 1/2 cup peanut butter (creamy or chunky)
Equipment Needed
- 9×13 inch baking pan
- Mixing bowls
- Measuring cups and spoons
- Spatula
- Microwave-safe bowl (or double boiler)
Instructions
-
Preheat your oven to 375°F (190°C). Make sure the rack is positioned in the center for even baking.
-
In a large mixing bowl, combine the canola oil, brown sugar, and corn syrup. Use a sturdy spoon or spatula to mix these wet ingredients together until they are well combined and relatively smooth.
-
Add the oatmeal to the bowl with the wet ingredients. Stir everything together thoroughly, ensuring that the oatmeal is evenly coated with the mixture. This step is crucial for creating a cohesive and flavorful crust. The mixture will be thick and a bit sticky.
-
Press the oatmeal mixture evenly into a 9×13 inch baking pan. Use your fingers or the back of a spoon to create a compact and uniform layer. The more evenly the crust is pressed, the more consistent its texture will be when baked.
-
Bake in the preheated oven for 12-15 minutes. Keep a close eye on the crust as it bakes. You’re looking for a soft, light brown color with slightly firmer edges. The crust will continue to set as it cools, so it’s better to err on the side of underbaking than overbaking.
-
Remove the baked crust from the oven and let it cool completely in the pan. This is an important step, as the topping will melt if applied to a warm crust. Patience is key!
-
While the crust is cooling, prepare the topping. In a microwave-safe bowl, combine the chocolate chips and peanut butter.
-
Melt the chocolate chips and peanut butter together. You can do this in the microwave in 30-second intervals, stirring in between each interval to prevent burning. Alternatively, you can melt them in a double boiler over simmering water, stirring constantly until smooth.
-
Once the chocolate and peanut butter are completely melted and smooth, pour the mixture over the cooled crust.
-
Use a spatula to spread the chocolate-peanut butter topping evenly over the entire surface of the crust.
-
Allow the topping to set completely. This can be done at room temperature, but refrigerating the bars will speed up the process and make them easier to cut.
-
Once the topping is set, cut the bars into squares. The size of the squares is up to you – smaller squares for a bite-sized treat, larger squares for a more substantial dessert.
Expert Tips & Tricks
- For a chewier crust, use old-fashioned rolled oats. For a slightly softer crust, quick oats work perfectly.
- If you find that the crust is browning too quickly, you can tent it loosely with aluminum foil during the last few minutes of baking.
- To prevent the chocolate from seizing when melting in the microwave, add a teaspoon of vegetable oil or shortening to the chocolate chips and peanut butter.
- For a decorative touch, sprinkle the chocolate-peanut butter topping with chopped nuts, sea salt, or colorful sprinkles before it sets.
- If you’re short on time, you can use a pre-made graham cracker crust instead of making the oatmeal crust. However, the oatmeal crust adds a unique flavor and texture that is well worth the effort.
- To easily slice the bars, use a warm knife and wipe it clean between cuts.
Serving & Storage Suggestions
These Minnesota Bars are delicious served at room temperature or slightly chilled. They make a wonderful addition to any dessert table and are perfect for potlucks, bake sales, or a simple after-dinner treat.
Store leftover bars in an airtight container at room temperature for up to 3 days, in the refrigerator for up to a week, or in the freezer for up to 2 months. If freezing, wrap the bars individually in plastic wrap to prevent freezer burn. Thaw frozen bars at room temperature before serving.
Nutritional Information
Note: Nutritional information is an estimate and may vary based on specific ingredients and serving sizes.
| Nutrient | Amount per Serving | % Daily Value |
|---|---|---|
| Calories | 320 kcal | 16% |
| Total Fat | 18g | 28% |
| Saturated Fat | 6g | 30% |
| Cholesterol | 0mg | 0% |
| Sodium | 50mg | 2% |
| Total Carbohydrate | 38g | 13% |
| Dietary Fiber | 3g | 12% |
| Sugars | 20g | — |
| Protein | 5g | 10% |
Variations & Substitutions
- Gluten-Free: Use certified gluten-free oatmeal to make these bars gluten-free.
- Nut-Free: Substitute the peanut butter with sunflower seed butter (sunbutter) or tahini for a nut-free option.
- Dairy-Free: Ensure your chocolate chips are dairy-free. Many brands offer excellent dairy-free options.
- Extra Chocolatey: Add a layer of melted chocolate on top of the peanut butter layer for an even more decadent treat.
- Seasonal Twist: Sprinkle the topping with chopped pecans and a dash of cinnamon during the fall months.
FAQs (Frequently Asked Questions)
Q: Can I use quick oats instead of old-fashioned oats for the crust?
A: Yes, you can use quick oats. The crust will be slightly softer and less chewy than with old-fashioned oats, but it will still be delicious.
Q: How do I prevent the chocolate-peanut butter topping from cracking when I cut the bars?
A: Make sure the topping is completely set before cutting. You can also use a warm knife and wipe it clean between cuts to help prevent cracking.
Q: Can I make these bars ahead of time?
A: Absolutely! Minnesota Bars are a great make-ahead dessert. They can be stored in the refrigerator for several days or frozen for longer storage.
Q: My crust is too crumbly. What did I do wrong?
A: Make sure you’ve measured the ingredients accurately. If the crust is still too crumbly, try adding a tablespoon or two of melted butter or additional corn syrup to help bind the ingredients together.
Q: Can I add nuts to the crust or topping?
A: Definitely! Chopped nuts like walnuts, pecans, or almonds can be added to the crust or sprinkled on top of the chocolate-peanut butter topping for added flavor and texture.
Final Thoughts
These Minnesota Bars are more than just a recipe; they’re a connection to cherished memories and a reminder of the simple joys in life. Whether you’re a seasoned baker or just starting out, I encourage you to give this recipe a try. The combination of the chewy oat crust and the rich chocolate-peanut butter topping is simply irresistible. Bake a batch, share them with loved ones, and create your own sweet memories. And if you happen to tweak the recipe to make it your own, I’d love to hear about it! Enjoy!