
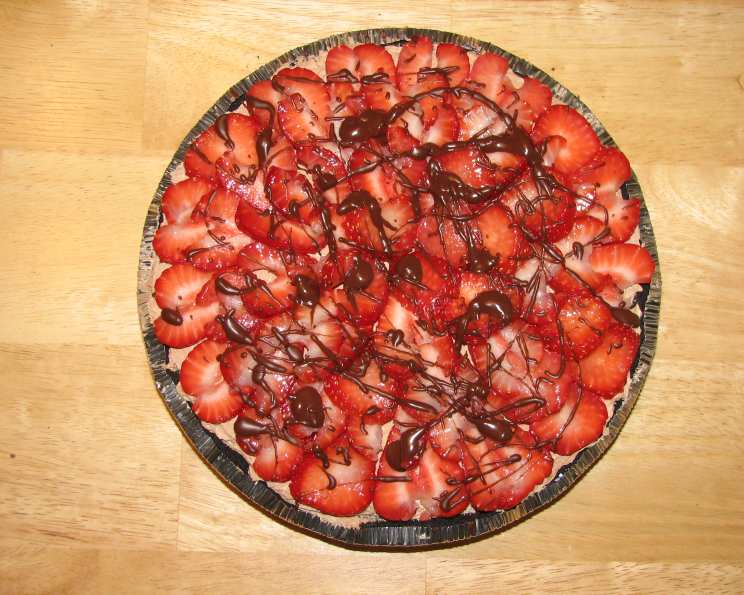
Miss Aimee B’s Chocolate Strawberry Pie: A Slice of Southern Charm
I remember the first time I tasted Miss Aimee B’s Chocolate Strawberry Pie. It was at a summer picnic, the kind where fireflies winked in the twilight and laughter echoed through the warm air. One bite of that pie – the rich, cool chocolate cream meeting the bright, juicy strawberries – and I was transported. It wasn’t just dessert; it was a memory in the making, a taste of pure joy I knew I had to recreate.
Recipe Overview
- Prep Time: 20 minutes
- Cook Time: 10 minutes
- Total Time: 8 hours 30 minutes (includes chilling)
- Servings: 8
- Yield: 1 pie
- Dietary Type: Not specified
Ingredients
- 1 cup Oreo cookie crumbs
- 3 tablespoons granulated sugar
- 1/3 cup butter, melted
- 1 cup semi-sweet chocolate chips
- 1 (8 ounce) package cream cheese
- 1/4 cup packed brown sugar
- 1 teaspoon vanilla
- 12 ounces Cool Whip, thawed in refrigerator (very important)
- 1 quart fresh strawberries
- 1/2 inch paraffin wax (optional)
- 1/4 cup semi-sweet chocolate chips
Equipment Needed
- 9-inch deep dish pie pan
- Mixing bowls
- Electric mixer
- Double boiler (or heatproof bowl and saucepan)
- Measuring cups and spoons
- Rubber spatula
- Knife
Instructions
-
Preheat your oven to 325 degrees F (165 degrees C). This temperature ensures the crust bakes properly without burning.
-
Prepare the crust: In a mixing bowl, combine the Oreo cookie crumbs, granulated sugar, and melted butter. Mix until the crumbs are evenly moistened and resemble wet sand.
-
Press the crumb mixture onto the bottom and up the sides of a lightly greased 9-inch deep dish pie pan. Make sure the crust is firmly packed for a stable base.
-
Bake the crust in the preheated oven for 10 minutes. This step sets the crust and gives it a slightly crisp texture.
-
Cool the baked crust completely on a wire rack before adding the filling. This prevents the filling from melting and ensures a firm pie.
-
Prepare the filling: In the top of a double boiler (or a heatproof bowl set over a saucepan of simmering water), melt 1 cup of semi-sweet chocolate chips, stirring occasionally until smooth. Remove from heat and let it cool slightly. Avoid overheating the chocolate, as it can seize and become grainy.
-
In a separate mixing bowl, beat the cream cheese with an electric mixer until light and fluffy. This incorporates air and creates a smooth, creamy base for the filling.
-
Add the packed brown sugar and vanilla to the cream cheese and mix well until fully combined. The brown sugar adds a subtle molasses flavor that complements the chocolate.
-
Add the cooled melted chocolate to the cream cheese mixture and mix well until evenly incorporated. Ensure there are no streaks of cream cheese or chocolate.
-
Gently fold in the Cool Whip to the chocolate-cream cheese mixture until just combined. Be careful not to overmix, as this can deflate the Cool Whip and result in a less airy filling.
-
Spoon the filling into the cooled crust (or a ready-made chocolate crust) and smooth out the top with a spatula.
-
Cover the pie tightly with plastic wrap and chill in the refrigerator for at least 8 hours, or preferably overnight. This allows the filling to set completely and the flavors to meld together.
-
Prepare the strawberries: Wash the fresh strawberries thoroughly, pat them dry with paper towels, and cut them lengthwise into 1/8-inch slices. Removing excess moisture is crucial for a visually appealing and structurally sound pie.
-
Arrange the strawberry slices around the outside edge of the pie, overlapping them slightly. Create a second row, overlapping the first, and continue in this fashion until the entire pie surface is covered with strawberry slices. This creates a beautiful and flavorful topping.
-
Prepare the chocolate drizzle: In a small, heatproof bowl, heat the 1/4 cup semi-sweet chocolate chips with the paraffin wax (if using) in the microwave in 30-second intervals, stirring in between, until melted and smooth. If you prefer to skip the paraffin, simply melt the chocolate chips on their own. The paraffin wax helps the chocolate harden with a glossy finish.
-
Drizzle the melted chocolate over the strawberries in a decorative pattern.
-
Chill the pie again for at least 30 minutes to allow the chocolate drizzle to set.
-
Serve the same day for the best flavor and texture.
Expert Tips & Tricks
- For a richer chocolate flavor, use dark chocolate chips instead of semi-sweet.
- If you’re short on time, a store-bought chocolate cookie crust works perfectly well.
- To prevent the crust from getting soggy, brush it with melted chocolate before adding the filling.
- Use a vegetable peeler to create chocolate curls for an elegant garnish.
- If you don’t have a double boiler, you can use a glass bowl set over a simmering pot of water, ensuring the bottom of the bowl doesn’t touch the water.
Serving & Storage Suggestions
Serve Miss Aimee B’s Chocolate Strawberry Pie chilled, directly from the refrigerator. It makes a stunning centerpiece for any dessert table. For an extra touch, add a dollop of whipped cream or a scoop of vanilla ice cream.
Leftovers should be stored in the refrigerator, tightly covered, for up to 2-3 days. The pie is best enjoyed fresh, as the strawberries may release moisture over time, potentially softening the crust. Freezing is not recommended, as the texture of the Cool Whip may change upon thawing.
Nutritional Information
| Nutrient | Amount per Serving | % Daily Value |
|---|---|---|
| Calories | 496 kcal | N/A |
| Total Fat | 36.4 g | 55% |
| Saturated Fat | 25 g | 125% |
| Cholesterol | 51.5 mg | 17% |
| Sodium | 155.3 mg | 6% |
| Total Carbohydrate | 44.1 g | 14% |
| Dietary Fiber | 3 g | 11% |
| Sugars | 38.9 g | N/A |
| Protein | 4.3 g | 8% |
Note: Nutritional information is an estimate and can vary based on specific ingredients and preparation methods.
Variations & Substitutions
- Gluten-Free: Use gluten-free Oreo-style cookies for the crust.
- Dairy-Free: Substitute the cream cheese with a dairy-free cream cheese alternative, and use a dairy-free whipped topping instead of Cool Whip. Ensure the chocolate chips are also dairy-free.
- Vegan: Use dairy-free Oreo-style cookies, dairy-free cream cheese, dairy-free whipped topping, and dairy-free chocolate chips.
- Berry Medley: Instead of just strawberries, use a mix of your favorite berries like blueberries, raspberries, and blackberries.
- Chocolate Crust Variation: For an intense chocolate flavor, mix melted chocolate into the Oreo cookie crust before baking.
FAQs (Frequently Asked Questions)
Q: Can I use a different type of cookie for the crust?
A: Absolutely! Graham crackers or chocolate wafers work well as substitutes for Oreo cookies. Just adjust the sugar accordingly based on the sweetness of the cookie.
Q: Can I make the filling ahead of time?
A: Yes, you can prepare the filling a day or two in advance and store it in an airtight container in the refrigerator. Just be sure to gently fold in the Cool Whip right before assembling the pie.
Q: What can I use instead of paraffin wax?
A: If you prefer to skip the paraffin wax, simply melt the chocolate chips on their own. The chocolate drizzle may not harden as much, but it will still taste delicious.
Q: How do I prevent the strawberries from sliding off the pie?
A: Pat the strawberries completely dry before slicing and arranging them on the pie. This will help them adhere better to the filling.
Q: Can I freeze this pie?
A: Freezing is not recommended as the Cool Whip can change in texture. It’s best to enjoy this pie fresh.
Final Thoughts
Miss Aimee B’s Chocolate Strawberry Pie is more than just a dessert; it’s an experience. The combination of the rich chocolate, creamy filling, and sweet strawberries is simply irresistible. Don’t be intimidated by the chilling time; it’s well worth the wait. So, gather your ingredients, put on your apron, and prepare to create a pie that will impress your friends and family. And most importantly, enjoy every delicious bite!