
Sculpt Your Sweets: A Guide to Mastering Modeling Chocolate
The first time I saw modeling chocolate, it was a revelation. I was a young pastry cook, tasked with creating whimsical decorations for a child’s birthday cake. Fondant was the standard, but it always seemed a bit… lifeless. Then, my mentor pulled out a pliable, chocolate-scented dough and sculpted it into the most delightful little creatures. The texture, the richness, the sheer possibility – it was magic. I remember thinking, “This is edible art!” I was hooked.
Recipe Overview
- Prep Time: 15 minutes
- Cook Time: 5-10 minutes
- Total Time: 2 hours, 20 minutes (includes chilling time)
- Yields: Varies depending on use
- Dietary Type: Varies depending on chocolate used (can be dairy-free depending on the chocolate)
Ingredients
Here’s what you’ll need to create your own modeling chocolate masterpiece. Note that the ratio of corn syrup to chocolate varies depending on the type of chocolate you use.
-
Dark Chocolate Modeling Paste:
- 7 ounces (200 grams) bittersweet chocolate, chopped
- 1/4 cup (60 ml) light corn syrup
-
Semi-Sweet Chocolate Modeling Paste:
- 7 ounces (200 grams) semi-sweet chocolate, chopped
- 3 1/2 – 4 tablespoons light corn syrup
-
White Chocolate Modeling Paste:
- 7 ounces (200 grams) white chocolate, chopped
- 1 1/2 – 2 tablespoons light corn syrup
-
Milk Chocolate Modeling Paste:
- 7 ounces (200 grams) milk chocolate, chopped
- 2 1/2 – 3 tablespoons light corn syrup
Equipment Needed
- Double boiler or metal bowl and saucepan
- Spatula or wooden spoon
- Sturdy plastic freezer bag
- Rolling pin (optional)
- Manual pasta machine (optional)
- Grease (vegetable oil or Pam)
Instructions
This recipe outlines how to make modeling chocolate with different chocolate varieties. The process is similar for each, but pay close attention to the amount of corn syrup needed for each type.
-
Prepare for Melting: Before you begin, lightly grease your measuring cup or spoons with vegetable oil or a non-stick cooking spray like Pam. This will prevent the corn syrup from sticking and ensure accurate measurement.
-
Melt the Chocolate: The key to smooth modeling chocolate is gently melting the chocolate. Use a double boiler, or create your own by setting a metal bowl over a pan of simmering water. Make sure the bottom of the bowl doesn’t touch the water.
-
Stir Constantly: Add the chopped chocolate to the double boiler or bowl. Stir the chocolate constantly until it is completely melted and smooth. Be patient and avoid overheating the chocolate, as this can cause it to seize.
-
Cool Slightly: Once the chocolate is melted, remove it from the heat and continue to stir until it has cooled slightly. This is important because adding the corn syrup to very hot chocolate can cause it to become grainy.
-
Incorporate the Corn Syrup: Now, stir in the specified amount of light corn syrup for the type of chocolate you are using (see ingredient list). You’ll notice that the chocolate will stiffen almost immediately as the corn syrup is incorporated.
-
Combine Thoroughly: Continue to stir until the chocolate and corn syrup are completely combined. The mixture may appear somewhat separated at first, but keep stirring! Persistence is key.
-
Chill the Dough: Transfer the chocolate mixture to a sturdy plastic freezer bag. Flatten the bag slightly to create a disk shape. This will help it chill evenly. Seal the bag tightly and refrigerate until the dough is firm. This usually takes about 2 hours.
-
Knead to Pliability: Once the dough is firm, remove it from the refrigerator. It will likely be quite hard. Knead the dough until it is soft and pliable enough to work with. This may take some time and effort. If the dough is too hard to knead easily, cut off small pieces and knead each piece individually until pliable, then combine them.
-
Prepare Your Work Surface: Grease your work surface with a little vegetable oil or spray it with Pam to prevent the chocolate from sticking.
-
Shape Your Creations: Now comes the fun part! You can shape the modeling chocolate into anything you desire. Roll it into a long rope or braid to wrap around the base of a cake, or flatten it into a sheet to cover the top edge.
-
Roll Out for Ribbons: To create ribbons or fondant-like coverings, pat the dough into a disk shape and roll it out to your desired thickness using a rolling pin. Alternatively, you can use a manual pasta machine to achieve a very thin and even sheet.
-
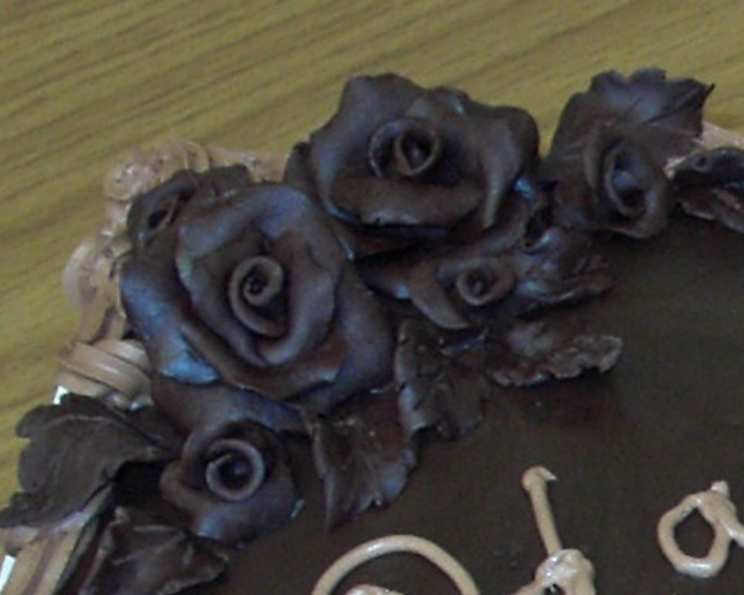
Sculpt Details: This dough is perfect for making flowers, leaves, or any other intricate decorations you can imagine. Use modeling tools or your fingers to sculpt the desired shapes.
Expert Tips & Tricks
- Chocolate Choice Matters: The quality of your chocolate directly impacts the taste and texture of your modeling chocolate. Use high-quality chocolate for the best results. Avoid using chocolate chips as they often contain stabilizers that can affect the final product.
- Dealing with Seized Chocolate: If your chocolate seizes (becomes grainy and stiff) after adding the corn syrup, don’t panic! Try adding a very small amount (a teaspoon or less) of hot water and stirring vigorously. This can sometimes help to bring it back together.
- Coloring Modeling Chocolate: To color modeling chocolate, use gel food coloring. Knead the coloring into the dough until it is evenly distributed. Avoid liquid food coloring, as it can make the dough too soft.
- Preventing Cracking: If your modeling chocolate is cracking as you work with it, it is likely too cold. Allow it to warm up slightly at room temperature before kneading it again. You can also knead in a tiny amount of shortening or vegetable oil to increase its pliability.
Serving & Storage Suggestions
Modeling chocolate is best used as a decorative element on cakes, cupcakes, and other desserts. It is not typically eaten on its own, but it is perfectly edible.
Store well-wrapped modeling chocolate at room temperature for several months. If it becomes hard to work with, knead in a little more corn syrup until it is pliable again. Avoid storing it in the refrigerator, as this can cause it to dry out and become brittle.
Nutritional Information
Note: Nutritional information is an estimate and will vary depending on the type of chocolate used.
| Nutrient | Amount per Serving (estimated) | % Daily Value |
|---|---|---|
| Calories | 150-200 kcal | 8-10% |
| Total Fat | 8-12g | 12-18% |
| Saturated Fat | 5-8g | 25-40% |
| Cholesterol | 0-5mg | 0-2% |
| Sodium | 5-15mg | 0-1% |
| Total Carbohydrate | 15-25g | 5-8% |
| Dietary Fiber | 1-2g | 4-8% |
| Sugars | 12-20g | N/A |
| Protein | 1-3g | 2-6% |
Variations & Substitutions
- Vegan Modeling Chocolate: Use a high-quality vegan chocolate and ensure your corn syrup is also vegan (some brands use bone char in processing).
- Flavor Extracts: Add a few drops of your favorite flavor extract (vanilla, peppermint, almond) to the melted chocolate for a unique flavor profile.
- Different Types of Chocolate: Experiment with different types of chocolate, such as ruby chocolate or flavored chocolate bars.
- Honey Substitution: While the recipe calls for corn syrup, you could experiment with honey. Keep in mind that honey has a stronger flavor and different moisture content, so you may need to adjust the amount.
FAQs (Frequently Asked Questions)
Q: Why is my modeling chocolate greasy?
A: This can happen if the chocolate and corn syrup separate. Try kneading the dough vigorously for a longer period. If it remains greasy, you may have added too much corn syrup.
Q: Can I use honey instead of corn syrup?
A: While possible, it’s not recommended. Honey has a distinct flavor and can result in a stickier texture. If you experiment with it, use a light-colored honey and adjust the amount accordingly.
Q: How long will modeling chocolate last?
A: Properly wrapped, modeling chocolate can last for several months at room temperature.
Q: My modeling chocolate is too hard to work with. What should I do?
A: Knead the dough for a longer period or warm it slightly in your hands. You can also knead in a tiny amount of vegetable shortening.
Q: Can I use this to cover an entire cake like fondant?
A: Yes, you can! Roll it out thinly using a rolling pin or pasta machine and drape it over the cake. The chocolate flavor will be a delicious upgrade from traditional fondant.
Final Thoughts
Modeling chocolate is a delightful medium for expressing your culinary creativity. Don’t be intimidated – it’s surprisingly forgiving and fun to work with. Whether you’re crafting delicate flowers, whimsical characters, or elegant accents, this edible clay will transform your desserts into works of art. So, gather your ingredients, unleash your imagination, and get ready to sculpt some sweet memories. And if you create something spectacular, don’t hesitate to share your creations!