
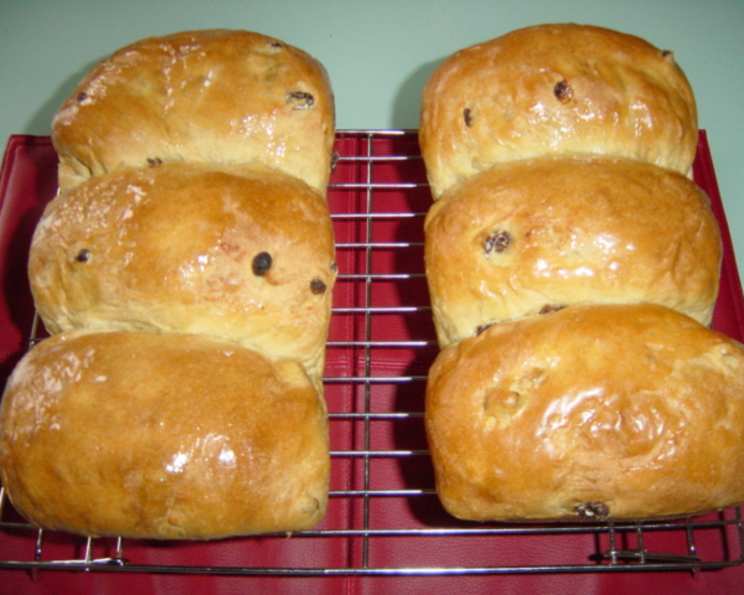
A Taste of Newfoundland: Molasses Raisin Bread
I can still picture my grandmother’s kitchen, the air thick with the scent of baking bread and the comforting aroma of molasses. She always seemed to have a loaf of warm raisin bread cooling on the counter, ready to be sliced and slathered with butter. It was a simple pleasure, a taste of home and a reminder of her unwavering love. The deep, rich flavor of molasses, combined with the plump sweetness of raisins, created a bread that was both hearty and satisfying. This recipe takes me right back to those cherished moments.
Recipe Overview
- Prep Time: 25 minutes
- Cook Time: 60 minutes (may vary with oven type)
- Total Time: 2 hours 25 minutes (includes rising time)
- Yield: 3-4 loaves
- Dietary Type: Vegetarian
Ingredients
- 2 tablespoons active dry yeast (or 2 packages)
- ½ cup sugar
- 4 cups lukewarm water
- ¾ cup molasses
- 1 teaspoon vanilla extract
- ¼ cup margarine, melted
- 1 tablespoon salt
- 2 teaspoons cinnamon
- 12 cups all-purpose flour, plus more for kneading
- 2 ½ cups raisins
Equipment Needed
- 3-4 loaf pans
- Large mixing bowl
- Measuring cups and spoons
- Mixing spoon or stand mixer
- Saran wrap or dish towel
- Wire racks
Instructions
-
Grease 3 or 4 loaf pans generously with margarine. Set aside.
-
In a large mixing bowl, dissolve the yeast in 1 cup of lukewarm water. Add 2 teaspoons of the sugar to feed the yeast. Let this mixture sit for about 5 minutes, until it becomes foamy, indicating the yeast is active.
-
To the yeast mixture, add the remaining 3 cups of lukewarm water, ¾ cup of molasses, ¼ cup of melted margarine, vanilla extract, cinnamon, 1 tablespoon of salt, and the remaining sugar. Mix everything together until well combined and smooth.
-
Gradually add the flour, one cup at a time, mixing well after each addition. It’s important to incorporate the flour thoroughly to avoid lumps. After the flour is incorporated, add the raisins and mix to evenly distribute them throughout the dough.
-
Turn the dough out onto a lightly floured surface. If you prefer, you can knead the dough directly in the bowl, which minimizes cleanup.
-
Knead the dough for approximately 12-15 minutes, until it becomes smooth and elastic. This step is crucial for developing the gluten, which gives the bread its structure. The dough should be pliable and spring back when gently pressed.
-
Grease a large mixing bowl with margarine. Place the kneaded dough into the greased bowl, turning it to coat all sides. This prevents the dough from drying out as it rises.
-
Cover the bowl tightly with saran wrap or a clean dish towel. Place the bowl in a warm place to allow the dough to rise. The ideal temperature is around 75-85°F. Let the dough rise until it has doubled in size, which typically takes about an hour. A good indication that the dough has risen enough is if you gently press your finger into it and the indentation remains.
-
Punch down the risen dough to release the trapped air. This helps to even out the texture of the bread. Divide the dough into three or four even parts, depending on the size of your loaf pans.
-
Take each of the three (or four) parts of dough and divide them into thirds again. You will now have nine or twelve pieces of dough in total. Shape each of these pieces into a ball by folding the edges under and tucking them in. This creates a smooth surface on the top of the ball.
-
Place three balls of dough into each of the greased loaf pans. Ensure they are evenly spaced. Cover the pans with saran wrap or a dish towel, and let them rise again until doubled, about 1 hour. This second rise allows the bread to achieve a light and airy texture.
-
Preheat your oven to 375°F (190°C).
-
Place the loaf pans on the lower rack of the preheated oven. Bake for approximately 60 minutes, or until the loaves are golden brown and sound hollow when tapped on the bottom. Note: convection ovens may bake faster; begin checking for doneness around 30 minutes.
-
Once baked, remove the bread from the pans immediately and brush the tops with melted margarine for a beautiful sheen and added flavor. Place the loaves on wire racks to cool completely before slicing.
Expert Tips & Tricks
- For a richer flavor, try using dark molasses instead of light molasses.
- If your kitchen is cold, create a warm environment for rising dough by placing the bowl near a warm oven or in a slightly warmed (then turned off) oven.
- To prevent the tops of the loaves from browning too quickly, loosely tent them with foil during the last 15-20 minutes of baking.
- If the raisins seem dry, plump them up by soaking them in warm water for 15 minutes before adding them to the dough. Drain well before using.
- A stand mixer with a dough hook can be used to knead the dough if you prefer not to knead by hand.
Serving & Storage Suggestions
Serve this delicious molasses raisin bread warm, sliced, and spread with butter or your favorite jam. It’s also wonderful toasted or used for French toast. To store, wrap the cooled loaves tightly in plastic wrap or place them in an airtight container. At room temperature, it will last for 2-3 days. For longer storage, freeze the loaves for up to 2-3 months. To reheat, thaw completely and warm in a low oven or toast individual slices.
Nutritional Information
| Nutrient | Amount per Serving (estimated) | % Daily Value |
|---|---|---|
| Calories | 300 kcal | 15% |
| Total Fat | 5g | 8% |
| Saturated Fat | 1g | 5% |
| Cholesterol | 0mg | 0% |
| Sodium | 200mg | 8% |
| Total Carbohydrate | 55g | 18% |
| Dietary Fiber | 3g | 12% |
| Sugars | 20g | – |
| Protein | 7g | 14% |
Note: Nutritional information is an estimate and may vary based on specific ingredients and serving size.
Variations & Substitutions
- For a dairy-free version, use a dairy-free margarine alternative.
- Add chopped walnuts or pecans for extra texture and flavor.
- Experiment with other spices, such as nutmeg or cloves, in addition to or instead of cinnamon.
- Substitute some of the all-purpose flour with whole wheat flour for a healthier bread.
- Add a simple glaze of powdered sugar and milk or lemon juice for a sweeter topping.
FAQs (Frequently Asked Questions)
Q: Why is my dough not rising?
A: The most common reasons are that the yeast is inactive (check the expiration date and ensure the water is lukewarm, not hot), the environment is too cold, or there isn’t enough sugar to feed the yeast.
Q: Can I use bread flour instead of all-purpose flour?
A: Yes, bread flour will result in a slightly chewier and more structured bread.
Q: How do I prevent the raisins from sinking to the bottom of the loaf?
A: Ensure the dough is properly kneaded and has developed sufficient gluten. Also, lightly coat the raisins in flour before adding them to the dough.
Q: Can I make this recipe in a bread machine?
A: Yes, you can adapt this recipe for a bread machine. Follow your machine’s instructions for adding ingredients and selecting the appropriate setting.
Q: How can I tell if the bread is fully baked?
A: The bread should be golden brown and sound hollow when tapped on the bottom. An internal temperature of 200-210°F (93-99°C) indicates it’s fully baked.
Final Thoughts
This molasses raisin bread is more than just a recipe; it’s a connection to the past, a taste of tradition, and a symbol of home. I encourage you to try baking this loaf and experience the warmth and comfort it brings. Share it with loved ones, savor each bite, and let the aroma fill your kitchen with the scent of sweet memories. And please, let me know what you think! I’d love to hear how it turns out for you. Pair it with a cup of hot tea or coffee for the ultimate comforting experience.