
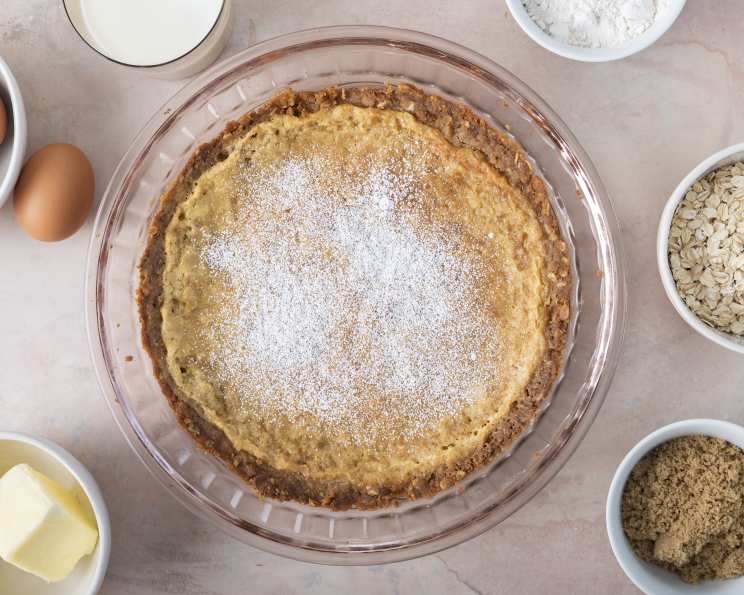
Decadence Defined: Mastering the Momofuku Crack Pie
My first encounter with Momofuku Crack Pie wasn’t in a New York restaurant, but in a cramped, sweltering apartment kitchen during a college baking competition. The air, thick with flour and ambition, crackled with the energy of sleep-deprived students attempting culinary feats beyond their ramen-fueled capabilities. While my own chocolate lava cakes tragically cratered, a friend presented a pie so unassuming in appearance, yet so devastatingly delicious, that it instantly stole the show. One bite of that sweet, salty, impossibly rich concoction, and I understood the hype. This pie wasn’t just dessert; it was an experience, a sugar-fueled symphony of textures and flavors that lingered long after the last crumb disappeared. I’ve been chasing that first bite ever since, refining my technique and sharing this recipe with anyone brave enough to enter the danger zone.
Recipe Overview
- Prep Time: 1 hour 20 minutes
- Cook Time: 25 minutes
- Total Time: 2 hours 45 minutes
- Servings: 16
- Yield: 2 10-inch pies
- Dietary Type: Not easily adaptable for dietary restrictions
Ingredients
For the Cookie:
- 3 ounces all-purpose flour (2/3 cup plus 1 tablespoon)
- 1/8 teaspoon baking powder, scant
- 1/8 teaspoon baking soda, scant
- 1/4 teaspoon salt
- 1/2 cup (1 stick) butter, softened
- 2 1/2 ounces light brown sugar (1/3 cup)
- 1 1/4 ounces white sugar (3 tablespoons)
- 1 egg
- 3 1/2 ounces rolled oats (scant 1 cup)
For the Crust:
- 1/4 cup (1/2 stick) butter
- 3/4 ounce light brown sugar (1 1/2 tablespoons)
- 1/8 teaspoon salt
For the Filling:
- 10 1/2 ounces white sugar (1 1/2 cups)
- 7 ounces light brown sugar (1 cup less 3 1/2 tsp)
- 1/4 teaspoon salt
- 3/4 ounce powdered milk (1/3 cup plus 1 teaspoon)
- 1 cup (2 sticks) butter, melted
- 7/8 cup heavy cream (3/4 cup plus 2 tablespoons, scant)
- 1 teaspoon vanilla extract
- 8 egg yolks
- Powdered sugar, for garnish
Equipment Needed
- Large mixing bowl
- Stand mixer or hand-held electric mixer
- 9×13 baking sheet
- Cooling rack
- Food processor
- Two 10-inch pie pans
- Whisk
- Oven
Instructions
- Preheat your oven to 375°F (190°C).
- In a large bowl, sift together the flour, baking powder, baking soda, and salt. Sifting ensures that these dry ingredients are evenly distributed and that there are no lumps, leading to a more consistent cookie base.
- In a stand mixer fitted with the paddle attachment (or using a large mixing bowl with a hand-held electric mixer), cream together the softened butter, light brown sugar, and white sugar until the mixture is light and fluffy. This step is crucial for incorporating air and creating a tender cookie. The mixture should change in color and texture, becoming paler and more voluminous.
- Add the egg to the creamed mixture and beat until fully combined. Ensure that the egg is fully incorporated to prevent separation later.
- With the mixer running on low speed, add the sifted flour mixture in small increments until just combined. Be careful not to overmix, as this will develop the gluten in the flour and result in a tough cookie.
- Add the rolled oats and mix until just combined. The oats provide texture and a nutty flavor to the cookie base.
- Spread the mixture evenly into an unlined and ungreased 9×13 inch baking sheet. Using an unlined sheet allows the cookie to bake evenly and develop a crisp edge.
- Bake in the preheated oven for about 20 minutes, or until golden brown and set. The cookie should be firm to the touch and slightly browned around the edges.
- Cool for a few minutes in the pan before turning it out onto a wire rack to cool completely. This prevents the cookie from sticking to the pan and allows it to cool evenly. Lower the oven temperature to 350°F (175°C) while the cookie cools.
- Crumble the cooled cookie into the workbowl of a food processor.
- Add the butter, brown sugar, and salt to the food processor.
- Pulse until the mixture is combined and resembles coarse crumbs. The mixture should hold together when pinched between your fingers. This forms the base for your crust.
- Divide the crumb mixture evenly between the two 10-inch pie pans.
- Press the mixture into an even, thin layer on the bottom and up the sides of each pie pan. The top edge will naturally be ragged. This forms the cookie crust for the pie.
- In a large bowl, whisk together the white sugar, light brown sugar, salt, and powdered milk.
- Add the melted butter, heavy cream, and vanilla extract to the sugar mixture and whisk until smooth. Ensure the butter is fully melted and incorporated for a smooth, emulsified filling.
- Whisk in the egg yolks one at a time. Be careful not to over-whisk and incorporate too much air into the mixture. Overmixing can lead to a pie that puffs up too much during baking and then collapses.
- Divide the filling evenly between the two pie crusts.
- Bake one pie at a time for 15 minutes, then reduce the oven temperature to 325°F (160°C) and continue baking for another 10 minutes. The filling should be golden brown but still slightly jiggly in the center, similar to the consistency of a pecan pie. This ensures the filling is cooked through but remains gooey and delicious.
- Place the pie pans on a wire rack to cool completely.
- Refrigerate the pies until well-chilled. The filling will firm up and become even gooier as it chills.
- Before serving, dust the pies generously with powdered sugar.
Expert Tips & Tricks
- Don’t skip the powdered milk. It contributes to the unique flavor and texture of the filling, adding a subtle tang and richness. If you absolutely can’t find it, you could try using a very small amount of cornstarch (about a teaspoon) for a similar effect, but the flavor won’t be quite the same.
- Use high-quality butter. Because the butter flavor is prominent, splurge on a good brand. European-style butter with a higher fat content will result in a richer, more flavorful pie.
- The filling should be just jiggly. Overbaking will result in a dry, crumbly pie. Err on the side of underbaking; the filling will continue to set as it cools in the refrigerator.
- For an even richer flavor, consider browning the butter before adding it to the filling. This adds a nutty, caramelized note that complements the sweetness of the pie. Just be sure to let it cool slightly before adding it to the other ingredients.
Serving & Storage Suggestions
Crack Pie is best served chilled, allowing the gooey filling to firm up slightly. A generous dusting of powdered sugar just before serving adds a touch of elegance. The pie is incredibly rich, so smaller slices are recommended.
To store leftovers, tightly wrap the pie in plastic wrap and store it in the refrigerator for up to 3-4 days. The texture may change slightly over time, but the flavor will remain delicious.
While it is possible to freeze Crack Pie, the texture of the filling may be affected upon thawing. If freezing, wrap the pie tightly in plastic wrap and then in aluminum foil. Thaw overnight in the refrigerator before serving.
Nutritional Information
| Nutrient | Amount per Serving | % Daily Value |
|---|---|---|
| Calories | 452 kcal | N/A |
| Calories from Fat | 252 g | 56% |
| Total Fat | 28.1 g | 43% |
| Saturated Fat | 16.9 g | 84% |
| Cholesterol | 167.1 mg | 55% |
| Sodium | 304.6 mg | 12% |
| Total Carbohydrate | 48.1 g | 16% |
| Dietary Fiber | 0.8 g | 3% |
| Sugars | 39.1 g | 156% |
| Protein | 3.8 g | 7% |
Note: Daily values are based on a 2,000 calorie diet. Nutritional information is an estimate and may vary based on specific ingredients and preparation methods.
Variations & Substitutions
- Gluten-Free Adaptation: While the original recipe relies heavily on wheat flour, a gluten-free version is possible. Substitute the all-purpose flour in the cookie base with a high-quality gluten-free all-purpose blend. Ensure the blend contains xanthan gum or add a small amount (about 1/2 teaspoon) to provide structure. Also, verify that your rolled oats are certified gluten-free.
- Salted Caramel Crack Pie: Swirl in a ribbon of salted caramel sauce (homemade or store-bought) into the filling before baking for an extra layer of decadent flavor.
- Citrus Zest Infusion: Add the zest of one lemon or orange to the filling for a bright, citrusy counterpoint to the richness of the pie.
- Nutty Variation: Add 1/2 cup of chopped pecans or walnuts to the cookie crust for added texture and flavor.
FAQs (Frequently Asked Questions)
Q: Why is it called “Crack Pie”?
A: The name comes from the pie’s addictive quality. Once you have a slice, it’s hard to stop!
Q: Can I use a pre-made cookie crust to save time?
A: While you could, the homemade cookie crust is what truly makes this pie special. The texture and flavor are far superior to anything store-bought.
Q: My filling puffed up too much while baking. What did I do wrong?
A: You likely incorporated too much air into the filling. Be careful not to over-whisk the egg yolks.
Q: How do I know when the pie is done?
A: The filling should be golden brown and still slightly jiggly in the center, like a pecan pie. It will continue to set as it cools.
Q: Can I make this ahead of time?
A: Absolutely! In fact, it’s best to make Crack Pie a day in advance to allow the flavors to meld and the filling to set properly.
Final Thoughts
Now that you’re armed with this recipe, it’s time to unleash your inner pastry chef and create your own version of Momofuku’s legendary Crack Pie. Don’t be intimidated by the ingredient list; each component plays a vital role in achieving that perfect balance of sweet, salty, and utterly irresistible. Bake a pie (or two!), share it with friends and family (or hoard it for yourself – we won’t judge), and bask in the glory of creating something truly extraordinary. And, please, share your baking adventures and feedback with me – I’m always eager to learn from fellow pie enthusiasts. Who knows, maybe your twist on this classic will become the next viral sensation!