
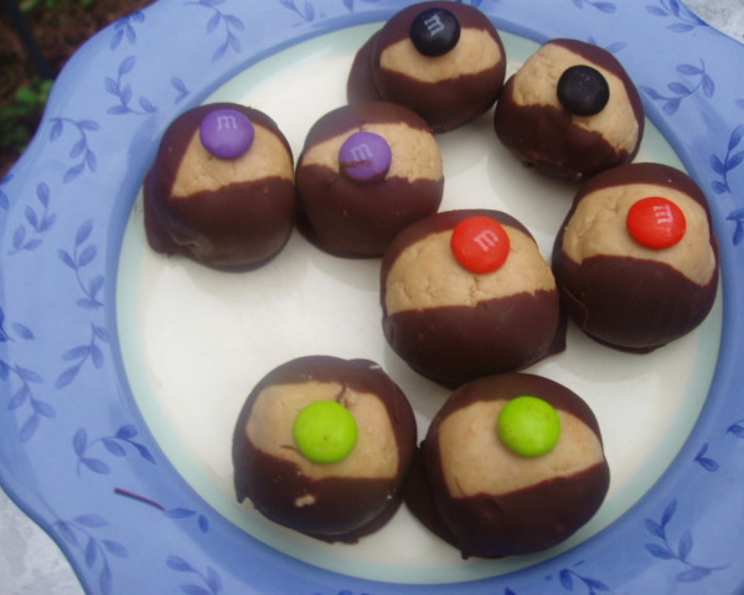
Monster Eyeballs: A Spooktacular Treat
My first Halloween as a newly minted pastry chef was a blur of fondant ghosts, buttercream spiders, and enough food coloring to stain my hands for a week. But among the elaborate creations, it was the simplest treat – a batch of peanut butter “monster eyeballs” a colleague made – that stole the show. There was something so charmingly grotesque about them, and the combination of creamy peanut butter and rich chocolate was an instant crowd-pleaser. I’ve been making them every year since, and they’re always a hit with kids and adults alike.
Recipe Overview
- Prep Time: 20 minutes
- Cook Time: 2 minutes
- Total Time: 40 minutes (plus chilling time)
- Servings: 48
- Yield: 48 eyeballs
- Dietary Type: Vegetarian
Ingredients
- 1 1⁄2 cups creamy peanut butter
- 1⁄2 cup butter, at room temperature
- 1 (1 lb) package confectioners’ sugar (about 4 cups)
- 1 teaspoon vanilla extract
- 1 (12 ounce) package semi-sweet chocolate chips (2 cups)
- 2 tablespoons vegetable shortening
- 1 (3 ounce) package miniature M&M’s chocolate candies
Equipment Needed
- Rimmed baking sheet
- Wax paper or parchment paper
- Medium bowl
- Microwave-safe bowl
- Fork or toothpick
Instructions
- In a medium bowl, thoroughly blend the peanut butter with the butter, confectioners’ sugar, and vanilla extract. The easiest way to do this is with your hands, which makes it a fun activity for kids to help with! The mixture should form a smooth, pliable dough.
- Line a rimmed baking sheet with wax paper or parchment paper. This prevents the eyeballs from sticking and makes cleanup a breeze.
- Using a teaspoon, roll the peanut butter mixture into small balls. Aim for consistent sizes so the finished eyeballs look uniform.
- Place the peanut butter balls on the prepared baking sheet.
- Refrigerate the baking sheet for at least 1 hour. This chilling time is essential for firming up the peanut butter balls, making them easier to dip in chocolate.
- While the peanut butter balls are chilling, prepare the chocolate coating. In a microwave-safe bowl, combine the semi-sweet chocolate chips and vegetable shortening.
- Melt the chocolate in the microwave. Heat on high for 60 seconds, then stir well. If the chocolate is not completely smooth, heat in two or three 10-second bursts, stirring well after each burst. Be careful not to overheat the chocolate, as it can seize up and become grainy. Alternatively, you can melt the chocolate, stirring frequently, in a double boiler over just-simmering water. Avoid overheating.
- Remove the sheet of chilled peanut butter balls from the refrigerator.
- Using a fork or a toothpick, dip each peanut butter ball most of the way into the melted chocolate, leaving a round or oval opening of undipped peanut butter on top. This opening will become the “cornea” of the eyeball.
- Hold each dipped ball over the bowl of melted chocolate to allow any excess chocolate to drip off.
- Return the dipped peanut butter ball to the wax paper, cornea side up.
- Place an M&M in the center of the peanut butter cornea to create the “iris”. Choose M&Ms in various colors to create a more realistic and spooky effect.
- Once all the eyeballs are decorated, refrigerate them for at least 1 hour before serving. This allows the chocolate to set completely and the eyeballs to firm up.
- Store the monster eyeballs in the refrigerator or freezer for longer storage, and serve chilled.
Expert Tips & Tricks
- For a smoother chocolate coating, add a teaspoon of coconut oil to the chocolate chips and shortening before melting.
- If you don’t have miniature M&Ms on hand, you can use regular-sized M&Ms, but you may need to break them in half. Alternatively, you could use other small candies, such as sprinkles or colored sugar, to decorate the irises.
- To avoid fingerprints on the chocolate, use a toothpick to gently nudge the M&Ms into place.
- If the chocolate starts to harden while you’re dipping, simply reheat it in the microwave in short bursts, stirring frequently.
- For a more intense peanut butter flavor, use natural peanut butter (the kind you have to stir) but be sure to mix it very well first.
- If the peanut butter mixture is too soft to roll into balls, add a little more confectioners’ sugar, a tablespoon at a time, until it reaches the desired consistency.
- To create a marbled effect in the chocolate coating, swirl in a small amount of white chocolate or dark chocolate after melting the semi-sweet chocolate.
- Add a tiny drop of red food coloring to the peanut butter mixture before rolling it into balls for a bloody-eye look, if you dare!
- If you are having trouble dipping the peanut butter balls, try freezing them for 15 minutes before dipping.
Serving & Storage Suggestions
These Monster Eyeballs are best served chilled, straight from the refrigerator. Arrange them on a platter for a spooky Halloween party, or package them in individual treat bags as party favors. They are a perfect addition to any Halloween dessert table.
Store the leftovers in an airtight container in the refrigerator for up to a week, or in the freezer for up to a month. If freezing, allow them to thaw in the refrigerator before serving.
They don’t hold up well at room temperature for extended periods, as the chocolate may melt.
Nutritional Information
| Nutrient | Amount per Serving | % Daily Value |
|---|---|---|
| Calories | 148.9 kcal | N/A |
| Calories from Fat | 81 kcal | 55% |
| Total Fat | 9.1 g | 13% |
| Saturated Fat | 3.7 g | 18% |
| Cholesterol | 5.3 mg | 1% |
| Sodium | 52.7 mg | 2% |
| Total Carbohydrate | 16.7 g | 5% |
| Dietary Fiber | 0.9 g | 3% |
| Sugars | 13.9 g | N/A |
| Protein | 2.4 g | 4% |
Variations & Substitutions
- Nut-Free Option: Replace the peanut butter with sunflower seed butter or another nut-free alternative.
- Dark Chocolate Eyeballs: Use dark chocolate chips instead of semi-sweet for a richer, more intense chocolate flavor.
- White Chocolate Eyeballs: Use white chocolate chips for a different color and flavor profile. You can also add a drop of food coloring to the white chocolate to create brightly colored eyeballs.
- Vegan Eyeballs: Use vegan butter and chocolate chips. Many brands of confectioners’ sugar are not vegan due to bone char filtration, so make sure to find a vegan-friendly brand.
- Peppermint Eyeballs: Add a few drops of peppermint extract to the melted chocolate for a refreshing twist.
- Almond Joy Eyeballs: Add a sprinkle of shredded coconut on top of the chocolate before it sets and use an almond in the center instead of an M&M.
FAQs (Frequently Asked Questions)
Q: Can I make these ahead of time?
A: Absolutely! In fact, it’s recommended to make them at least a few hours ahead of time to allow the chocolate to set completely.
Q: Can I freeze these?
A: Yes, you can freeze them for up to a month. Just make sure to store them in an airtight container to prevent freezer burn.
Q: The chocolate is seizing up when I melt it. What am I doing wrong?
A: Overheating the chocolate is the most common cause of seizing. Try melting it in shorter bursts, stirring well after each burst. Make sure that no water gets into the chocolate, as even a tiny drop can cause it to seize.
Q: My peanut butter balls are too soft to roll. What can I do?
A: Add a little more confectioners’ sugar, a tablespoon at a time, until the mixture reaches the desired consistency. You can also chill the mixture for a while before rolling it into balls.
Q: Can I use regular M&Ms instead of miniature ones?
A: Yes, you can, but the miniature ones are a better size for the eyeballs. If you use regular M&Ms, you may need to break them in half.
Final Thoughts
So, gather your little monsters, preheat your… well, actually, no preheating required! That’s part of the beauty of this recipe. This Halloween, ditch the store-bought candies and create a batch of these delightfully creepy Monster Eyeballs. They are sure to be a hit at your Halloween party, and they are so much fun to make. Don’t be afraid to get creative with your decorations and experiment with different flavors. And most importantly, have fun! I’d love to hear about your spooky creations – share your experiences and photos. Perhaps pair them with a dark roast coffee for the adults while the kids enjoy their sweet treats. Happy haunting!