
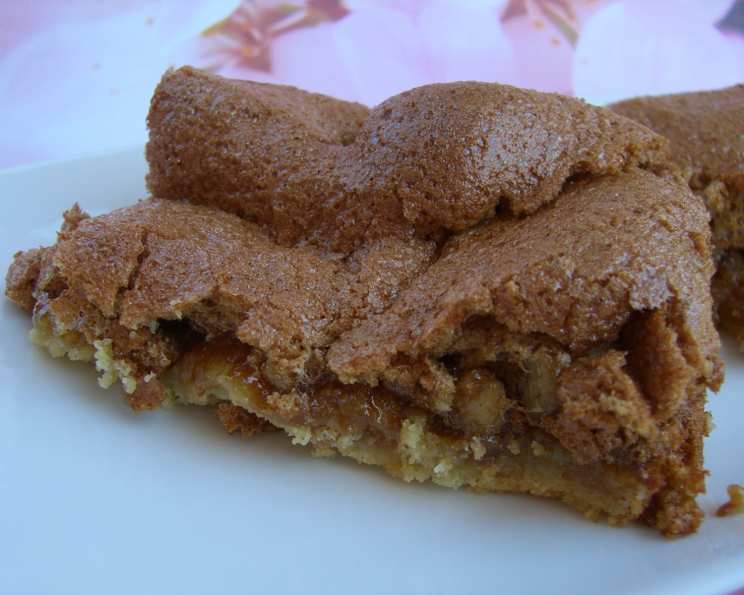
Mud Hen Cookies: A Slice of Nostalgia
My grandmother, bless her heart, wasn’t much for fancy desserts. Chocolate lava cakes and intricate pastries? Not in her repertoire. But her repertoire did include the most wonderfully unassuming, slightly-crisp, perfectly sweet “Mud Hen Cookies,” as she called them. I remember standing on a stool next to her, mesmerized as she transformed simple ingredients into these delightful treats. The aroma of vanilla and toasted nuts would fill the kitchen, a promise of the joy to come. Even now, one bite takes me right back to her warm kitchen, a place filled with love and the simple pleasures of life. Where the name came from is lost to time, but the cookies remain a cherished tradition.
Recipe Overview
- Prep Time: 20 minutes
- Cook Time: 30 minutes
- Total Time: 50 minutes
- Servings: 24
- Yield: 24 squares
- Dietary Type: Not specified
Ingredients
- 1/2 cup butter, softened
- 1 cup sugar
- 3 large eggs, reserve whites
- 1 1/2 cups flour
- 1 teaspoon baking powder
- 1 teaspoon vanilla
- 1/2 teaspoon salt
- 1 cup nuts, chopped (walnuts, pecans, or a mix work well)
- 1 cup brown sugar, packed
Equipment Needed
- 9×13 inch baking pan
- Mixing bowls
- Electric mixer (optional, but recommended)
- Measuring cups and spoons
- Spatula
Instructions
-
Preheat your oven to 350°F (175°C). Make sure your oven rack is positioned in the center.
-
In a large mixing bowl, cream together the softened butter and sugar until light and fluffy. An electric mixer will make this process much easier, but you can certainly do it by hand.
-
Add the three egg yolks (reserving the whites for later), flour, baking powder, vanilla, and salt to the butter and sugar mixture. Mix until just combined. Be careful not to overmix, as this can result in a tough cookie.
-
Grease a 13×9 inch baking pan thoroughly. This is crucial to prevent the cookies from sticking. You can use butter, shortening, or cooking spray. I personally prefer lining the pan with parchment paper, leaving an overhang, for easy removal later.
-
Spread the batter very thinly and evenly in the prepared baking pan. A spatula or the back of a spoon works well for this. The batter will seem sparse, but it will spread during baking.
-
Sprinkle the chopped nuts evenly over the batter. Distribute them as uniformly as possible to ensure every bite has a nutty crunch.
-
In a clean, dry mixing bowl, beat the reserved egg whites until stiff peaks form. This is best achieved with an electric mixer. Make sure there’s no grease or yolk contamination for optimal volume.
-
Gradually add the packed brown sugar to the stiff egg whites, continuing to beat until the mixture is glossy and forms stiff peaks. This meringue topping is what gives the cookies their unique texture and sweetness.
-
Spread the brown sugar meringue evenly over the chopped nuts. Gently spread it to the edges of the pan, ensuring the nuts are completely covered.
-
Bake in the preheated oven for 30 minutes, or until the meringue topping is lightly golden brown and the edges are set. Keep a close eye on the cookies during the last few minutes of baking to prevent burning.
-
Remove the pan from the oven and let the cookies cool slightly in the pan before cutting them into squares while still warm. They will be easier to cut when warm. If you used parchment paper, lift the whole sheet out and onto a cutting board to make this easier.
Expert Tips & Tricks
- For a deeper, richer flavor, use brown butter instead of regular softened butter. Simply melt the butter in a saucepan over medium heat, swirling occasionally, until it turns a nutty brown color and smells fragrant. Let it cool slightly before using.
- To prevent the meringue topping from weeping, ensure that the egg whites are beaten to very stiff peaks before adding the brown sugar.
- If you prefer a chewier cookie, underbake them slightly. If you prefer a crispier cookie, bake them for a few minutes longer.
- Don’t overmix the initial batter. Overmixing develops the gluten in the flour, resulting in a tough cookie. Mix until just combined.
Serving & Storage Suggestions
These Mud Hen Cookies are delicious served warm or at room temperature. They are perfect with a cup of coffee, tea, or a glass of cold milk. To store, place the cooled cookies in an airtight container at room temperature for up to 3 days. For longer storage, you can freeze them for up to 2 months. Thaw them at room temperature before serving. They taste especially good when served alongside a scoop of vanilla ice cream.
Nutritional Information
| Nutrient | Amount per Serving | % Daily Value |
|---|---|---|
| Calories | 172.8 kcal | – |
| Calories from Fat | – | 39% |
| Total Fat | 7.5 g | 11% |
| Saturated Fat | 3 g | 15% |
| Cholesterol | 36.6 mg | 12% |
| Sodium | 141.5 mg | 5% |
| Total Carbohydrate | 24.8 g | 8% |
| Dietary Fiber | 0.7 g | 2% |
| Sugars | 17.5 g | 70% |
| Protein | 2.6 g | 5% |
Note: Nutritional information is an estimate and may vary based on specific ingredients and preparation methods.
Variations & Substitutions
- Gluten-Free: Substitute the all-purpose flour with a gluten-free blend. Be sure to use a blend that contains xanthan gum for binding.
- Nut-Free: Replace the chopped nuts with sunflower seeds, pumpkin seeds, or toasted coconut flakes.
- Spice it up: Add a pinch of cinnamon or nutmeg to the batter for a warmer flavor.
- Citrus Zest: Add the zest of one lemon or orange to the meringue topping for a bright, citrusy twist.
- Chocolate Chips: Sprinkle a handful of chocolate chips over the batter along with the nuts for an extra layer of decadence.
FAQs (Frequently Asked Questions)
Q: Why are these cookies called “Mud Hen Cookies”?
A: The origin of the name is unknown. It’s a mystery lost to time, but the recipe is a cherished classic.
Q: Can I use a different type of nut?
A: Absolutely! Walnuts and pecans are great options, but you can also use almonds, hazelnuts, or any other nut you prefer.
Q: How do I prevent the egg whites from deflating?
A: Ensure your mixing bowl and whisk are completely clean and dry. Any trace of grease or yolk can prevent the egg whites from whipping properly.
Q: Can I make these cookies ahead of time?
A: Yes, you can bake the cookies a day ahead of time. Store them in an airtight container at room temperature.
Q: What if my meringue topping starts to brown too quickly?
A: Tent the pan loosely with foil to prevent further browning while the rest of the cookie finishes baking.
Final Thoughts
These Mud Hen Cookies are more than just a dessert; they’re a slice of history, a taste of nostalgia, and a testament to the simple pleasures in life. I encourage you to try this recipe and experience the joy of baking these wonderfully unassuming treats. Share them with your loved ones, create your own memories, and perhaps even discover the secret behind the enigmatic name. And if you do find out where the name came from, please let me know! Happy baking!