
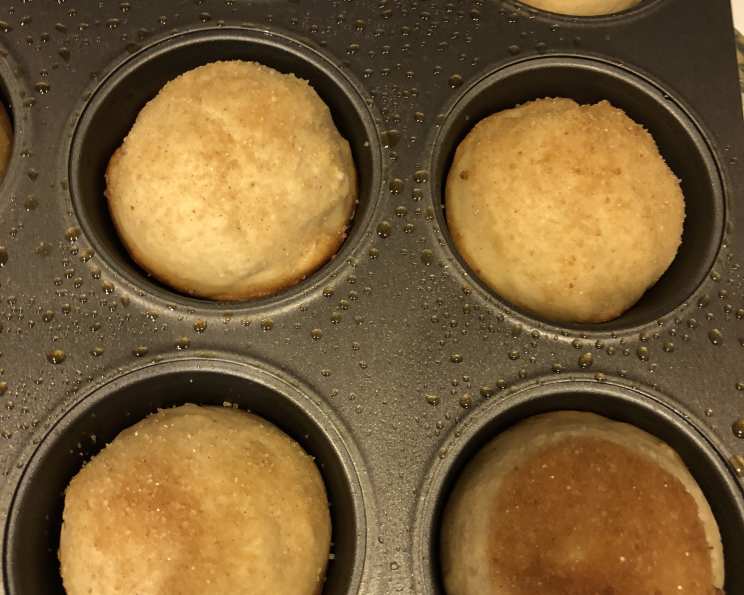
Muffins That Taste Like Doughnuts: A Sweet Nostalgia
The scent of warm doughnuts frying used to fill our kitchen every Saturday morning. My grandfather, a retired baker, would meticulously craft them, his hands dusted with flour, a smile playing on his lips. He’d let me ‘help,’ which usually meant sprinkling too much sugar and eating the occasional imperfect ring. While those Saturdays are long past, I’ve found a way to capture that same comforting, cinnamon-sugared joy in these incredible muffins. They’re not quite doughnuts, but each bite evokes the same warm, fuzzy feeling – a perfect blend of nostalgia and deliciousness.
Recipe Overview
- Prep Time: 10 minutes
- Cook Time: 20-25 minutes
- Total Time: 30-35 minutes
- Servings: 12
- Yield: 12 muffins
- Dietary Type: Vegetarian
Ingredients
Muffins:
- 1 ¾ cups flour
- 1 ½ teaspoons baking powder
- ½ teaspoon salt
- ½ teaspoon nutmeg
- ¼ teaspoon cinnamon
- ⅓ cup oil (vegetable or canola works well)
- ¾ cup white sugar
- 1 egg
- ¾ cup milk
Topping:
- ½ cup melted butter (unsalted)
- ¾ cup sugar
- 1 teaspoon cinnamon
Equipment Needed
- 12-cup muffin tin
- Mixing bowls
- Measuring cups and spoons
- Whisk or mixing spoon
- Small bowl for melted butter
- Small bowl for cinnamon-sugar mixture
- Wire rack
Instructions
- Preheat your oven to 350°F (175°C). This is crucial for even baking, allowing the muffins to rise properly and develop a golden crust.
- In a medium mixing bowl, whisk together the dry ingredients: flour, baking powder, salt, nutmeg, and cinnamon. Whisking ensures the ingredients are evenly distributed, preventing pockets of baking powder or salt in the final product.
- In a separate, larger mixing bowl, combine the wet ingredients: oil, egg, sugar, and milk. Whisk or stir these ingredients together until they are well combined and the sugar has started to dissolve.
- Gradually add the dry ingredients to the wet ingredients. Gently stir until just combined. Be careful not to overmix the batter; overmixing can develop the gluten in the flour, resulting in tough muffins. A few streaks of flour are perfectly fine.
- Grease your muffin tin thoroughly. You can use cooking spray, melted butter, or even paper liners. The goal is to prevent the muffins from sticking to the pan.
- Spoon the muffin batter into the prepared muffin tin, filling each cup about two-thirds full. This allows room for the muffins to rise without overflowing.
- Bake in the preheated oven for 20-25 minutes, or until a wooden skewer inserted into the center of a muffin comes out clean. Keep a close eye on them towards the end of the baking time to prevent burning.
- While the muffins are baking, prepare the topping. In one small bowl, melt the butter. In another small bowl, mix together the sugar and cinnamon.
- Once the muffins are baked, remove them from the oven and let them cool slightly in the muffin tin for a few minutes. This makes them easier to handle.
- Gently remove the muffins from the tin and let them cool slightly.
- While the muffins are still warm, dip the tops of each muffin into the melted butter, allowing the excess to drip off.
- Immediately dip the buttered tops into the cinnamon-sugar mixture, ensuring they are evenly coated. The melted butter helps the cinnamon-sugar adhere to the muffins.
- Place the coated muffins on a wire rack to cool completely. This will prevent the bottoms from becoming soggy.
Expert Tips & Tricks
- For extra moist muffins, add a tablespoon of sour cream or plain yogurt to the wet ingredients.
- If you want a richer, more intense flavor, use brown butter instead of melted butter for the topping. To make brown butter, melt the butter in a saucepan over medium heat, continuing to cook until the butter turns a nutty brown color and has a fragrant aroma.
- Don’t have nutmeg on hand? You can substitute with a pinch of allspice for a similar warm, spicy note.
- Make ahead: The dry ingredients can be mixed together and stored in an airtight container for up to a week. The wet ingredients can also be pre-mixed and stored in the refrigerator for up to 24 hours. When you’re ready to bake, simply combine the wet and dry ingredients according to the recipe.
- If you find that your muffins are browning too quickly, you can tent them with foil during the last few minutes of baking. This will prevent them from burning.
- To check for doneness, gently press the top of a muffin. If it springs back, it’s done. If it leaves an indentation, it needs a little more time.
Serving & Storage Suggestions
These muffins are best served warm, straight from the oven, but they are also delicious at room temperature. Pair them with a hot cup of coffee, tea, or a glass of cold milk for a satisfying breakfast or snack.
To store leftover muffins, place them in an airtight container at room temperature for up to 2 days. For longer storage, you can freeze them for up to 2 months. To freeze, wrap each muffin individually in plastic wrap and then place them in a freezer bag or container. Thaw the muffins at room temperature before serving. To reheat, microwave for a few seconds or warm in a low oven.
Nutritional Information
| Nutrient | Amount per Serving | % Daily Value |
|---|---|---|
| Calories | 301.6 kcal | N/A |
| Calories from Fat | 134 g | 44% |
| Total Fat | 14.9 g | 22% |
| Saturated Fat | 6.2 g | 30% |
| Cholesterol | 38 mg | 12% |
| Sodium | 223.9 mg | 9% |
| Total Carbohydrate | 40.1 g | 13% |
| Dietary Fiber | 0.7 g | 2% |
| Sugars | 25.1 g | 100% |
| Protein | 3 g | 6% |
Note: Nutritional information is an estimate and may vary based on specific ingredients and portion sizes.
Variations & Substitutions
- Spice it up: Add a pinch of cardamom or ginger to the dry ingredients for a more complex flavor profile.
- Chocolate chips: Fold in ½ cup of chocolate chips to the batter for a chocolate-doughnut inspired muffin.
- Gluten-free: Substitute the all-purpose flour with a gluten-free blend for a gluten-free version. Be sure to use a blend that contains xanthan gum or add it separately to help bind the ingredients.
- Dairy-free: Replace the milk with almond milk, soy milk, or oat milk. Ensure the butter is a dairy-free version.
- Lemon zest: Add the zest of one lemon to the batter for a bright, citrusy twist.
FAQs (Frequently Asked Questions)
Q: Can I use self-rising flour instead of all-purpose flour and baking powder?
A: No, it’s best to stick to the recipe as written. Self-rising flour contains both flour and baking powder, but the ratio might not be exactly right for this recipe, which could affect the texture of the muffins.
Q: Can I use brown sugar instead of white sugar?
A: Yes, you can substitute brown sugar for white sugar in both the muffins and the topping. Brown sugar will add a slightly molasses-like flavor and make the muffins a bit more moist.
Q: Why are my muffins dry?
A: Overbaking is the most common cause of dry muffins. Make sure to check for doneness with a wooden skewer and remove the muffins from the oven as soon as they are done. Also, be careful not to overmix the batter.
Q: Can I freeze the muffins after they are dipped in butter and sugar?
A: Yes, you can freeze the muffins after they are dipped, but the cinnamon-sugar topping may become slightly sticky after thawing. However, the flavor will still be delicious.
Q: My cinnamon-sugar mixture is clumping up. What can I do?
A: This can happen if the melted butter is too hot. Let the butter cool slightly before dipping the muffins. You can also try adding a tablespoon of milk to the cinnamon-sugar mixture to help moisten it.
Final Thoughts
These “doughnut” muffins are a simple yet incredibly satisfying treat that’s sure to bring a smile to your face. They’re perfect for a weekend breakfast, a quick afternoon snack, or even a special occasion. Don’t be afraid to experiment with different variations and substitutions to create your own unique twist. And most importantly, have fun in the kitchen! I encourage you to bake these with loved ones, share the delicious results, and create your own sweet memories around this delightful recipe. Enjoy!