
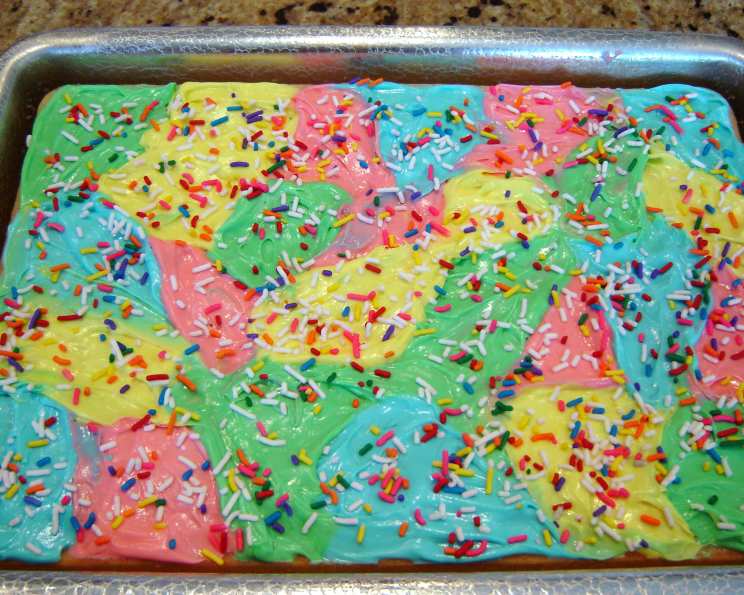
A Symphony of Color: Mastering the Multi-Color Frosting Technique
I remember the first time I tried to frost a cake. It was for my little brother’s birthday, and I envisioned a smooth, flawless surface. Instead, I ended up with a lumpy, uneven mess! But I learned from that experience, and over the years, I’ve discovered techniques that not only make frosting easier but also allow for stunning visual effects. One of my absolute favorites is the multi-color frosting technique. It’s playful, vibrant, and perfect for celebrations—plus, it’s surprisingly simple to achieve, even for a novice baker.
Recipe Overview
- Prep Time: 15 minutes
- Total Time: 20 minutes
- Servings: varies, depending on cake size
- Yield: enough to frost one standard layer cake
- Dietary Type: Varies based on frosting used, typically vegetarian
Ingredients
- 1 (16 ounce) can vanilla frosting (ensure it’s a smooth, creamy variety for best results)
- Food coloring (gel food coloring is recommended for vibrant colors; liquid food coloring can also be used, but may require more to achieve the desired shade)
- Candy sprinkles (choose your favorite variety; consider coordinating colors with your frosting)
Equipment Needed
- Four small bowls
- Spoons or spatulas
- Cake stand or serving plate
Instructions
- Begin by dividing the vanilla frosting evenly into four separate bowls. This ensures you have an equal amount of frosting for each color.
- Tint one bowl of frosting pink using several drops of red food coloring. Start with a few drops and mix thoroughly. Add more, one drop at a time, until you achieve your desired shade of pink. Remember, the color will deepen slightly as it sits.
- Repeat the tinting process with green, blue, and yellow food coloring, using the remaining bowls of frosting. Again, add the food coloring gradually until you reach the desired colors. Mix each bowl thoroughly to ensure the color is evenly distributed.
- Now comes the fun part! Using a spoon, randomly drop spoonfuls of the tinted frosting over the top of your cake. There’s no right or wrong way to do this; just let your creativity flow. Try to distribute the colors evenly across the surface.
- Starting at the edges of the cake, carefully spread the frosting to cover the entire cake. Be mindful not to overlap the colors too much or smear them together excessively. The goal is to create a marbled effect, where each color remains distinct yet blends harmoniously with the others. Use a light touch and gentle strokes to avoid muddying the colors.
- Immediately after frosting, generously cover the cake with your chosen candy sprinkles. The sprinkles will adhere best to the fresh frosting.
Expert Tips & Tricks
- Gel food coloring is your friend: It provides much more intense color than liquid food coloring, meaning you need less of it, which helps prevent the frosting from becoming too thin or runny.
- Don’t overmix: Overmixing the frosting after adding the food coloring can cause it to become tough. Mix just until the color is evenly distributed.
- Chill the cake: Before frosting, chilling the cake layers in the refrigerator for about 30 minutes will make them easier to handle and prevent them from crumbling.
- Palette knives are helpful: If you have a palette knife, use it to smooth the frosting for a more professional finish.
- Practice on a plate: Before frosting the actual cake, practice the technique on a plate to get a feel for how the colors blend.
- Customize your colors: Feel free to use any combination of colors you like. Pastel shades, neon hues, or even a monochrome palette can create stunning effects.
Serving & Storage Suggestions
Serve the multi-color frosted cake immediately for the best flavor and visual appeal. Alternatively, you can store it in the refrigerator for up to 3 days. To prevent the frosting from drying out, cover the cake loosely with plastic wrap or place it in an airtight container. It’s best to avoid freezing the cake, as the frosting may become grainy upon thawing. Let the cake come to room temperature for about 30 minutes before serving to allow the frosting to soften slightly.
Nutritional Information
(Note: The nutritional information is an estimate and may vary depending on the specific ingredients used, particularly the brand of frosting.)
| Nutrient | Amount per Serving | % Daily Value |
|---|---|---|
| Calories | 250 kcal | 13% |
| Total Fat | 10g | 15% |
| Saturated Fat | 6g | 30% |
| Cholesterol | 0mg | 0% |
| Sodium | 100mg | 4% |
| Total Carbohydrate | 40g | 13% |
| Dietary Fiber | 0g | 0% |
| Sugars | 30g | – |
| Protein | 1g | 2% |
Variations & Substitutions
- Vegan Frosting: Use a vegan vanilla frosting alternative and vegan food coloring for a fully plant-based version.
- Chocolate Cake: This technique works beautifully on chocolate cake, providing a vibrant contrast to the dark base.
- Seasonal Colors: As originally mentioned, adapt the colors to suit the occasion. Orange and black for Halloween, red and green for Christmas, pastel shades for Easter, etc.
- Flavor Infusions: Add a drop or two of flavored extracts (like lemon, almond, or peppermint) to each bowl of frosting to complement the colors.
- Ombre Effect: Instead of randomly dropping spoonfuls, create an ombre effect by applying darker shades at the bottom and gradually lightening towards the top.
FAQs (Frequently Asked Questions)
Q: Can I use whipped cream instead of frosting?
A: While possible, whipped cream is more delicate and may not hold the colors as well as frosting. It’s also more prone to melting, so it’s best to use it only if you plan to serve the cake immediately.
Q: What if I don’t have gel food coloring?
A: Liquid food coloring can be used, but you may need to add more to achieve the desired color intensity. Be careful not to add too much, as it can thin out the frosting.
Q: How can I prevent the colors from smearing together?
A: Use a light touch when spreading the frosting, and avoid overworking it. Work quickly to minimize blending. Chilling the cake before frosting can also help.
Q: Can I use this technique on cupcakes?
A: Absolutely! This technique works great on cupcakes. Simply apply the colored frosting in smaller dollops and spread gently.
Q: What if I don’t have sprinkles?
A: Sprinkles add a fun finishing touch, but they’re not essential. You can also use other toppings like chocolate shavings, chopped nuts, or fresh fruit.
Final Thoughts
This multi-color frosting technique is more than just a way to decorate a cake; it’s an invitation to express your creativity and add a touch of joy to any occasion. Don’t be afraid to experiment with different colors, textures, and toppings. The most important thing is to have fun and enjoy the process. Whether you’re celebrating a birthday, a holiday, or simply a beautiful day, this vibrant frosting technique is sure to bring a smile to everyone’s face. So, gather your ingredients, unleash your inner artist, and create a cake that’s as delicious as it is visually stunning! I’d love to see what you create, so please share your photos and feedback. And why not pair your colorful cake with a refreshing glass of iced tea or a scoop of your favorite ice cream for the ultimate sweet treat? Happy baking!