
The Hearty Embrace of Homemade Multi-Grain Bread
The aroma is what gets me every time. It’s a memory unlocked, a rush of warmth and comfort. My grandmother, bless her heart, always had a loaf of multi-grain bread on her counter, its nutty scent permeating the entire house. I remember sneaking slices as a child, the slight chewiness and satisfying weight a perfect afternoon snack. Recreating that experience, that memory, in my own kitchen is a small act of love, a way to keep her spirit alive with every single bite.
Recipe Overview
- Prep Time: 15 minutes
- Cook Time: 15 minutes
- Rise Time: 2 hours (1 hour for first rise, 1 hour for second rise)
- Total Time: 2 hours 30 minutes
- Servings: 4-5 loaves
- Dietary Type: Vegetarian (can be made Dairy-Free)
Ingredients
- ½ cup multi-grain hot cereal, (such as Bob’s Red Mill brand)
- 1 cup boiling water
- ¼ cup shortening
- 8 cups whole wheat flour
- 5 tablespoons gluten flour, plus 1 teaspoon gluten flour
- 4 teaspoons salt
- ⅔ cup brown sugar
- 8 teaspoons fast rising yeast
- 1 cup milk (or 1 cup soymilk for dairy-free)
- 2 cups hot water
Equipment Needed
- KitchenAid Stand Mixer (or similar stand mixer)
- Large oil-greased bowl
- Plastic wrap
- 4-5 loaf pans (8×4 inches)
- Measuring cups and spoons
- Mixing bowls
- Scale (optional, for precise dough division)
Instructions
-
Soak the Cereal: In a mixing bowl, combine the ½ cup of multi-grain hot cereal with 1 cup of boiling water. Stir well to ensure all the cereal is moistened. Cover the bowl with plastic wrap and let it sit for 45 minutes. This step allows the cereal to soften and release its flavors, contributing to the bread’s texture and taste.
-
Melt the Shortening: Add the ¼ cup of shortening to the soaked cereal mixture. Stir until the shortening is completely melted and incorporated. If you forget this step, you can melt the shortening separately in the microwave and add it later.
-
Combine Dry Ingredients: In the bowl of your KitchenAid stand mixer, combine the 8 cups of whole wheat flour, 5 tablespoons of gluten flour, 4 teaspoons of salt, ⅔ cup of brown sugar, and 8 teaspoons of fast rising yeast. Whisk these ingredients together to ensure they are evenly distributed. The gluten flour is crucial for adding elasticity to the whole wheat dough, which can sometimes be dense.
-
Prepare the Liquid Mixture: In a separate measuring cup, combine the 1 cup of milk (or soymilk) with the 2 cups of hot water. Ensure the water is hot but not scalding; a temperature around 110-115°F (43-46°C) is ideal for activating the yeast without killing it.
-
Mix the Dough: Add the soaked cereal mixture to the mixing bowl containing the dry ingredients. Gradually add the milk and hot water mixture. Turn the mixer on to a low speed (stir setting) until most of the flour is incorporated. Be careful not to add all the liquid at once; you might need slightly more or less depending on the humidity and the flour’s absorption rate.
-
Knead the Dough: Increase the mixer speed to speed 2 and knead the dough for at least 2 minutes. The dough should be slightly sticky; if it seems too dry, add a little more water, one tablespoon at a time, until you achieve the desired consistency. Kneading is essential for developing the gluten, which gives the bread its structure.
-
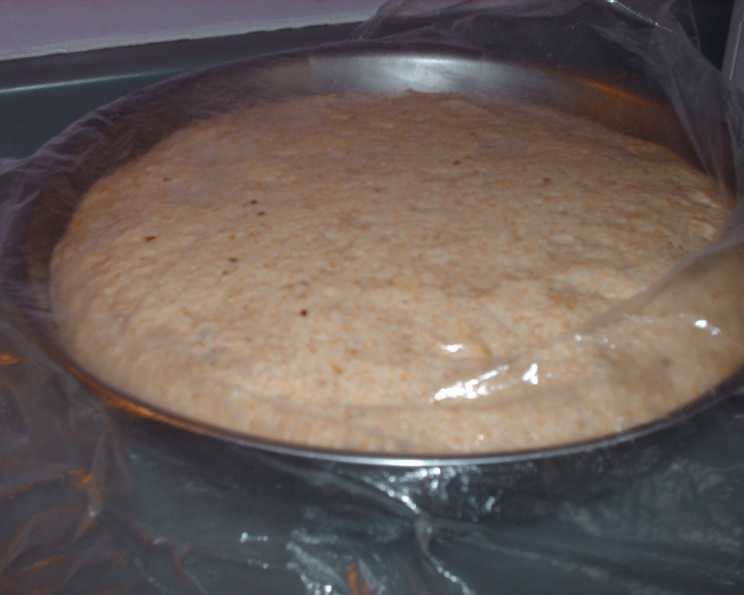
First Rise: Turn the dough out into a large bowl that has been lightly greased with oil. Turn the dough to coat it in the oil. Cover the bowl tightly with plastic wrap and let it rise in a warm place for about 1 hour, or until the dough has doubled in size. The rising time may vary depending on the temperature of your kitchen; a warmer environment will accelerate the process.
-
Punch Down and Divide: Once the dough has doubled, gently punch it down to release the air. Grease 4-5 loaf pans (8×4 inches) with shortening. Weigh the dough and divide it by 4 or 5 to see which division is closer to 500 grams (approximately 1.1 pounds). This step ensures that each loaf is roughly the same size, resulting in even baking. Scale the dough accordingly, aiming for even amounts in each portion.
-
Shape and Place in Pans: Shape each portion of dough into a loaf and place it into a greased loaf pan. Ensure the dough is evenly distributed within the pan to allow for a uniform rise.
-
Second Rise: Cover the loaf pans with plastic wrap again and let the dough rise for another hour, or until it has doubled in size and reaches the top of the pan. This second rise is crucial for achieving a light and airy texture.
-
Bake: Preheat your oven to 400°F (200°C). Bake the loaves for 15 minutes. After 15 minutes, reduce the oven temperature to 350°F (175°C) and bake for another 20-25 minutes, or until the bread is golden brown and the bottom sounds hollow when tapped.
-
Cool: Remove the loaves from the oven and let them cool in the pans for a few minutes before transferring them to a wire rack to cool completely. This prevents the bread from becoming soggy.
Expert Tips & Tricks
- Gluten Flour is Key: Don’t skip the gluten flour! It’s essential for giving whole wheat bread the necessary structure and chewiness.
- Warm Environment: A warm environment is crucial for proper rising. If your kitchen is cold, place the dough in a slightly warmed oven (turned off!) or near a warm appliance.
- Doneness Test: The hollow sound test is reliable, but you can also use a thermometer. The internal temperature of the bread should be around 200-210°F (93-99°C).
- Shiny Crust: For a shinier crust, brush the tops of the loaves with melted butter or an egg wash before baking.
- Soaking Time: Don’t rush the cereal soaking time. This allows the grains to fully hydrate, resulting in a softer, more flavorful bread.
Serving & Storage Suggestions
This multi-grain bread is delicious served warm with butter, honey, or your favorite jam. It also makes excellent sandwiches and toast.
- Room Temperature: Store the cooled bread in an airtight container at room temperature for up to 3 days.
- Refrigerator: For longer storage, wrap the bread tightly in plastic wrap and store it in the refrigerator for up to a week.
- Freezer: To freeze, slice the bread and wrap it tightly in plastic wrap, then place it in a freezer bag. It can be stored in the freezer for up to 3 months. Thaw at room temperature before serving. To reheat, wrap a slice in a damp paper towel and microwave for 10-15 seconds.
Nutritional Information
(Estimated per slice, based on 12 slices per loaf)
| Nutrient | Amount per Serving | % Daily Value |
|---|---|---|
| Calories | 225 kcal | 11% |
| Total Fat | 3.3g | 5% |
| Saturated Fat | 0.9g | 5% |
| Cholesterol | 1.4mg | 0% |
| Sodium | 398mg | 17% |
| Total Carbohydrate | 35.9g | 13% |
| Dietary Fiber | 5.2g | 21% |
| Sugars | 6.1g | – |
| Protein | 6.3g | 13% |
Variations & Substitutions
- Seed Topping: Sprinkle the tops of the loaves with rolled oats, sunflower seeds, or pumpkin seeds before baking for added texture and flavor.
- Sweetener: Use honey or maple syrup instead of brown sugar for a different flavor profile.
- Spice It Up: Add a teaspoon of cinnamon or nutmeg to the dry ingredients for a warm, spiced bread.
- Dried Fruit: Incorporate dried cranberries, raisins, or chopped dates into the dough for a touch of sweetness and chewiness.
- Different Flours: Experiment with different types of flour, such as rye flour or spelt flour, for a unique flavor and texture.
- Dairy-Free: Substitute the milk with almond milk, oat milk, or any other plant-based milk alternative.
FAQs (Frequently Asked Questions)
Q: Can I use regular active dry yeast instead of fast-rising yeast?
A: Yes, but you’ll need to proof the active dry yeast in warm water with a teaspoon of sugar for about 5-10 minutes before adding it to the other ingredients. Also, the rising times may be slightly longer.
Q: My dough isn’t rising. What could be the problem?
A: The most common reason for dough not rising is inactive yeast. Make sure your yeast is fresh and that the water you’re using isn’t too hot, which can kill the yeast. Also, a cold environment can slow down the rising process.
Q: Can I make this recipe without a stand mixer?
A: Yes, you can knead the dough by hand. It will require a bit more effort, but aim to knead for about 8-10 minutes until the dough is smooth and elastic.
Q: How do I prevent the crust from getting too dark?
A: If the crust is browning too quickly, tent the loaves with aluminum foil during the last 10-15 minutes of baking.
Q: Why is my bread dense and heavy?
A: Over-kneading or not using enough gluten flour can result in a dense bread. Also, make sure you’re measuring the flour accurately; too much flour can make the bread heavy.
Final Thoughts
There’s something truly special about the simple act of baking bread. It’s a connection to generations past, a way to nourish both body and soul. This multi-grain bread recipe is a wonderful place to start your baking journey, or to simply revisit a beloved classic. Don’t be afraid to experiment with variations and make it your own. I hope this recipe brings you as much joy and comfort as it brings me, and I can’t wait to hear about your baking adventures. Enjoy!