
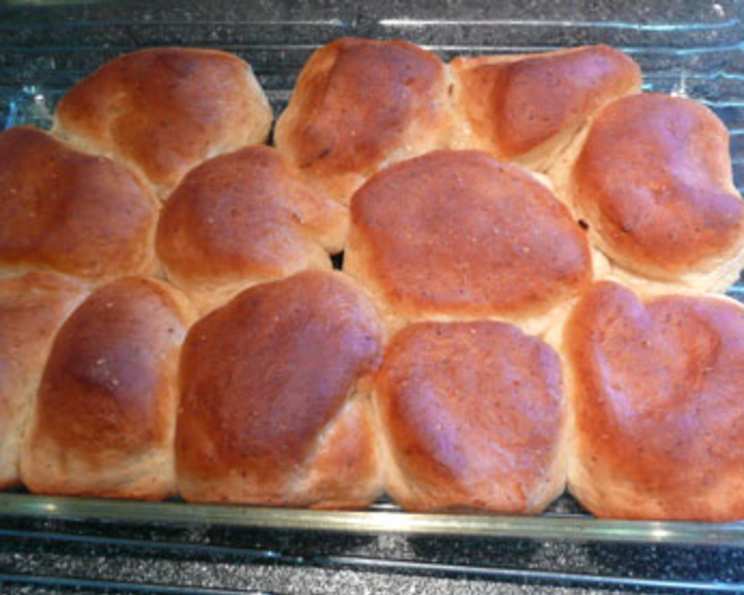
Multi-Grain Dinner Rolls – Bread Machine
The aroma of freshly baked bread has always been a comforting constant in my life. I can still vividly remember my grandmother’s kitchen, filled with the warm scent of yeast and flour. Every Sunday, she’d bake a batch of fluffy, golden dinner rolls. These multi-grain rolls, crafted with my trusty bread machine, are my attempt to recreate that heartwarming experience while adding a touch of wholesome goodness. They bring back those happy memories every time.
Recipe Overview
- Prep Time: 25 minutes
- Cook Time: 30 minutes
- Total Time: 2 hours 35 minutes (includes rising time)
- Servings: 24
- Yield: 24 Rolls
- Dietary Type: Vegetarian
Ingredients
- 1 1⁄4 cups warm water (110 degrees F/45 degrees C)
- 3 tablespoons powdered milk
- 4 tablespoons grain cereal (such as Bob’s Red Mill 10-grain cereal)
- 2 tablespoons vegetable oil
- 2 tablespoons honey
- 1 teaspoon salt
- 3 cups bread flour
- 2 1⁄2 teaspoons instant yeast (such as SAF Instant yeast)
- Vegetable oil cooking spray
- 1⁄2 cup melted butter, divided
Equipment Needed
- Bread Machine
- Two 13x9x2-inch baking pans
- Lightly floured surface
- Cooling Rack
Instructions
- Begin by adding the ingredients to your bread machine pan in the order listed. That means starting with the warm water, followed by the powdered milk, grain cereal, vegetable oil, honey, salt, bread flour, and finally, the instant yeast. This order helps ensure proper activation of the yeast.
- Select the dough setting on your bread machine. This setting will mix and knead the dough for you, creating the perfect foundation for your rolls.
- Keep a close eye on the dough during the first five minutes of the mixing cycle. This is a crucial step to ensure the dough has the right consistency. If the dough appears too sticky, add bread flour one tablespoon at a time. Conversely, if the dough seems too dry, add water one tablespoon at a time.
- The ideal dough consistency should be a soft ball that doesn’t stick to the sides of the bread machine pan but remains slightly sticky to the touch. This ensures the rolls will be tender and moist.
- While the bread machine is doing its work, prepare your baking pans. Spray two 13x9x2-inch baking pans generously with vegetable oil cooking spray. This will prevent the rolls from sticking and make them easier to remove after baking.
- Once the dough cycle is complete, carefully remove the dough from the bread machine pan and place it on a lightly floured surface. This will prevent the dough from sticking to your work surface.
- Divide the dough in half. Then, divide each half into 12 equal pieces, resulting in 24 dough balls in total. Roll each piece into a smooth, round ball.
- Arrange the dough balls evenly in the prepared baking pans, placing 12 rolls in each pan.
- Cover the pans with a clean kitchen towel or plastic wrap and let the rolls rise in a warm place for 45 minutes to 1 hour, or until they have doubled in size. This rising period is essential for creating light and airy rolls.
- Preheat your oven to 350 degrees F (175 degrees C). Make sure the oven rack is positioned in the middle.
- Place the baking pans on the middle rack of the preheated oven and bake for 15 minutes.
- After 15 minutes, remove the pans from the oven and brush the tops of the rolls generously with melted butter. This will give them a beautiful golden-brown color and add richness to their flavor.
- Return the pans to the oven and continue baking for an additional 15 minutes, or until the rolls are done and nicely browned. To check for doneness, insert a toothpick into the center of a roll; it should come out clean.
- Remove the rolls from the oven and transfer them to a cooling rack to cool for a few minutes before serving. This will prevent them from becoming soggy.
- Serve warm and enjoy!
Expert Tips & Tricks
- For an extra soft crust, brush the rolls with melted butter again immediately after removing them from the oven. Then cover loosely with a clean kitchen towel while they cool.
- If you don’t have powdered milk, you can substitute it with an equal amount of regular milk. However, reduce the amount of warm water by the same amount.
- To make these rolls ahead of time, bake them until they are lightly golden, about 5 minutes less than the recipe states. Let them cool completely, then freeze them in an airtight container. When ready to serve, thaw them completely and bake them in a 350-degree F oven for 5-10 minutes, or until heated through and golden brown.
- If you notice the tops of the rolls browning too quickly during baking, tent the pans loosely with aluminum foil to prevent burning.
- To add extra flavor, try adding a tablespoon of dried herbs, such as rosemary or thyme, to the dough.
- For a sweeter roll, add an extra tablespoon of honey or sugar to the dough.
Serving & Storage Suggestions
These multi-grain dinner rolls are best served warm, straight from the oven. They make a perfect accompaniment to soups, stews, salads, or any main course. They’re also delicious on their own with a pat of butter or a drizzle of honey.
Leftover rolls can be stored at room temperature in an airtight container for up to 2 days. For longer storage, keep them in the refrigerator for up to 5 days or freeze them for up to 3 months. To reheat, wrap the rolls in foil and warm them in a 350-degree F oven for 5-10 minutes, or until heated through. You can also microwave them for a few seconds, but be careful not to overheat them, as they can become tough.
Nutritional Information
| Nutrient | Amount per Serving | % Daily Value |
|---|---|---|
| Calories | 112.3 kcal | – |
| Total Fat | 5.4 g | 8% |
| Saturated Fat | 2.8 g | 13% |
| Cholesterol | 11.1 mg | 3% |
| Sodium | 128.7 mg | 5% |
| Total Carbohydrate | 13.9 g | 4% |
| Dietary Fiber | 0.5 g | 2% |
| Sugars | 1.9 g | – |
| Protein | 2.1 g | – |
Note: Nutritional information is an estimate and may vary depending on specific ingredients and portion sizes.
Variations & Substitutions
- Dairy-Free: Substitute the powdered milk with a dairy-free alternative like soy or almond milk powder.
- Vegan: In addition to the dairy-free substitution, ensure your vegetable oil and honey are sourced from vegan-friendly suppliers. Consider using maple syrup or agave nectar as a honey alternative.
- Herbaceous Rolls: Incorporate 1-2 tablespoons of finely chopped fresh herbs like rosemary, thyme, or parsley into the dough for an aromatic twist.
- Seeded Rolls: Before baking, brush the tops of the rolls with a beaten egg (or dairy-free milk for a vegan option) and sprinkle with sesame seeds, poppy seeds, or sunflower seeds for added texture and flavor.
- Sweet Rolls: Add 1/4 cup of sugar and 1 teaspoon of cinnamon to the dough for a sweeter variation, perfect for breakfast or dessert.
FAQs (Frequently Asked Questions)
Q: Can I use active dry yeast instead of instant yeast?
A: Yes, you can. However, you’ll need to proof the active dry yeast in the warm water with a teaspoon of sugar for about 5-10 minutes before adding it to the bread machine. Ensure it’s bubbly before proceeding.
Q: My dough didn’t rise properly. What could be the reason?
A: There could be several reasons: the yeast might be old or inactive, the water might have been too hot or too cold, or the room temperature might have been too low. Make sure your yeast is fresh, the water is around 110 degrees F (45 degrees C), and the rising environment is warm.
Q: Can I freeze the unbaked dough?
A: Yes, you can. After shaping the rolls, place them on a baking sheet lined with parchment paper and freeze them until solid. Then, transfer them to a freezer bag and store for up to 1 month. When ready to bake, let them thaw overnight in the refrigerator and then rise as directed in the recipe.
Q: What if I don’t have a bread machine?
A: You can mix and knead the dough by hand or with a stand mixer. If kneading by hand, knead for about 8-10 minutes until the dough is smooth and elastic. If using a stand mixer, use the dough hook and mix on low speed for about 6-8 minutes.
Q: Can I reduce the amount of salt in the recipe?
A: While salt contributes to flavor, it also plays a role in gluten development. Reducing the salt too much can affect the texture of the rolls. It’s generally safe to reduce it by about 1/4 teaspoon without significantly impacting the outcome.
Final Thoughts
These multi-grain dinner rolls, born from a desire to recreate a beloved childhood memory, are more than just a recipe; they’re a comforting hug in bread form. The subtle sweetness of the honey, the wholesome goodness of the multi-grain cereal, and the satisfyingly soft texture create a symphony of flavors and sensations that are simply irresistible. I encourage you to give this recipe a try and experience the joy of baking your own delicious, homemade rolls. Don’t be afraid to experiment with variations and substitutions to make them your own. And most importantly, share them with loved ones and create your own heartwarming memories. They pair wonderfully with a hearty beef stew or a simple side salad. Happy baking!