
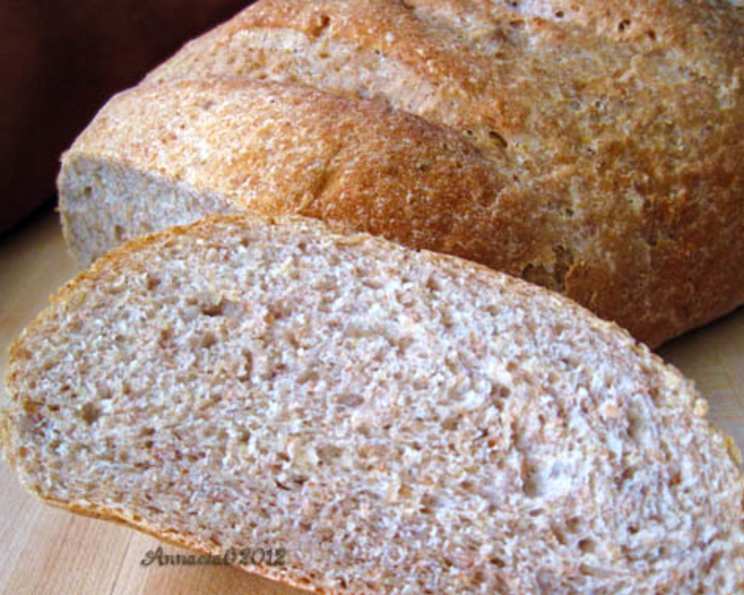
Baking with Heart: A Multigrain Loaf for Gentle Digestion
I remember the first time I truly understood the power of homemade bread. It wasn’t just the taste, the warmth, or the satisfying crust. It was the feeling of nourishment, of creating something wholesome and healing with my own hands. My grandmother, a beacon of health and vitality well into her nineties, always had a loaf of her own special multigrain on the counter. The aroma filled the house, and a slice, lightly toasted with a smear of honey, was her daily ritual. She always said it was the secret to her long and happy life – a gentle food, packed with goodness, and made with love. Inspired by her, I sought to create a similar loaf, especially for those with sensitive stomachs.
Recipe Overview
- Prep Time: 15 minutes
- Cook Time: 35-40 minutes
- Total Time: 3 hours 15 minutes (includes rise time)
- Yields: 1 1.5 lb loaf
- Serves: 12
- Dietary Type: Vegetarian
Ingredients
- 1 1/4 cups water
- 1 tablespoon olive oil
- 1 1/2 teaspoons salt
- 2 teaspoons honey
- 2 cups bread flour
- 1 cup whole wheat flour
- 1/2 cup rye flour (or substitute with more whole wheat flour)
- 1/4 cup regular oatmeal or quick-cooking oatmeal
- 2 teaspoons vital wheat gluten
- 2 1/4 teaspoons active dry yeast
- 2 tablespoons sesame seeds
- 2 tablespoons raw sunflower seeds
- 1 tablespoon steel cut oats
- 1 tablespoon flax seed meal (ground flaxseeds)
Equipment Needed
- Bread Machine
- Parchment Paper or Baking Sheet
- Sharp Knife or Bread Lame
Instructions
-
Prepare the bread machine: Ensure your bread machine is clean and ready for use.
-
Add the Wet Ingredients: Pour the water into the bread machine pan. Then, add the olive oil and honey. This order is generally recommended to protect the yeast from direct contact with the salt.
-
Add the Dry Ingredients: Add the salt to the pan, followed by the bread flour, whole wheat flour, rye flour, oatmeal, and vital wheat gluten. Make a small well on top of the dry ingredients and add the active dry yeast to the well.
-
Add the Seeds and Flax: Sprinkle in the sesame seeds, raw sunflower seeds, steel cut oats, and flax seed meal over the other ingredients.
-
Start the Dough Cycle: Select the dough cycle on your bread machine and press start. The dough cycle typically lasts for around 1 hour and 30 minutes to 2 hours, allowing the bread to rise properly.
-
Check and Adjust Consistency (Crucial Step): After about 10 minutes of kneading, open the bread machine and observe the dough’s consistency. If the dough appears too dry and is struggling to come together, add water, one tablespoon at a time, until it forms a soft, slightly sticky ball. If the dough is too wet and sticky, add bread flour, one tablespoon at a time, until it reaches the desired consistency. This adjustment is vital for achieving the right texture.
-
Remove and Shape the Dough: Once the dough cycle is complete, carefully remove the dough from the bread machine pan.
-
Shape the Loaf: On a lightly floured surface, gently shape the dough into a round or oblong loaf.
-
Second Rise: Place the shaped loaf on a baking sheet lined with parchment paper or a baking sheet sprinkled with cornmeal. Cover loosely with a clean kitchen towel or plastic wrap and let it rise in a warm place until almost doubled in size. This usually takes about 45 minutes to 1 hour.
-
Preheat the Oven: While the dough is rising, preheat your oven to 400°F (200°C).
-
Score the Loaf: Use a sharp knife or bread lame to slash the top of the loaf several times. This allows the bread to expand during baking and prevents it from cracking unevenly.
-
Bake: Place the baking sheet with the loaf in the preheated oven and bake for 35 to 40 minutes, or until the crust is golden brown and the internal temperature reaches 200-210°F (93-99°C).
-
Cool Completely: Remove the bread from the oven and transfer it to a wire rack to cool completely before slicing. This is crucial for preventing a gummy texture.
Expert Tips & Tricks
- Vital Wheat Gluten is Key: Don’t skip the vital wheat gluten, especially when using a significant amount of whole wheat and rye flour. It helps to develop the gluten structure, resulting in a lighter and less dense loaf.
- Temperature Matters: Use lukewarm water (around 105-115°F or 40-46°C) for the best yeast activity. Too hot and you’ll kill the yeast; too cold and it won’t activate properly.
- Listen to Your Dough: The dough should be soft and slightly sticky, but not unmanageable. Adjust the flour and water as needed based on the climate and humidity in your kitchen.
- Steam for a Crusty Crust: For an extra-crispy crust, place a baking sheet filled with hot water on the bottom rack of the oven during baking. The steam will help to create a beautiful, crackly crust. Remove the baking sheet with water during the last 10 minutes of baking if the crust is browning too quickly.
- Underbaking is a No-No: Ensure the bread is fully baked to prevent a gummy interior. Use a digital thermometer to check the internal temperature.
- Kneading by Hand: If you prefer, you can knead this dough by hand. After the first rise in a bowl, follow steps 7-13. Knead for about 8-10 minutes, until smooth and elastic.
Serving & Storage Suggestions
This multigrain bread is delicious served warm with butter, honey, or your favorite jam. It’s also fantastic for sandwiches, toast, or as an accompaniment to soups and salads.
Storage: Store the cooled bread in an airtight container at room temperature for up to 3 days. For longer storage, slice the bread and freeze it in a freezer-safe bag for up to 2 months. Thaw at room temperature or toast directly from frozen.
Nutritional Information
| Nutrient | Amount per Serving | % Daily Value |
|---|---|---|
| Calories | 170 kcal | N/A |
| Fat | 3.6 g | 5% |
| Saturated Fat | 0.5 g | 2% |
| Cholesterol | 0 mg | 0% |
| Sodium | 293 mg | 12% |
| Total Carbohydrate | 30 g | 10% |
| Dietary Fiber | 3 g | 12% |
| Sugars | 1.2 g | N/A |
| Protein | 5.3 g | 10% |
Note: Nutritional information is an estimate and may vary based on specific ingredients and portion sizes.
Variations & Substitutions
- Gluten-Free: This recipe is not easily adaptable for gluten-free baking due to the crucial role of gluten in the structure. However, you could experiment with gluten-free bread machine recipes available online, incorporating a similar seed and grain blend.
- Seed Variations: Feel free to substitute the seeds with other types like chia seeds, pumpkin seeds, or poppy seeds.
- Nut Variations: Add chopped walnuts, pecans, or almonds for added flavor and texture. Incorporate about 1/4 cup of chopped nuts along with the seeds.
- Sweetener: Maple syrup can be used in place of honey, or molasses for a deeper flavor.
- Spice it Up: Add 1/2 teaspoon of ground cinnamon or nutmeg for a warm, spiced flavor.
- Herbaceous: Incorporate 1 tablespoon of dried herbs like rosemary, thyme, or oregano for a savory loaf.
- Rye Flour Substitute: If you don’t have rye flour, simply substitute it with an equal amount of whole wheat flour.
FAQs (Frequently Asked Questions)
Q: Can I bake this bread entirely in the bread machine?
A: Yes, you can bake it in the bread machine on the whole wheat or basic setting. However, shaping it by hand and baking in the oven allows for a better crust and shape.
Q: Why is my bread dense and gummy?
A: This can be due to underbaking, using too much flour, or not enough gluten development. Ensure you bake it to an internal temperature of 200-210°F and that the dough has the correct consistency before the second rise. Also, vital wheat gluten helps to avoid the gummy texture.
Q: Can I use instant yeast instead of active dry yeast?
A: Yes, you can substitute instant yeast (also called bread machine yeast) directly into the dry ingredients without proofing. Use the same amount (2 1/4 teaspoons).
Q: How do I store this bread to keep it fresh?
A: Store the bread in an airtight container or bread bag at room temperature for up to 3 days. For longer storage, freeze it sliced.
Q: Can I reduce the amount of salt in the recipe?
A: While salt is important for flavor and gluten development, you can reduce it slightly if needed. However, reducing it too much may affect the texture and rise of the bread. Start by reducing it by 1/4 teaspoon and see how it goes.
Final Thoughts
I hope this multigrain bread recipe brings you as much joy and nourishment as it has brought me. The simple act of baking bread is incredibly therapeutic, and knowing you’re creating something healthy and wholesome for yourself and your loved ones is truly rewarding. Don’t be afraid to experiment with different seeds, grains, and flavors to create your own signature loaf. And most importantly, share your creations and your feedback – I’d love to hear how it turns out! Perhaps enjoy a slice alongside a hearty bowl of homemade soup or a simple salad – the perfect comforting and nourishing meal.