
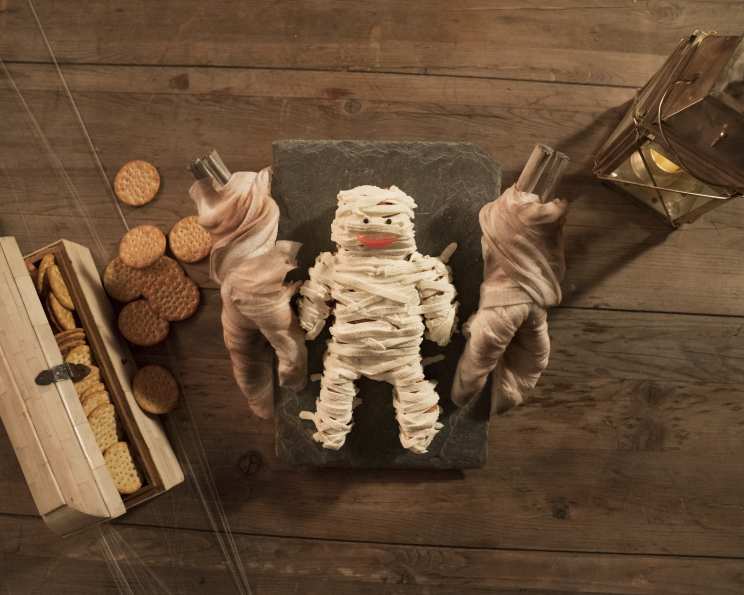
Mummy-Shaped Cheese Ball: A Spooktacular Appetizer
Halloween has always held a special place in my heart. As a child, my grandmother, a master of all things spooky and delicious, would craft elaborate Halloween spreads. Her crowning glory was always a cheese ball shaped like a mummy, complete with peppercorn eyes and a slightly sinister grin. The combination of savory cheese, creamy wrapping, and the playful presentation made it an instant hit. Even now, the sight of a mummy cheese ball instantly transports me back to her cozy kitchen, filled with laughter, candy corn, and the delightful anticipation of trick-or-treating. This recipe is an homage to her creativity, a way to bring a little bit of that Halloween magic into your own home.
Recipe Overview
- Prep Time: 20 minutes
- Cook Time: 0 minutes
- Total Time: 20 minutes
- Servings: 24
- Yield: 1 cheese ball mummy
- Dietary Type: Vegetarian
Ingredients
- 2 (10 ounce) port wine cheese balls
- 1 (8 ounce) package cream cheese, softened
- 2 tablespoons milk
- 2 peppercorns
- 1 slice red pepper
- Crackers, for serving
Equipment Needed
- Cutting board
- Knife
- Mixing bowl
- Electric mixer or whisk
- Pastry bag with basket weave tip
- Serving platter
Instructions
- Begin by preparing the cheese balls. Using a sharp knife, carefully cut a strip out on each side of the first port wine cheese ball to create the mummy’s body and arms.
- Cut 2 thick strips out of the second port wine cheese ball to create the legs and head. Don’t worry if the shapes aren’t perfect; the “bandages” will cover most imperfections.
- Arrange the body, arms, legs, and head on the serving platter. Gently flatten the pieces a bit with your hand so they adhere slightly to the platter and create a stable base for the creamy “bandages.”
- In a mixing bowl, combine the softened cream cheese and milk.
- Using an electric mixer or a whisk, beat the cream cheese and milk until smooth and creamy. Ensure there are no lumps.
- Prepare a pastry bag with a basket weave tip. This tip is essential for creating the textured bandage effect. If you don’t have a basket weave tip, a plain round tip can also work, but the effect will be different.
- Fill the pastry bag with the cream cheese mixture.
- Pipe the cream cheese mixture over the entire mummy, creating layers and overlapping lines to resemble bandages. Be sure to cover the entire surface of the cheese ball pieces.
- Leave one or two longer, slightly uneven lines of piped cream cheese, as if the mummy’s wrappings are coming undone. This adds a touch of playful realism to the presentation.
- Add two whole peppercorns to the head for the eyes, pressing them gently into the cream cheese so they stay in place.
- Cut the red pepper slice into a small, slightly curved shape to resemble a simple, slightly mischievous mouth. Attach the red pepper mouth just below the eyes, using a tiny dab of cream cheese if needed to secure it.
- Serve immediately with your favorite crackers.
Expert Tips & Tricks
- Soften the cream cheese completely: This is crucial for achieving a smooth and pipeable mixture. Leave the cream cheese at room temperature for at least an hour, or even longer in a cool environment.
- Chill the port wine cheese balls before shaping: This makes them easier to handle and cut neatly. Place them in the refrigerator for about 30 minutes before starting.
- Use a wet knife for cleaner cuts: Dipping your knife in water before cutting the port wine cheese balls prevents them from sticking and creates smoother edges.
- Get creative with the “bandages”: Don’t be afraid to experiment with different piping patterns. Varying the thickness and direction of the lines will add visual interest.
- Make ahead option: The cream cheese mixture can be prepared a day in advance and stored in the refrigerator. The port wine cheese balls can also be shaped ahead of time. Assemble everything just before serving to prevent the cream cheese from drying out.
- Alternative “bandage” flavors: For a different flavor profile, consider adding a pinch of garlic powder, onion powder, or dried herbs to the cream cheese mixture.
- Troubleshooting a runny cream cheese mixture: If your cream cheese mixture is too thin, add a tablespoon of powdered sugar to thicken it up.
Serving & Storage Suggestions
Serve the Mummy-Shaped Cheese Ball immediately with an assortment of your favorite crackers. Arrange the crackers around the platter for easy access. You can also include other complementary snacks like vegetable sticks, olives, or pretzels.
Leftover Mummy-Shaped Cheese Ball should be stored in an airtight container in the refrigerator. It will keep for up to 3 days. The cream cheese “bandages” may soften slightly upon storage. For best results, consume within 24 hours. Due to the nature of the ingredients, this dish is not suitable for freezing. Do not leave the cheese ball at room temperature for more than 2 hours, as it can spoil quickly.
Nutritional Information
| Nutrient | Amount per Serving | % Daily Value |
|---|---|---|
| Calories | 33.3 kcal | – |
| Calories from Fat | 29 g | 89% |
| Total Fat | 3.3 g | 5% |
| Saturated Fat | 1.9 g | 9% |
| Cholesterol | 10.6 mg | 3% |
| Sodium | 31 mg | 1% |
| Total Carbohydrate | 0.5 g | 0% |
| Dietary Fiber | 0 g | 0% |
| Sugars | 0.3 g | 1% |
| Protein | 0.6 g | 1% |
Note: Nutritional information is an estimate and may vary based on specific ingredients and serving sizes.
Variations & Substitutions
- Spicy Mummy: Add a pinch of cayenne pepper or a dash of hot sauce to the cream cheese mixture for a fiery kick.
- Herbaceous Mummy: Mix in finely chopped fresh herbs like chives, parsley, or dill into the cream cheese for a fresh, savory flavor.
- Vegan Mummy: Substitute the port wine cheese balls and cream cheese with vegan alternatives. There are several excellent vegan cheese options available that can be used in this recipe.
- Smoked Paprika Mummy: Incorporate a teaspoon of smoked paprika into the cream cheese for a smoky and flavorful twist.
- Kid-Friendly Mummy: Use cheddar cheese balls instead of port wine cheese balls for a milder flavor that kids will love. You can also substitute the peppercorns with small candy eyes.
FAQs (Frequently Asked Questions)
Q: Can I use a different type of cheese ball?
A: Absolutely! While the port wine cheese balls provide a distinct flavor, you can use any type of cheese ball you prefer. Cheddar, Swiss, or even a jalapeno cheese ball would work well.
Q: What if I don’t have a pastry bag?
A: If you don’t have a pastry bag, you can use a resealable plastic bag. Simply cut a small hole in one corner of the bag and use it as a makeshift piping bag.
Q: Can I make this ahead of time?
A: Yes, you can prepare the cream cheese mixture a day in advance and store it in the refrigerator. Shape the port wine cheese balls ahead of time as well. Assemble everything just before serving for the best results.
Q: What if my cream cheese mixture is too thick?
A: If the cream cheese mixture is too thick to pipe easily, add a teaspoon of milk at a time until it reaches the desired consistency.
Q: Can I use a different garnish for the eyes and mouth?
A: Feel free to get creative with the garnish! You can use small pieces of black olives, candy eyes, or even small dots of mustard for the eyes. For the mouth, try a small piece of pimiento or a sliver of carrot.
Final Thoughts
This Mummy-Shaped Cheese Ball is more than just an appetizer; it’s a conversation starter, a centerpiece, and a delicious tribute to the spooky season. Whether you’re hosting a Halloween party or simply looking for a fun and festive snack, this recipe is sure to impress. So, gather your ingredients, unleash your creativity, and create a mummy that’s both frightfully fun and utterly delicious. Don’t hesitate to share your own mummy creations and let me know what variations you try! I’d love to hear how you make this recipe your own. Perhaps pair it with a blood-red punch or a platter of bat-shaped cookies for the ultimate Halloween experience. Happy haunting!