
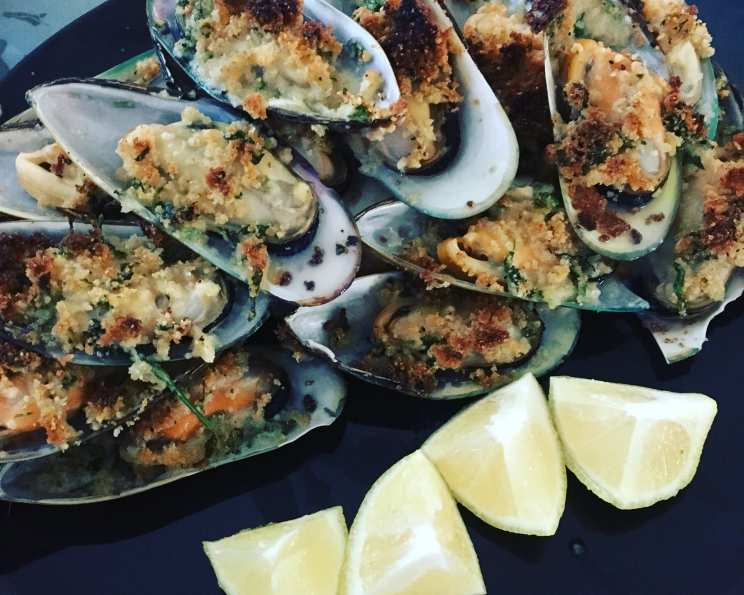
Mussels on the Half Shell: A Taste of the Sea, Made Easy
The salty tang of the ocean is one of those primal flavors that instantly transports me. I remember being a kid, vacationing on the coast, and daringly trying my first mussel – a tiny, briny treasure plucked straight from a tide pool. It wasn’t quite love at first bite, but it sparked a curiosity that’s stayed with me. Now, I recreate that coastal feeling at home with these incredibly easy and flavorful mussels on the half shell. They’re the perfect appetizer to share with friends, and they bring a little bit of the ocean to any table.
Recipe Overview
- Prep Time: 10 minutes
- Cook Time: 5-6 minutes
- Total Time: 15 minutes
- Servings: 4
- Yield: Variable, depending on mussel size
- Dietary Type: Pescatarian
Ingredients
- 454 g (1 pound) mussels (on the half shell, frozen)
- 1 cup fresh breadcrumbs
- 3 tablespoons butter or margarine, melted
- 1/4 cup fresh parsley, chopped
- 1 garlic clove, minced finely
- 1 teaspoon lemon zest
- 2 tablespoons Parmesan cheese, freshly grated
- Salt and pepper to taste
- 1 lemon, juice of
Equipment Needed
- Cookie Sheet
- Mixing Bowl
- Broiler
Instructions
-
Begin by thawing the mussels. The best way is to place them in the refrigerator overnight. If you’re short on time, you can place them in a colander under cold running water until thawed.
-
Once thawed, drain the mussels well. This is important to prevent a watery finished product. Gently squeeze out any extra liquid from the mussels, being careful not to damage the delicate meat.
-
Arrange the mussels on a cookie sheet. Make sure they are stable and won’t tip over during cooking.
-
In a mixing bowl, combine the breadcrumbs, melted butter (or margarine), parsley, garlic, lemon zest, Parmesan cheese, salt, and pepper. Mix thoroughly until all ingredients are well incorporated. This breadcrumb mixture is the key to adding flavor and creating a beautiful, golden crust.
-
Squeeze the juice of one lemon generously over the mussels. The lemon juice adds brightness and acidity, complementing the richness of the other ingredients.
-
Spoon the breadcrumb mixture evenly onto each mussel, pressing down gently to help it adhere. Don’t be afraid to be generous; the breadcrumbs will create a delicious crust.
-
Broil the mussels in a preheated broiler for 5 to 6 minutes, or until the breadcrumb mixture is crunchy and brown, and the mussels are cooked through. Keep a close eye on them, as broilers can vary in intensity, and you want to avoid burning the breadcrumbs. The mussels are done when the edges are slightly curled and the filling is golden brown.
-
Serve immediately and enjoy!
Expert Tips & Tricks
- For extra flavor, try adding a pinch of red pepper flakes to the breadcrumb mixture.
- If you don’t have fresh breadcrumbs, you can use dried breadcrumbs, but the texture will be slightly different. Consider toasting the dried breadcrumbs lightly in a pan with a little butter before adding them to the mixture to enhance their flavor and crispness.
- Make sure your broiler is properly preheated before putting the mussels in. This will ensure even cooking and browning.
- Don’t overcrowd the cookie sheet. Cook the mussels in batches if necessary to ensure that they cook evenly.
- If you want to prepare these ahead of time, you can assemble them up to the point of broiling. Cover them tightly and refrigerate for up to a few hours. Add a couple of minutes to the broiling time when cooking from cold.
Serving & Storage Suggestions
These mussels are best served immediately while they are hot and the breadcrumb topping is crispy. Garnish with a lemon wedge and a sprinkle of fresh parsley for a pop of color. They make a fantastic appetizer or a light lunch when paired with a simple salad.
Leftovers can be stored in an airtight container in the refrigerator for up to 24 hours. However, the breadcrumb topping will lose some of its crispness. To reheat, bake in a preheated oven at 350°F (175°C) for about 5-7 minutes, or until heated through. Reheating in the broiler is not recommended, as the breadcrumbs may burn. I don’t recommend freezing cooked mussels, as the texture can become rubbery.
Nutritional Information
| Nutrient | Amount per Serving | % Daily Value |
|---|---|---|
| Calories | 296.7 kcal | N/A |
| Calories from Fat | N/A | 41% |
| Total Fat | 13.4 g | 20% |
| Saturated Fat | 6.7 g | 33% |
| Cholesterol | 56.9 mg | 18% |
| Sodium | 638.9 mg | 26% |
| Total Carbohydrate | 25.1 g | 8% |
| Dietary Fiber | 1.4 g | 5% |
| Sugars | 2.1 g | N/A |
| Protein | 18.4 g | 36% |
Variations & Substitutions
- Gluten-Free: Use gluten-free breadcrumbs.
- Dairy-Free: Substitute the butter with a dairy-free alternative like olive oil. Omit the Parmesan cheese or use a vegan Parmesan substitute.
- Spicy: Add a pinch of red pepper flakes to the breadcrumb mixture.
- Herby: Experiment with different herbs, such as thyme, oregano, or basil.
- Wine Infused: Before adding the breadcrumb mixture, drizzle a little dry white wine over the mussels for an extra layer of flavor.
FAQs (Frequently Asked Questions)
Q: Can I use frozen mussels that are not on the half shell?
A: Yes, but the presentation will be different. You’ll need to shuck the cooked mussels and serve them in a bowl with the breadcrumb mixture.
Q: How do I know when the mussels are cooked?
A: The mussels are cooked when the breadcrumb mixture is golden brown and crispy, and the mussel meat is firm and slightly opaque.
Q: Can I use dried parsley instead of fresh parsley?
A: Yes, but fresh parsley provides a brighter flavor. If using dried parsley, use about 1 tablespoon.
Q: What if I don’t have a broiler?
A: You can bake the mussels in a preheated oven at 400°F (200°C) for about 10-12 minutes, or until the breadcrumb mixture is golden brown and the mussels are cooked through.
Q: Can I add other vegetables to the breadcrumb mixture?
A: Absolutely! Finely diced bell peppers, onions, or mushrooms would be delicious additions.
Final Thoughts
These mussels on the half shell are a delightful way to enjoy the taste of the sea without spending hours in the kitchen. They are simple, flavorful, and always a crowd-pleaser. I encourage you to give this recipe a try and experiment with different variations to find your perfect combination. Share your creations and feedback with me – I’d love to hear how you make this dish your own! Pair these with a crisp white wine for the perfect appetizer experience. Enjoy!