
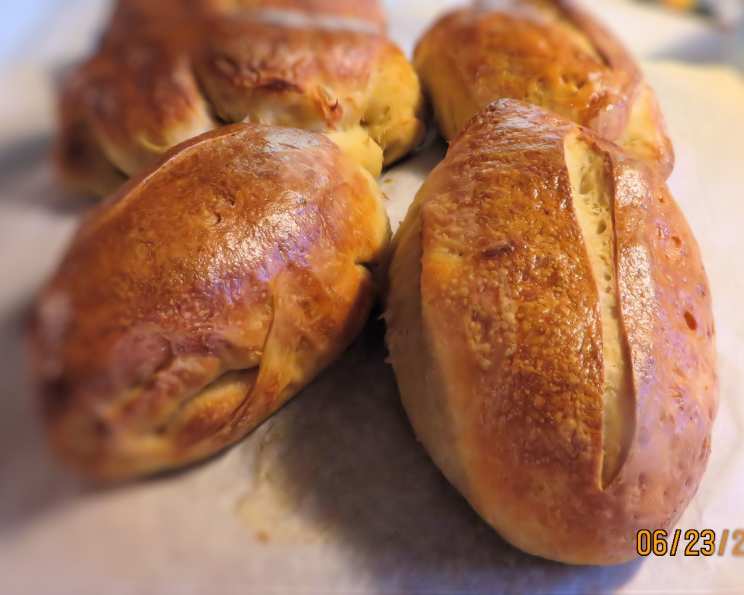
My Hard Rolls for Bratwurst: A Culinary Homage to Summer
The aroma alone transports me back to summer evenings at my grandfather’s. He was a man of few words but many skills, particularly when it came to the grill. His bratwurst, nestled in perfectly crisp-crusted, chewy-crumbed rolls, were legendary. Every bite was a symphony of smoky sausage, tangy mustard, and that unmistakable, satisfying snap of the roll. These hard rolls aren’t just bread; they’re vessels of memories, carriers of flavor, and the key to unlocking the ultimate bratwurst experience.
Recipe Overview
- Prep Time: 1 hour 15 minutes (plus overnight refrigeration)
- Cook Time: 14 minutes
- Total Time: 6 hours 29 minutes (includes proofing and refrigeration)
- Servings: 5-7
- Yield: 10 rolls
- Dietary Type: Not specified
Ingredients
- 500 g flour (unbleached all-purpose, about 4 cups)
- 313 g water (11 ounces)
- 10 g salt (1 2/3 teaspoons table salt)
- 3 g instant yeast (1 teaspoon)
- 5 g sugar (1 teaspoon)
- 10 g butter (2 teaspoons)
- 1 egg (beaten with 1 teaspoon water for optional wash)
Equipment Needed
- Large mixing bowl
- Measuring cups and spoons
- Kitchen scale
- Dough scraper or knife
- Clean kitchen towel
- Baking sheet
- Parchment paper (optional)
- Oven with steaming capability (or a pan for creating steam)
- Wire rack
Instructions
- In a large mixing bowl, thoroughly combine the flour, instant yeast, and sugar.
- Gradually add the water, mixing until all the flour is wetted and there are no lumps. The dough will be shaggy at this stage.
- Cover the bowl and let the dough rest for 20 minutes. This is an autolyse, which allows the flour to fully hydrate, leading to a better texture.
- Sprinkle the salt evenly over the dough.
- Turn the dough out onto a lightly floured surface. Knead for 3 minutes until the dough becomes uniform and somewhat smooth. It will still be a bit sticky, that’s okay.
- Cover the dough with a clean kitchen towel and let it rest for 10 minutes. This allows the gluten to relax.
- Perform a stretch and fold. This involves gently stretching a portion of the dough upwards and folding it over the center. Repeat this from top to bottom, then side to side, creating a letter-style fold.
- Cover the dough and let it rest for 30 minutes.
- Repeat the stretch and fold process again.
- Place the dough in the refrigerator, covered, and let it rest overnight (or for at least 8 hours). This slow, cold fermentation develops complex flavors.
- The next morning, check the dough. It should have approximately doubled in volume. If it hasn’t, let it sit at room temperature until it does. This may take a few hours depending on the temperature of your kitchen.
- Once the dough has doubled, gently turn it out onto a lightly floured surface.
- Divide the dough into 10 equal pieces, each weighing approximately 85-88 grams. Use a kitchen scale for accuracy.
- Shape each piece into a round or oblong roll, depending on your preference.
- Preheat your oven to 450°F (232°C). Place a baking pan suitable for steaming on the bottom rack of the oven.
- Cover the shaped rolls with oiled plastic wrap to prevent them from drying out.
- Let the rolls proof until they have increased to 1.5 to 2 times their original volume. This proofing time can vary from 1 to 2 hours, depending on room temperature.
- If desired, gently brush the tops of the rolls with the egg wash (beaten egg with 1 teaspoon of water). This will give them a shiny, golden-brown crust.
- Use a sharp knife or lame to score each roll once down the middle. This helps control the expansion of the rolls during baking.
- Carefully add 1 cup of hot water to the preheated steam pan in the oven. Be very careful to avoid splashing, as the steam will be intense.
- Immediately place the baking sheet with the rolls into the oven.
- Bake for 7 minutes.
- Turn the baking sheet around for even baking and bake for another 7 minutes, or until the internal temperature of the rolls reaches 200°F (93°C).
- Remove the rolls from the oven and transfer them to a wire rack to cool completely.
Expert Tips & Tricks
- Achieving a Crispy Crust: The key to a truly crispy crust is the steam. Make sure your oven is properly preheated and that you add the hot water quickly and carefully. You can also try spraying the rolls with water a few times during the first few minutes of baking.
- Dough Handling: This dough can be a bit sticky, especially at first. Don’t be tempted to add more flour. Instead, use a dough scraper to help you handle it and keep your hands lightly floured.
- Shaping the Rolls: For a classic New York-style hard roll, shape the dough into a tight round. For a German Brötchen, shape it into a slightly flatter round and skip the egg wash.
- Scoring: A sharp blade is essential for clean scoring. Use a razor blade or a very sharp knife. Score deeply enough to allow the rolls to expand properly.
- Overnight Proofing: Don’t skip the overnight proof in the refrigerator! This slow fermentation develops the complex flavors that make these rolls so delicious. If you’re short on time, you can reduce the refrigeration time, but the flavor will be less developed.
Serving & Storage Suggestions
These hard rolls are, of course, best served with grilled bratwurst and your favorite toppings. They’re also excellent for sandwiches, burgers, or simply enjoyed with butter and jam.
Store cooled rolls in an airtight container at room temperature for up to 2 days. For longer storage, freeze them in a freezer-safe bag or container. To reheat, thaw the rolls completely and then warm them in a preheated oven at 350°F (175°C) for a few minutes, or until heated through. You can also refresh the crust by lightly spritzing them with water before reheating.
Nutritional Information
(Note: These are estimates and can vary based on specific ingredients and portion sizes)
| Nutrient | Amount per Serving | % Daily Value |
|---|---|---|
| Calories | 398 kcal | 20% |
| Total Fat | 3.6 g | 5% |
| Saturated Fat | 1.5 g | 7% |
| Cholesterol | 41.5 mg | 14% |
| Sodium | 807.8 mg | 34% |
| Total Carbohydrate | 77.6 g | 26% |
| Dietary Fiber | 2.9 g | 12% |
| Sugars | 1.3 g | 3% |
| Protein | 11.8 g | 24% |
Variations & Substitutions
- Whole Wheat Rolls: Substitute up to 50% of the all-purpose flour with whole wheat flour for a nuttier flavor and added fiber.
- Rye Rolls: Replace up to 25% of the all-purpose flour with rye flour for a more robust flavor.
- Seeded Rolls: Sprinkle the tops of the rolls with sesame seeds, poppy seeds, or caraway seeds before baking.
- Herb Rolls: Add dried herbs such as rosemary, thyme, or oregano to the dough for a savory twist.
- Gluten-Free: While difficult to replicate the exact texture, a gluten-free all-purpose blend can be used, but extra hydration and binding agents (like xanthan gum) may be necessary. Be prepared for a denser final product.
FAQs (Frequently Asked Questions)
Q: Why do I need to let the dough rest for 20 minutes after mixing the ingredients?
A: This rest, called an autolyse, allows the flour to fully absorb the water, resulting in a more extensible and easier-to-handle dough. It also contributes to a better final texture and flavor.
Q: Can I use active dry yeast instead of instant yeast?
A: Yes, but you’ll need to proof the active dry yeast in warm water before adding it to the flour. Use the same amount of yeast (3g) and dissolve it in about 1/4 cup of warm water with a pinch of sugar. Let it sit for 5-10 minutes until it becomes foamy, then add it to the dough.
Q: How do I create steam in my oven if I don’t have a steam setting?
A: Simply place a baking pan on the bottom rack of your oven and preheat it along with the oven. When you put the rolls in, carefully pour 1 cup of hot water into the pan. The water will create steam, which is essential for a crispy crust.
Q: My rolls didn’t double in size overnight. What should I do?
A: The rising time can vary depending on the temperature of your kitchen. If your rolls haven’t doubled overnight, let them sit at room temperature for a few more hours until they do.
Q: Can I freeze the dough instead of baking the rolls immediately?
A: Yes, you can freeze the dough after shaping the rolls. Place the shaped rolls on a baking sheet lined with parchment paper and freeze them until solid. Then, transfer them to a freezer-safe bag or container. When ready to bake, thaw the rolls overnight in the refrigerator and then let them proof at room temperature until doubled in size before baking.
Final Thoughts
These hard rolls are more than just bread; they are a testament to the simple pleasure of homemade food. Don’t be intimidated by the multiple steps – each one contributes to the unique texture and flavor that make these rolls so special. So, fire up the grill, grab your favorite bratwurst, and bake a batch of these rolls. I encourage you to experiment with the variations, tailor them to your own tastes, and create your own memories around this classic bread. And don’t forget to share your creations and experiences with me! Enjoy!