
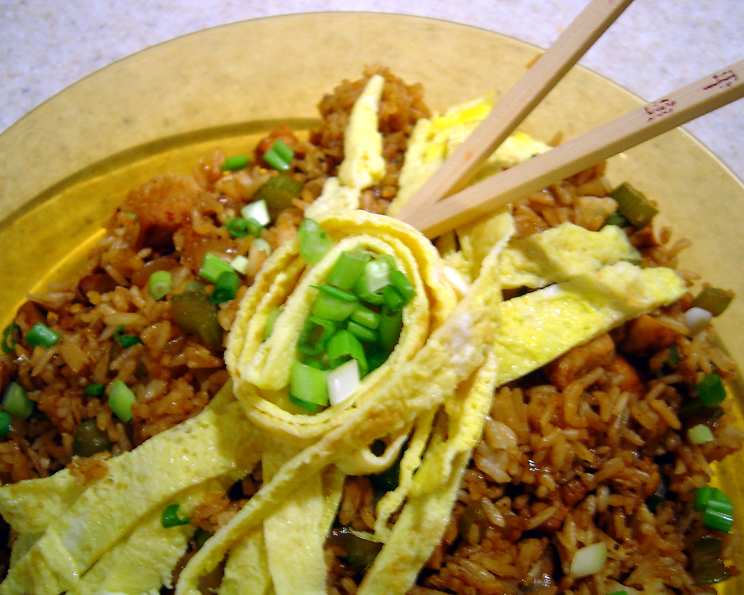
My Family’s Nasi Goreng: A Taste of Home
The aroma alone transports me back to my grandmother’s bustling kitchen. I can almost feel the warmth of the wok, hear the sizzle of ingredients hitting the hot oil, and see her hands expertly tossing the rice. Nasi Goreng, Indonesian fried rice, was a staple in our home, a dish that brought comfort and a fiery kick to every meal. It wasn’t just food; it was love on a plate, and this recipe is my way of sharing that love with you.
Recipe Overview
- Prep Time: 15 minutes
- Cook Time: 40 minutes
- Total Time: 55 minutes
- Servings: 4-5
- Yield: Variable, depending on ingredients
- Dietary Type: Adaptable (see variations below)
Ingredients
- 2 cups prepared jasmine rice (2 cups uncooked – this will expand during cooking)
- 2 medium onions, sweet or yellow, diced
- 3 cloves garlic, minced
- 2-3 stalks celery, diced
- 2 cooked chicken breasts, chopped (or half a package turkey bacon, chopped finely)
- 1 tablespoon tomato ketchup
- ½ teaspoon shrimp paste (or half inch cube of solid shrimp paste (blachan))
- Salt and pepper, to taste
- ¼ cup ketjap manis (or more, to taste)
- 1 teaspoon sambal oelek (chili paste, or to taste) (optional)
- Olive oil or vegetable oil, for cooking
- 2-3 eggs, optional, for fried egg garnish
Equipment Needed
- Large skillet or wok
- Small pan (for fried egg garnish, optional)
- Knife
- Cutting board
Instructions
- Begin by preparing your ingredients. Dice the onions and celery. Mince the garlic. Chop the cooked chicken (or turkey bacon) into bite-sized pieces. Ensure your rice is cooked and slightly cooled – day-old rice works best for optimal texture.
- Heat a generous amount of oil (approximately 2 tablespoons) in a large skillet or wok over medium heat. The pan should be hot enough to sizzle when a drop of water is added.
- If using chicken or turkey bacon, add it to the hot pan and fry until cooked through and slightly crispy. This usually takes about 5-7 minutes. Remove the cooked protein from the pan and set aside. This step imparts a rich flavor to the oil, which will enhance the overall taste of the nasi goreng.
- Add the diced onions and celery to the skillet and sauté until softened and translucent, approximately 5-7 minutes. Stir frequently to prevent burning.
- Add the minced garlic to the pan and cook for about 1 minute, until fragrant. Be careful not to burn the garlic, as it can become bitter.
- Return the cooked chicken or turkey bacon to the skillet.
- Add the tomato ketchup, shrimp paste, and sambal oelek (if using) to the skillet. Mix well and simmer for 2-3 minutes, stirring occasionally, until the shrimp paste dissolves completely into the mixture and everything is heated through. Breaking up the shrimp paste with the back of a spoon helps it dissolve faster.
- Add the cooked rice to the skillet and mix thoroughly, ensuring that all the grains are coated evenly with the sauce. Use a spatula or wooden spoon to break up any clumps of rice.
- Heat the rice mixture, stirring frequently, until the rice is heated through, approximately 5-7 minutes. The goal is to achieve a slightly crispy texture on some of the rice grains.
- Season with salt and pepper to taste.
- Add ketjap manis (Indonesian sweet soy sauce) to taste. Start with ¼ cup and add more until the rice is a light brown color from the sauce. The amount of ketjap manis used will depend on your personal preference for sweetness and the brand of ketjap manis used, as some are sweeter than others.
- For the optional omelet garnish: Heat a small amount of olive oil in a small pan over low-medium heat.
- Whip 2 or 3 eggs in a bowl until light and frothy. Pour the eggs over the olive oil in the pan.
- Cook until the middle sets, then turn off the heat and cover the pan to let the steam finish cooking the edges. This method creates a moist and tender omelet.
- Cut the omelet into thin strips.
- Serve the nasi goreng hot, garnished with the omelet strips (if using).
Expert Tips & Tricks
- Day-old rice is key: Freshly cooked rice tends to be too moist and can result in soggy nasi goreng. Using day-old rice allows the grains to dry out slightly, resulting in a better texture.
- Don’t overcrowd the pan: If you’re making a large batch, cook the nasi goreng in batches to avoid overcrowding the pan. Overcrowding can lower the temperature of the pan and result in steamed, rather than fried, rice.
- Adjust the spice level: The amount of sambal oelek can be adjusted to suit your personal preference. If you’re not a fan of spicy food, omit the sambal oelek altogether.
- Get creative with toppings: Nasi goreng is a versatile dish that can be customized with a variety of toppings, such as fried shallots, pickled vegetables, or a fried egg.
- For extra flavor, try adding a tablespoon of fish sauce to the mixture along with the ketjap manis.
Serving & Storage Suggestions
Serve your homemade nasi goreng immediately while it’s hot and flavorful. Garnish with the optional fried egg strips for a classic touch. Leftovers can be stored in an airtight container in the refrigerator for up to 3 days. To reheat, simply microwave for a few minutes or stir-fry in a pan until heated through. You can also freeze nasi goreng for longer storage, up to 2 months. Thaw completely before reheating.
Nutritional Information
| Nutrient | Amount per Serving | % Daily Value |
|---|---|---|
| Calories | 472 kcal | N/A |
| Total Fat | 39 g | 8% |
| Saturated Fat | 4.4 g | 6% |
| Cholesterol | 1.2 mg | 6% |
| Sodium | 41.2 mg | 13% |
| Total Carbohydrate | 101.1 g | 4% |
| Dietary Fiber | 83.4 g | 27% |
| Sugars | 3.7 g | 14% |
| Protein | 3.6 g | 14% |
Note: Nutritional information is an estimate and may vary based on specific ingredients and portion sizes.
Variations & Substitutions
- Vegetarian Nasi Goreng: Omit the chicken or turkey bacon and add tofu or tempeh for protein.
- Vegan Nasi Goreng: Omit the chicken or turkey bacon and substitute the shrimp paste with a vegan shrimp paste alternative, or simply leave it out. Ensure your ketjap manis is also vegan.
- Spicy Nasi Goreng: Add more sambal oelek or a pinch of cayenne pepper for extra heat.
- Seafood Nasi Goreng: Substitute the chicken or turkey bacon with shrimp, prawns, or squid.
- Gluten-Free Nasi Goreng: Ensure your ketjap manis and shrimp paste are gluten-free.
FAQs (Frequently Asked Questions)
Q: Can I use a different type of rice?
A: While jasmine rice is traditionally used, you can use other types of long-grain rice. However, the texture and flavor may differ slightly.
Q: Can I make this ahead of time?
A: While nasi goreng is best served fresh, you can prepare the ingredients ahead of time. Chop the vegetables and cook the protein in advance, then combine everything when you’re ready to cook.
Q: How do I prevent the rice from sticking to the pan?
A: Make sure your pan is hot before adding the rice, and stir frequently to prevent sticking. Using a non-stick skillet or wok can also help.
Q: What if I can’t find shrimp paste?
A: If you can’t find shrimp paste, you can omit it. However, it adds a unique umami flavor that enhances the overall taste of the dish. Some Asian grocery stores may carry a vegan alternative.
Q: Can I add other vegetables?
A: Absolutely! Feel free to add other vegetables such as carrots, peas, or green beans. Just add them to the skillet along with the onions and celery.
Final Thoughts
Nasi Goreng is more than just a recipe; it’s a culinary adventure, a canvas for your creativity, and a taste of my cherished childhood memories. So, gather your ingredients, fire up your wok, and embark on a journey to create your own version of this beloved Indonesian classic. Don’t be afraid to experiment with different ingredients and flavors to make it your own. I encourage you to share your creations and experiences with this recipe. Selamat makan! (Enjoy your meal!)