
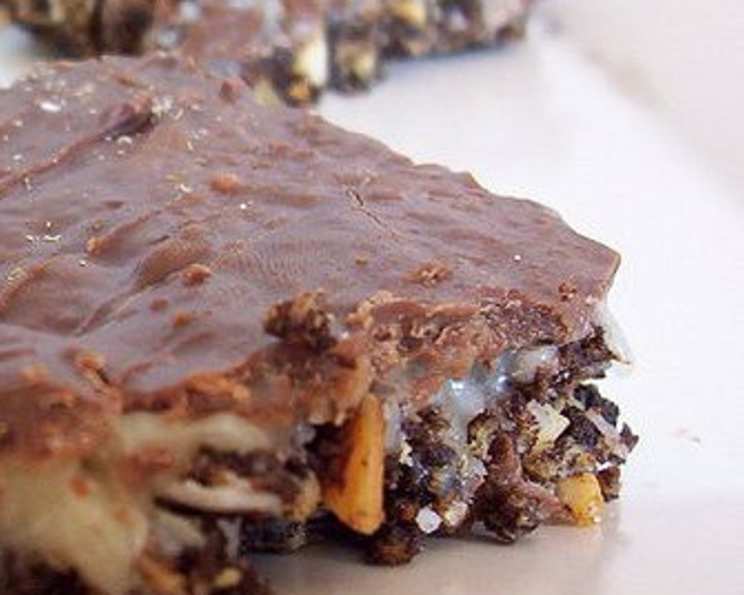
Nancy’s Prayer Bars: A Taste of Southern Hospitality
I remember first encountering these bars at a church potluck in rural Louisiana. The table groaned under the weight of casseroles, fried chicken, and enough desserts to satisfy an army. But it was these unassuming, layered bars that caught my eye. One bite, and I was transported. The rich, fudgy base, the creamy vanilla middle, and the decadent chocolate top – it was a symphony of textures and flavors. I immediately cornered the baker, Nancy, and practically begged her for the recipe. She smiled knowingly and told me it was a closely guarded secret from a Junior League cookbook, passed down through generations. Now, I’m honored to share this delightful treasure with you.
Recipe Overview
- Prep Time: 45 minutes
- Cook Time: 2 minutes
- Total Time: 1 hour 17 minutes
- Servings: 60
- Yield: Approx. 60 bars
- Dietary Type: Not specified, contains dairy, eggs, and nuts.
Ingredients
First Layer (Crust)
- ½ cup (1 stick) butter
- 4 tablespoons cocoa powder
- ½ cup powdered sugar
- 1 slightly beaten egg
- 1-2 teaspoons vanilla extract
- ½ cup chopped nutmeats (pecans, walnuts, etc.)
- 2 cups crushed graham crackers
- 1 cup finely shredded coconut (optional)
Second Layer (Filling)
- ¼ cup (½ stick) butter
- 3 tablespoons whipping cream
- 1 teaspoon vanilla extract
- 2 teaspoons dry vanilla pudding mix (not instant)
- 2 cups powdered sugar
Third Layer (Topping)
- 1 (9 ¾ ounce) Hershey’s chocolate candy bar (a 10.2-ounce bar also works well)
Equipment Needed
- 13×9 inch baking pan
- Double boiler or saucepan
- Mixing bowls
- Whisk or electric mixer
- Spatula
Instructions
-
Prepare the First Layer (Crust): Begin by melting the butter and cocoa powder together. You can use a double boiler over hot water for gentle, even melting, or a saucepan over very low heat, being careful not to burn the mixture.
-
Combine Wet Ingredients: Once the butter and cocoa are melted and smooth, remove from the heat and add the powdered sugar, slightly beaten egg, and vanilla extract. Return the pan to very low heat and continue to cook for a minute or two, stirring constantly, until well combined. This short cooking time helps to slightly thicken the mixture and prevent a raw egg taste.
-
Incorporate Dry Ingredients: In a separate mixing bowl, combine the chopped nutmeats, crushed graham crackers, and optional shredded coconut.
-
Combine Wet and Dry: Pour the melted chocolate mixture over the dry ingredients and mix thoroughly until everything is evenly coated.
-
Press into Pan: Press the mixture firmly and evenly into the bottom of a 13×9 inch baking pan. A flat-bottomed measuring cup or your fingers can help achieve a smooth, compact crust.
-
Chill the Crust: Cover the pan with plastic wrap and chill in the refrigerator for about 30 minutes. This allows the crust to firm up, making it easier to spread the filling.
-
Prepare the Second Layer (Filling): While the crust is chilling, prepare the filling. In a saucepan, melt the butter, whipping cream, and vanilla extract together over low heat.
-
Add Pudding Mix: Once the butter is melted, add the dry vanilla pudding mix and cook for one minute, stirring constantly, until the mixture is smooth and slightly thickened.
-
Incorporate Powdered Sugar: Remove the saucepan from the heat and add the powdered sugar. Blend well, using a whisk or an electric mixer, until the filling is smooth and creamy.
-
Spread Filling over Crust: Remove the chilled crust from the refrigerator and spread the filling evenly over the top.
-
Prepare the Third Layer (Topping): Break the Hershey’s chocolate candy bar into pieces and melt it using a double boiler or in the microwave in short intervals, stirring frequently to prevent burning.
-
Spread Chocolate Topping: Carefully spread the melted chocolate evenly over the filling layer. Work quickly, as the chocolate will start to set as it cools.
-
Chill the Finished Bars: Cover the pan with plastic wrap and chill in the refrigerator for at least 30 minutes, or until the chocolate is firm.
-
Cut and Serve: Before cutting the bars, let them sit at room temperature for a few minutes. This will make them easier to cut without crumbling. Cut into 2-inch squares.
-
Store: Store the bars in the refrigerator until ready to serve.
Expert Tips & Tricks
-
Melting Chocolate: For a glossy chocolate topping, add a teaspoon of vegetable oil or shortening to the chocolate while melting. This will create a smoother consistency and prevent the chocolate from seizing.
-
Nut Variety: Feel free to experiment with different types of nuts in the crust. Pecans and walnuts are traditional, but almonds, hazelnuts, or even macadamia nuts would also be delicious.
-
Pudding Mix Alternatives: If you can’t find dry vanilla pudding mix (not instant), you can substitute with cornstarch. Use 1 tablespoon of cornstarch in place of the 2 teaspoons of pudding mix.
-
Preventing Crumbling: Cutting the bars while slightly chilled but not rock-hard helps prevent crumbling. Use a sharp knife and wipe it clean between cuts for neat squares.
-
Layer Adhesion: For better adhesion between the layers, lightly score the surface of the crust with a fork before spreading the filling.
Serving & Storage Suggestions
These bars are best served chilled, but slightly softened at room temperature for the most intense flavor. They make a wonderful addition to a dessert platter, a potluck, or a simple afternoon treat. Store leftover bars in an airtight container in the refrigerator for up to a week. You can also freeze them for up to a month. To freeze, wrap the bars individually in plastic wrap and then place them in a freezer-safe container. Thaw in the refrigerator before serving. These are rich, so consider serving them in smaller portions.
Nutritional Information
| Nutrient | Amount per Serving | % Daily Value |
|---|---|---|
| Calories | ~150 kcal | ~8% |
| Total Fat | ~8g | ~12% |
| Saturated Fat | ~5g | ~25% |
| Cholesterol | ~20mg | ~7% |
| Sodium | ~40mg | ~2% |
| Total Carbohydrate | ~18g | ~6% |
| Dietary Fiber | ~1g | ~4% |
| Sugars | ~12g | N/A |
| Protein | ~2g | ~4% |
Please note that these are estimated values and may vary based on specific ingredient brands and portion sizes.
Variations & Substitutions
- Gluten-Free: Substitute the graham crackers with gluten-free graham crackers or a combination of gluten-free flour, oats, and nuts.
- Dairy-Free: Replace the butter in all layers with a dairy-free butter alternative. Use a dairy-free whipping cream and ensure your chocolate bar is also dairy-free.
- Nut-Free: Omit the nuts from the crust and consider using seeds, such as sunflower or pumpkin seeds, for added texture.
- Chocolate Variations: Experiment with different types of chocolate for the topping. Dark chocolate or milk chocolate would both be delicious alternatives to the Hershey’s bar.
- Extracts: Try adding different extracts to the filling, such as almond extract or peppermint extract, for a unique flavor twist.
FAQs (Frequently Asked Questions)
Q: Can I use instant pudding mix instead of the dry vanilla pudding mix?
A: It’s best to use the dry vanilla pudding mix (not instant) as it helps to create the correct texture in the filling. Instant pudding mix may result in a thinner filling. If using instant pudding, reduce the amount of powdered sugar slightly.
Q: Can I make these bars ahead of time?
A: Absolutely! These bars are perfect for making ahead of time. They can be stored in the refrigerator for up to a week, allowing the flavors to meld together even more.
Q: The chocolate topping is cracking when I cut the bars. What can I do?
A: Adding a teaspoon of vegetable oil or shortening to the chocolate while melting will help to prevent cracking. Also, let the bars sit at room temperature for a few minutes before cutting.
Q: Can I freeze these bars?
A: Yes, these bars freeze well. Wrap them individually in plastic wrap and then place them in a freezer-safe container. Thaw in the refrigerator before serving.
Q: What can I use if I don’t have a double boiler?
A: You can create a makeshift double boiler by placing a heat-safe bowl over a saucepan of simmering water, ensuring the bottom of the bowl doesn’t touch the water.
Final Thoughts
Nancy’s Prayer Bars are more than just a dessert; they’re a slice of Southern hospitality, a comforting treat that brings people together. I encourage you to try this recipe and experience the delightful combination of flavors and textures for yourself. Don’t be afraid to experiment with variations and make it your own. Share your creations with friends and family, and perhaps even pass down the recipe to future generations. Pair these bars with a cup of freshly brewed coffee or a scoop of vanilla ice cream for the ultimate indulgence. Enjoy!