
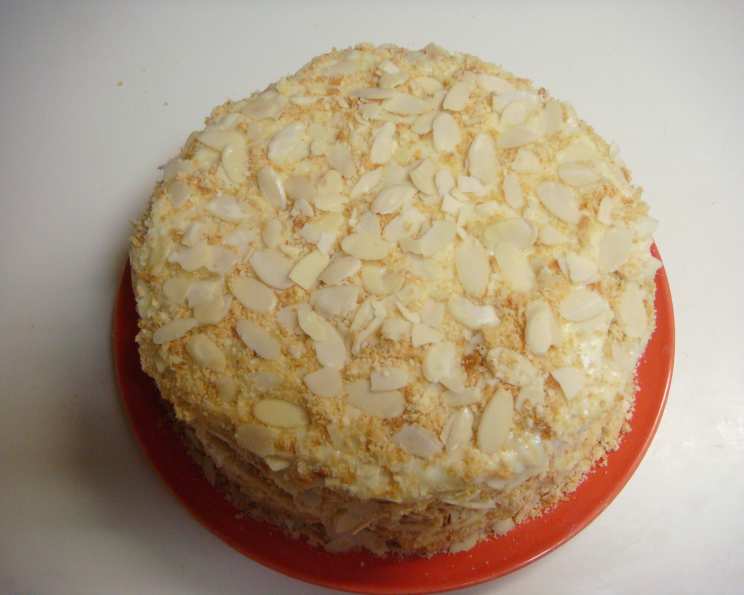
Napoleon Torte: A Culinary Journey Through Layers of Delight
The scent of a Napoleon Torte baking transports me back to my grandmother’s kitchen. I can almost see her, her hands dusted with flour, carefully layering the delicate pastry with rich, creamy fillings. It wasn’t just a dessert; it was an act of love, a centerpiece for family gatherings, and a testament to her patience and skill. It’s a dessert that’s stuck with me throughout my career, reminding me of the simple joys of baking and sharing good food with loved ones.
Recipe Overview
- Prep Time: 1 hour (plus overnight chilling)
- Cook Time: 30-40 minutes
- Total Time: Several Hours (includes chilling and assembly)
- Servings: 30
- Yield: 1 large torte
- Dietary Type: Not suitable for dairy-free, gluten-free, or vegan diets.
Ingredients
For the Pastry:
- 1 lb butter, softened
- 4 cups flour
- 2 cups sour cream
For Filling #1:
- 1 3/4 cup granulated sugar
- 5 tablespoons flour
- 1/4 teaspoon salt
- 2 cups milk, scalded
- 4 egg yolks, beaten
- 1 teaspoon vanilla
For Filling #2:
- 2 (14 ounce) cans sweetened condensed milk
- 6 egg yolks, beaten
- 2 teaspoons vanilla
- 1/2 lb butter, softened
Equipment Needed
- Large mixing bowls
- Double boiler (or heatproof bowl and saucepan)
- Whisk
- Rolling pin
- Baking sheets
- Parchment paper
- Fork
- Large platter
- Electric mixer or stand mixer (optional, but recommended)
Instructions
-
Prepare the Pastry: In a large bowl, cut the softened butter into the flour using a pastry blender or your fingertips until the mixture resembles coarse crumbs.
-
Incorporate Sour Cream: Blend in the sour cream until a dough forms. Don’t overmix; just combine until it comes together.
-
Divide and Chill: Form the dough into 10 equal balls. Wrap each ball individually in wax paper or plastic wrap. Refrigerate the dough overnight. This chilling period is crucial for developing the dough’s characteristic flakiness.
-
Roll Out the Layers: The next day, allow the dough to stand at room temperature for about 15 minutes to soften slightly. On a lightly floured surface, roll each ball into a wafer-thin circle. Aim for consistent thickness for even baking.
-
Prick and Bake: Using a fork, prick each circle all over. This prevents the pastry from puffing up unevenly during baking.
-
Bake the Layers: Preheat your oven to 350 degrees F (175 degrees C). Place the pastry circles on baking sheets lined with parchment paper and bake for 7 to 10 minutes, or until lightly golden brown. Watch them carefully, as they can burn quickly.
-
Cool the Layers: Remove the baked pastry layers from the baking sheets and let them cool completely on wire racks. They will become crisp as they cool.
-
Prepare Filling #1 (Custard Cream): In the top of a double boiler (or a heatproof bowl set over a simmering pot of water), whisk together the granulated sugar, flour, and salt.
-
Add Scalded Milk: Gradually add the hot milk to the dry ingredients, whisking constantly to prevent lumps from forming.
-
Cook and Thicken: Cook and stir the mixture over simmering water until it thickens into a custard-like consistency. This will take several minutes.
-
Temper the Egg Yolks: In a separate bowl, pour a small amount of the hot custard over the beaten egg yolks, whisking constantly to temper them (this prevents them from scrambling).
-
Combine and Cook: Pour the egg yolk mixture back into the hot custard in the double boiler. Cook for 2 minutes, stirring constantly, until the custard is smooth and thickened.
-
Cool and Flavor: Remove from the heat and let the custard cool completely. Stir in the vanilla.
-
Prepare Filling #2 (Condensed Milk Cream): Pour the sweetened condensed milk into the top of a double boiler.
-
Cook and Thicken: Cook over simmering water, stirring frequently, for about 30 minutes, or until the condensed milk has thickened considerably and turned a light caramel color.
-
Add Egg Yolks: Slowly add the beaten egg yolks to the thickened condensed milk in a thin stream, stirring constantly to prevent them from scrambling.
-
Cook Further: Continue cooking and stirring for another 10 minutes.
-
Chill the Mixture: Remove from the heat and let the mixture chill completely in the refrigerator.
-
Beat the Butter: In a separate bowl, beat the softened butter until light and fluffy using an electric mixer or stand mixer.
-
Combine with Condensed Milk Mixture: Gradually beat the chilled condensed milk mixture into the fluffy butter until smooth and well combined. This step creates a rich and decadent cream. Stir in the vanilla.
-
Assemble the Torte: Place one layer of pastry on a large platter. Spread it with either Filling #1 or Filling #2.
-
Continue Layering: Continue stacking the pastry layers, alternating between the two fillings, until only one layer of pastry remains.
-
Frost and Crumble: Frost the top and sides of the torte with the remaining filling. Crush the remaining pastry layer into crumbs and sprinkle them generously over the top and sides of the torte.
-
Chill and Set: Refrigerate the assembled torte for several hours, or preferably overnight, to allow the flavors to meld and the fillings to set. This is an essential step for achieving the right texture.
Expert Tips & Tricks
- Even Baking: To ensure the pastry layers bake evenly, use a pizza cutter or a large knife to trim them to the same size before baking. You can use a cake pan as a guide.
- Preventing Soggy Layers: If you’re worried about soggy layers, brush each baked pastry layer with a thin layer of melted white chocolate before assembling the torte. This creates a moisture barrier.
- Making Ahead: The pastry layers can be made several days in advance and stored in an airtight container at room temperature. The fillings can also be made a day ahead and stored in the refrigerator.
- Creamy Custard: For an extra smooth and creamy custard (Filling #1), strain it through a fine-mesh sieve after cooking.
- Nutty Variation: Toast some nuts like almonds or walnuts and add it to the filling for another layer of flavor and texture.
Serving & Storage Suggestions
Serve the Napoleon Torte chilled. For an elegant presentation, dust the top with powdered sugar just before serving. The torte can be stored in the refrigerator for up to 3-4 days. It is not recommended to freeze the torte, as the fillings may become watery upon thawing.
Nutritional Information
(Estimated values – will vary based on specific ingredients and portion sizes)
| Nutrient | Amount per Serving | % Daily Value |
|---|---|---|
| Calories | 450 kcal | 23% |
| Total Fat | 30g | 46% |
| Saturated Fat | 18g | 90% |
| Cholesterol | 150mg | 50% |
| Sodium | 250mg | 10% |
| Total Carbohydrate | 40g | 13% |
| Dietary Fiber | 1g | 4% |
| Sugars | 25g | N/A |
| Protein | 7g | 14% |
Variations & Substitutions
- Lemon Napoleon: Add lemon zest to both fillings for a bright, citrusy flavor. You can also brush the pastry layers with lemon syrup after baking.
- Chocolate Napoleon: Add cocoa powder to the pastry dough and/or melt chocolate into the fillings for a chocolate version.
- Berry Napoleon: Add fresh berries between the layers along with the fillings for a fruity twist.
- Spiced Napoleon: Add a pinch of cinnamon, nutmeg, or cardamom to the pastry dough and/or fillings for a warm, spiced flavor.
- Coffee Napoleon: Add instant coffee granules to the filling #2 for coffee flavored cream filling.
FAQs (Frequently Asked Questions)
Q: Why is the pastry dough chilled overnight?
A: Chilling the dough allows the gluten to relax, resulting in a more tender and flaky crust. It also makes the dough easier to roll out.
Q: Can I use store-bought puff pastry instead of making the pastry from scratch?
A: While you can, the texture and flavor will be different. Homemade pastry is more delicate and crumbly, which is characteristic of a Napoleon Torte.
Q: How do I prevent the pastry layers from becoming soggy?
A: Ensure the pastry layers are completely cooled before assembling the torte. Brushing them with melted white chocolate can also help create a moisture barrier.
Q: Can I make this torte ahead of time?
A: Yes, in fact, it’s recommended! The torte needs to chill for several hours for the flavors to meld and the fillings to set. Making it a day in advance is ideal.
Q: What if my custard (Filling #1) has lumps?
A: If your custard has lumps, strain it through a fine-mesh sieve to remove them. Make sure to whisk constantly while cooking to prevent lumps from forming.
Final Thoughts
The Napoleon Torte is more than just a dessert; it’s an experience. It’s a testament to the beauty of layering simple ingredients to create something truly extraordinary. While it requires some time and effort, the results are well worth it. Gather your ingredients, put on some music, and embark on this culinary adventure. Share your creation with loved ones and savor the moment. Don’t be afraid to experiment with variations and make it your own. And most importantly, enjoy the process!