
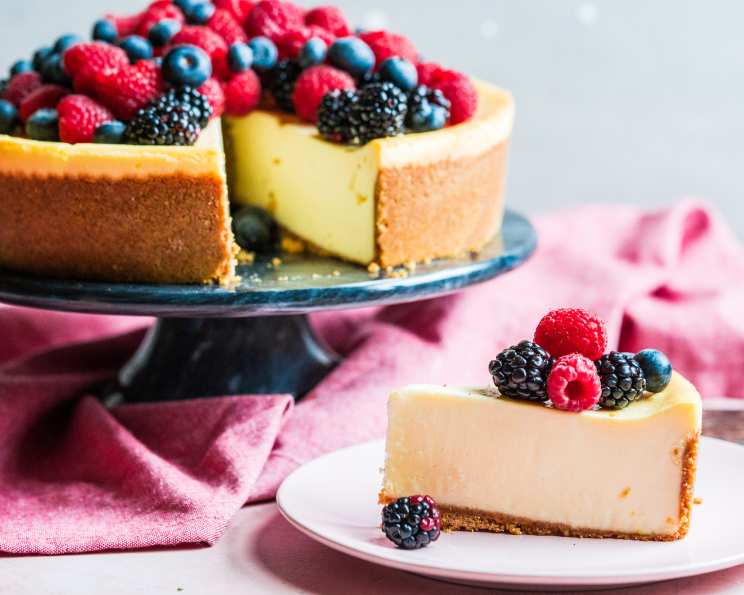
The Quintessential New York Cheesecake on Shortbread Crust
The memory is etched in my mind: the tiny diner, bathed in the golden glow of a late afternoon sun. My grandfather, a man of few words but impeccable taste, slid a forkful of cheesecake across the table towards me. It was New York style, impossibly tall and creamy, with a buttery, crumbly crust. The first bite was pure magic, a symphony of textures and flavors that sparked a lifelong love affair with this iconic dessert. From that day on, no matter where I went in the world, I was always searching for a cheesecake that could transport me back to that moment. And now, after years of experimentation, I’m thrilled to share my version, one that I believe captures the essence of that perfect slice.
Recipe Overview
- Prep Time: 30 minutes
- Cook Time: 1 hour 10 minutes
- Total Time: 3 hours 30 minutes (plus overnight chilling)
- Servings: 16
- Yield: 1 ten-inch cake
- Dietary Type: Not specified
Ingredients
For the Crust:
- 1 1⁄2 cups all-purpose flour
- 1⁄3 cup white sugar
- 1 egg, beaten
- 1⁄2 cup butter, softened
For the Filling:
- 2 1⁄2 lbs cream cheese, softened
- 1 3⁄4 cups white sugar
- 1 pinch salt
- 3 tablespoons all-purpose flour
- 5 large eggs
- 2 egg yolks (from large eggs)
- 2 teaspoons vanilla extract (adjust to taste)
- 1⁄4 cup heavy whipping cream
Optional Toppings:
- Fresh berries (blueberries, raspberries, cherries)
- Sugar
- Cornstarch
- Liqueur (Chambord, Frangelico, Amaretto)
- Caramel sauce
- Apples
- Milk chocolate sauce
- Chopped pecans
- Whipped cream
Equipment Needed
- Medium bowl
- Large bowl
- Stand mixer (optional, but recommended)
- 10-inch springform pan
- Clean 10x14x2-inch roasting pan
- Fork
- Whisk
- Cooling rack
- Plastic wrap
Instructions
-
PREP: As with all baking endeavors, ensure all your ingredients are at a cool room temperature (around 65°F). This ensures even mixing and a smoother batter. Get a couple of quarts of water simmering on the stove; this will be used for the water bath. Arrange your oven racks so there’s one on the lowest rung and one in the middle position. If you don’t have a center position, opt for a mid-lower placement. Have a clean 10x14x2-inch (or similar) roasting pan at the ready.
-
Preheat: Preheat your oven to 400°F (200°C).
-
Prepare the Pan: Grease a 10-inch springform pan thoroughly. This prevents the crust from sticking and ensures easy removal after baking.
-
CRUST: In a medium bowl, gently combine the 1 1/2 cups of flour, 1/3 cup of sugar, 1 beaten egg, and 1/2 cup of softened butter. Mix until the dough just comes together. Be careful not to overmix, as this can result in a tough crust.
-
Press the Crust: Press the dough evenly into the bottom of the prepared springform pan, extending it to the edges.
-
Prick and Bake: Use a fork to prick the crust all over. This will prevent it from puffing up during baking. Bake in the preheated oven for 10-15 minutes, or until lightly browned. Let the crust cool completely on a wire rack before adding the filling.
-
FILLING: Increase the oven temperature to 475°F (246°C). This initial high heat helps to set the cheesecake and create that signature golden top.
-
Prepare the Water Bath: Turn the oven light off. Place the roasting pan on the bottom rack of the oven and carefully fill it with the boiling water. The water bath is crucial for creating a humid environment, which helps to prevent cracks in the cheesecake.
-
Cream the Cheese: In a large bowl (preferably using a stand mixer), very gently beat the 2 1/2 lbs of softened cream cheese until completely smooth. Use the slowest setting for about 5 minutes. Avoid over-beating, as this can incorporate too much air into the mixture.
-
Scrape Down: Scrape down the sides of the bowl regularly to ensure all the cream cheese is evenly incorporated.
-
Add Sugar and Flour: Gradually add the pinch of salt, 1 3/4 cups of sugar, and 3 tablespoons of flour to the cream cheese. Continue to beat slowly until well combined, scraping down the sides of the bowl as needed. The flour helps to stabilize the cheesecake and prevent it from being too watery.
-
Incorporate Eggs and Vanilla: In a separate small bowl, gently whisk together the 2 teaspoons of vanilla extract, 5 large eggs, and 2 egg yolks. Gradually add this egg mixture to the cream cheese mixture, stirring until just combined and smooth. Stop the mixer occasionally and scrape down the sides of the bowl.
-
The Secret Step: This is very important! Stop the mixer, remove the bowl, and give it a good scraping (some of the cream cheese will inevitably stick to the sides and bottom). Replace the bowl on the mixer and stir until all lumps are gone. This ensures a perfectly smooth and creamy cheesecake.
-
Add Cream: Add the 1⁄4 cup of heavy whipping cream and mix only enough to blend. Overmixing at this stage can cause the cheesecake to crack.
-
Pour and Release Air: Gently pour the filling over the cooled crust. Run a thin knife around the filling in an “S” pattern to release any trapped air bubbles. Let it sit on the counter for 5 minutes, then repeat.
-
First Bake: Bake the cheesecake in the preheated oven for 10 minutes at 475°F (246°C).
-
Second Bake: Reduce the oven temperature to 200°F (93°C) and continue to bake for one hour.
-
Cooling Process: Turn off the oven, but leave the cheesecake inside for another hour. Do not open the oven door! This gradual cooling process is critical for preventing cracks. You’ve created a perfect humid environment that will help produce a professional, NY-style cheesecake. It may appear a little jiggly in the center and will have a golden appearance around the edges – this is exactly what you want.
-
Cooling on Rack: Allow the cheesecake to cool on a wire rack for several hours. After about 20 minutes, slightly release the latch on the side of the pan. Rotate the sides to ensure the cake is free (but don’t remove it yet). You can remove the sides after an hour (or so) if you want to admire your work, but replace it quickly or the cake may fall.
-
Chill Overnight: After it’s completely cool, wrap the cheesecake completely with plastic wrap, ensuring a layer is stuck to the top of the cake. Chill it overnight in the refrigerator. This step is essential for the cheesecake to fully set and develop its signature flavor.
-
Serving: The cheesecake will stay at its peak flavor for several days as long as you keep it wrapped and cold.
-
Toppings (Optional): Enjoy the cheesecake plain, or top it with your favorite sauce or fruit compote.
For a simple berry compote: Boil a bag of frozen berries with a 1/4 cup of sugar until the liquid coats the back of a spoon. Thicken with a tablespoon of cornstarch mixed into a 1/4 cup of cold water — pour in slowly while maintaining the boil and stirring constantly. Adjust the thickness by adding liquid or more cornstarch. Flavor with liqueur, fruit juice, or extract. Blueberries or raspberries with Chambord are awesome, cherries work well with Frangelico or Amaretto. If you use alcohol, be sure to boil off the alcohol. Cool the fruit sauce in a mason jar and refrigerate. It keeps longer than the cheesecake! You can also serve it with caramel sauce and buttered/sliced/baked apples. A light milk chocolate sauce, a sprinkle of chopped pecans, and a dollop of whipped cream will produce a nice turtle cake.
Expert Tips & Tricks
- Room Temperature is Key: Don’t underestimate the importance of room temperature ingredients. Cold cream cheese is a recipe for lumps.
- Low and Slow is the Way to Go: Beating the cream cheese on a low speed minimizes air incorporation, which leads to a smoother, denser cheesecake.
- Water Bath Wonders: The water bath isn’t just about humidity; it also helps to regulate the oven temperature, preventing the cheesecake from cooking too quickly around the edges.
- Patience is a Virtue: Resist the urge to open the oven door during the cooling process. The sudden temperature change can cause the cheesecake to crack.
- Don’t Overbake: A slight jiggle in the center is a good thing! The cheesecake will continue to set as it cools.
Serving & Storage Suggestions
For optimal flavor and texture, serve the cheesecake cold, straight from the refrigerator. A simple slice on a plate is all it needs, though a dusting of powdered sugar or a dollop of whipped cream adds a touch of elegance. Leftovers should be tightly wrapped in plastic wrap and stored in the refrigerator for up to 5 days. You can also freeze slices of cheesecake for up to 2 months. Thaw overnight in the refrigerator before serving.
Nutritional Information
| Nutrient | Amount per Serving | % Daily Value |
|---|---|---|
| Calories | 489.5 kcal | N/A |
| Calories from Fat | 304 g | 62% |
| Total Fat | 33.9 g | 52% |
| Saturated Fat | 19 g | 94% |
| Cholesterol | 188.9 mg | 62% |
| Sodium | 317.8 mg | 13% |
| Total Carbohydrate | 39.3 g | 13% |
| Dietary Fiber | 0.3 g | 1% |
| Sugars | 28.4 g | N/A |
| Protein | 8.4 g | 16% |
Note: Nutritional information is an estimate and may vary based on specific ingredients and portion sizes.
Variations & Substitutions
- Gluten-Free Crust: Use a gluten-free flour blend and follow the same crust instructions.
- Lemon Zest: Add 1-2 teaspoons of lemon zest to the filling for a bright, citrusy flavor.
- Chocolate Swirl: Melt semi-sweet chocolate and swirl it into the filling before baking.
- Different Crusts: Try a graham cracker crust or an Oreo cookie crust for a different flavor profile.
- Seasonal Fruit: Top with seasonal fruits like peaches in the summer or cranberries in the fall.
FAQs (Frequently Asked Questions)
Q: Why is my cheesecake cracking?
A: Cracking is often caused by temperature fluctuations or overbaking. Ensure your ingredients are at room temperature, use a water bath, and avoid opening the oven door during baking and cooling.
Q: Can I make this cheesecake ahead of time?
A: Absolutely! In fact, this cheesecake benefits from chilling overnight, which allows the flavors to meld and the texture to set.
Q: Can I freeze this cheesecake?
A: Yes, you can freeze slices of cheesecake for up to 2 months. Wrap them tightly in plastic wrap and thaw overnight in the refrigerator before serving.
Q: What can I do if my cheesecake cracks?
A: Don’t despair! Cracks can be easily hidden with a layer of fruit compote, chocolate ganache, or cookie crumbs.
Q: Why do I need a water bath?
A: A water bath creates a humid environment in the oven, which helps to prevent the cheesecake from drying out and cracking. It also ensures even baking and a creamy texture.
Final Thoughts
This New York Cheesecake on Shortbread Crust is more than just a dessert; it’s a culinary journey, a testament to the power of simple ingredients transformed into something truly extraordinary. I encourage you to embark on this baking adventure, to savor the process, and to share the fruits of your labor with loved ones. Whether you top it with a vibrant berry compote or simply enjoy it plain, I hope this cheesecake brings you as much joy as it has brought me. And please, don’t hesitate to share your feedback – I’m always eager to hear about your baking experiences! Pair it with a strong cup of coffee or a dessert wine for the ultimate indulgence. Happy baking!