
New Zealand Kiwi Bread: A Taste of Sunshine
My first encounter with kiwi bread was during a baking competition in culinary school. I was a nervous freshman, surrounded by seasoned bakers creating elaborate cakes and pastries. I wanted something simple, something that celebrated flavor over fuss. I remembered the vibrant green kiwis my mother used to pack in my lunchbox – a burst of tangy sweetness amidst the usual sandwiches. That memory inspired me, and my kiwi bread, a humble loaf studded with those jewel-toned fruits, unexpectedly won the judges over. It was a reminder that sometimes, the most beautiful creations are the simplest, born from genuine memories and a love for good food.
Recipe Overview
- Prep Time: 20 minutes
- Cook Time: 55 minutes
- Total Time: 1 hour 15 minutes
- Yields: 1 loaf
- Serves: 10
- Dietary Type: Not specified
Ingredients
- 6-7 medium ripe kiwis
- 1 cup packed brown sugar
- 1 teaspoon grated lemon peel
- 1 egg
- ½ cup vegetable oil
- 1 ½ cups flour
- ½ teaspoon salt
- ½ teaspoon baking powder
- ½ teaspoon baking soda
For the Icing:
- 1 cup powdered sugar
- 6-8 teaspoons lemon juice
Equipment Needed
- 2-quart saucepan
- Mixing bowls
- Measuring cups and spoons
- Loaf pan
- Wire rack
- Whisk or electric mixer (optional)
Instructions
- Begin by preparing the kiwis. Peel and chop enough kiwis to yield 1 ½ cups of chopped kiwi.
- In a 2-quart saucepan, combine the chopped kiwi, brown sugar, and grated lemon peel. Place the saucepan over medium heat and bring the mixture to a boil, stirring continuously until the fruit loses some of its color. This process usually takes about 5-7 minutes.
- Remove the saucepan from the heat and allow the kiwi mixture to cool completely. This is crucial to prevent the egg from cooking in the next steps.
- While the kiwi mixture is cooling, preheat your oven to 350°F (175°C).
- In a separate mixing bowl, beat the egg and vegetable oil together until well combined. You can use a whisk or an electric mixer for this step.
- In another mixing bowl, whisk together the flour, salt, baking powder, and baking soda. This ensures that the leavening agents are evenly distributed throughout the flour.
- Once the kiwi mixture has cooled, add the baking soda to it. Stir the mixture until it begins to bubble. This reaction is what gives the bread its rise.
- Add the kiwi mixture to the egg mixture and stir until just combined. Do not overmix.
- Gradually add the flour mixture to the wet ingredients, stirring until the dry ingredients are just moistened. Avoid overmixing, as this can result in a tough bread.
- Grease a loaf pan thoroughly to prevent the bread from sticking. You can use butter, shortening, or cooking spray.
- Spoon the batter into the prepared loaf pan, spreading it evenly.
- Bake in the preheated oven for approximately 55 minutes, or until a wooden skewer inserted into the center comes out clean.
- Once baked, remove the loaf pan from the oven and let it cool in the pan for 10 minutes. This helps the bread to set and prevents it from crumbling when you turn it out.
- After 10 minutes, turn the bread out onto a wire rack to cool completely.
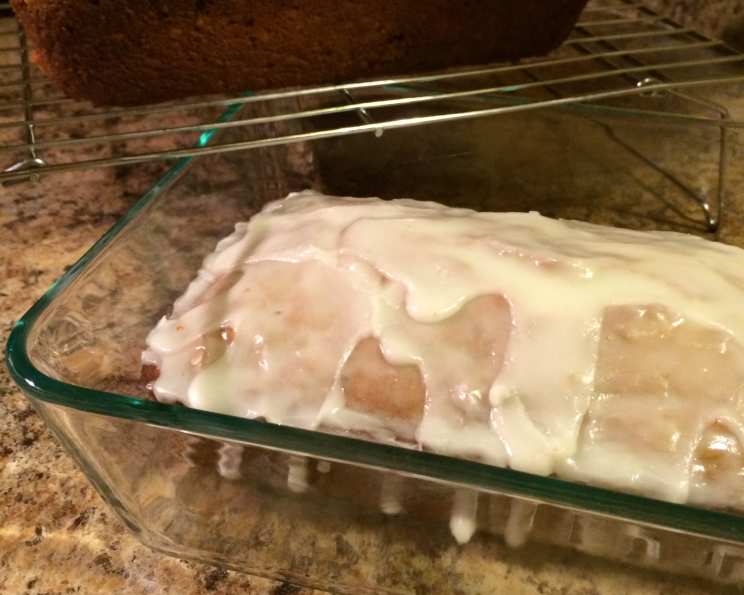
- While the bread is cooling, prepare the icing. In a small bowl, whisk together the powdered sugar and lemon juice until you achieve a smooth, pourable consistency. Add more lemon juice if the icing is too thick, or more powdered sugar if it is too thin.
- Once the bread has cooled completely, spoon the icing over the loaf, allowing it to drizzle down the sides.
Expert Tips & Tricks
- Kiwi Ripeness: Use ripe, but not overly soft, kiwis for the best flavor and texture. Overripe kiwis can make the bread too mushy.
- Lemon Zest Power: Don’t skip the lemon zest! It brightens the flavor and complements the kiwi beautifully.
- Cooling Time: Allowing the kiwi mixture to cool completely is essential. Adding it hot can cook the egg, ruining the texture.
- Prevent Sticking: Ensure the loaf pan is thoroughly greased. Consider using parchment paper lining for easy removal.
- Checking Doneness: If the top of the bread starts to brown too quickly, tent it loosely with foil during the last 15 minutes of baking.
- Icing Consistency: Adjust the amount of lemon juice in the icing to achieve your desired consistency. For a thicker icing, use less juice; for a thinner glaze, use more.
Serving & Storage Suggestions
New Zealand Kiwi Bread is delicious served warm or at room temperature. It pairs wonderfully with a cup of tea or coffee, or as a light dessert.
- Serving: Slice the bread and serve it as is, or with a dollop of whipped cream or a scoop of vanilla ice cream.
- Storage: Store leftover bread in an airtight container at room temperature for up to 3 days, or in the refrigerator for up to a week.
- Freezing: For longer storage, wrap the bread tightly in plastic wrap and then in foil, and freeze it for up to 2 months. Thaw overnight in the refrigerator before serving.
- Reheating: To reheat, wrap a slice of bread in foil and warm it in a preheated oven at 300°F (150°C) for about 10 minutes, or until heated through. You can also microwave individual slices for a few seconds.
Nutritional Information
Note: Nutritional information is an estimate and may vary based on specific ingredients and portion sizes.
| Nutrient | Amount per Serving | % Daily Value |
|---|---|---|
| Calories | 328 kcal | N/A |
| Calories from Fat | N/A | N/A |
| Total Fat | 11.8 g | 18% |
| Saturated Fat | 1.6 g | 8% |
| Cholesterol | 18.6 mg | 6% |
| Sodium | 212.5 mg | 8% |
| Total Carbohydrate | 54.3 g | 18% |
| Dietary Fiber | 1.8 g | 7% |
| Sugars | 37 g | N/A |
| Protein | 3.1 g | 6% |
Variations & Substitutions
- Gluten-Free: Substitute the all-purpose flour with a gluten-free flour blend. You may need to add a binder like xanthan gum to improve the texture.
- Spice it Up: Add a pinch of cinnamon, nutmeg, or cardamom to the flour mixture for a warm, spiced flavor.
- Nutty Delight: Incorporate chopped walnuts or pecans into the batter for added texture and flavor.
- Citrus Boost: Use orange zest instead of lemon zest for a different citrusy note.
- Tropical Twist: Add shredded coconut to the batter for a tropical flavor.
FAQs (Frequently Asked Questions)
Q: Can I use frozen kiwi for this recipe?
A: While fresh kiwi is ideal, you can use frozen kiwi. Be sure to thaw it completely and drain any excess liquid before chopping and adding it to the recipe.
Q: Can I reduce the amount of sugar in this recipe?
A: You can reduce the sugar slightly, but keep in mind that it will affect the sweetness and texture of the bread. Start by reducing the sugar by ¼ cup and adjust to your taste.
Q: My bread is sinking in the middle. What did I do wrong?
A: A sunken bread can be caused by several factors, including overmixing the batter, using too much leavening agent, or not baking the bread long enough. Make sure to follow the recipe carefully and bake the bread until a skewer inserted into the center comes out clean.
Q: Can I make this recipe in muffin tins instead of a loaf pan?
A: Yes, you can bake this recipe as muffins. Reduce the baking time to about 20-25 minutes, or until a toothpick inserted into the center comes out clean.
Q: My icing is too runny. How can I fix it?
A: If your icing is too runny, gradually add more powdered sugar, one tablespoon at a time, until you reach your desired consistency.
Final Thoughts
New Zealand Kiwi Bread is more than just a recipe; it’s a taste of sunshine, a burst of flavor, and a celebration of simplicity. Whether you’re a seasoned baker or a kitchen novice, I encourage you to try this recipe and experience the magic of combining sweet and tangy kiwis into a delicious loaf. Share your creations with friends and family, and let the flavors transport you to a sunny orchard in New Zealand. Happy baking!