
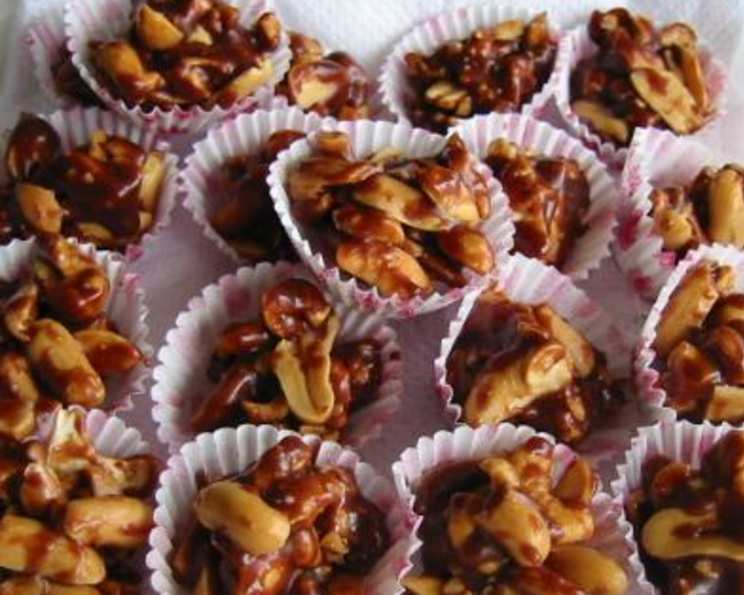
No-Bake Chocolate Peanut Butter Dream Bites
I remember being a kid and eagerly awaiting the arrival of the holidays, not just for the presents, but for the homemade treats that would magically appear on every surface of our kitchen. My Aunt Carol always made the most incredible fudge, cookies, and candies. But one year, she surprised us all with something new – these addictive little chocolate peanut butter nuggets. They were gone within hours, and I’ve been chasing that perfect combination of salty, sweet, and crunchy ever since. This recipe brings me right back to that kitchen, filled with the warmth of family and the joy of shared sweets.
Recipe Overview
- Prep Time: 15 minutes
- Cook Time: 5 minutes
- Total Time: 20 minutes (plus chilling time)
- Servings: Approximately 40 mini treats
- Yield: 40 mini treats
- Dietary Type: Can be adapted to Gluten-Free
Ingredients
- 1/4 cup honey
- 2 tablespoons sugar
- 3 tablespoons peanut butter (I use smooth)
- 1 ounce bittersweet chocolate
- 1 cup roasted peanuts (I use salted)
- 1 cup roasted cashews (I use salted)
Equipment Needed
- Saucepan
- Ziplock bag
- Rolling pin or pestle
- Mini paper cups or parchment paper
Instructions
- First, prepare the nuts. Combine the roasted peanuts and roasted cashews in a ziplock bag. Seal the bag tightly and then, using a rolling pin or a pestle, whack the nuts to coarsely chop them. You don’t want a fine powder; aim for a mix of smaller pieces and larger chunks for a delightful texture.
- Now, prepare the sweet base. In a saucepan, combine the honey and sugar. Place the saucepan over low heat and heat the mixture until it starts to boil gently. Watch closely to prevent burning.
- Remove the saucepan from the heat. Immediately add the bittersweet chocolate and stir continuously until the chocolate is completely melted and the mixture is smooth and glossy.
- Add the peanut butter to the chocolate mixture and stir until everything is well combined and the mixture is smooth and creamy. This step brings in that rich, nutty flavor that makes these treats so irresistible.
- Pour the chopped nuts into the saucepan with the chocolate peanut butter mixture. Stir quickly and thoroughly to ensure that all the nuts are evenly coated with the sticky mixture.
- Working quickly before the glaze sets, drop the nut mixture by teaspoonfuls onto mini paper cups or parchment paper. If the glaze starts to harden too much while you’re working, simply heat it up briefly on the stovetop over low heat to make it more manageable.
- Place the prepared treats in the refrigerator to chill until they are firm and set. This usually takes about 30 minutes to an hour.
Expert Tips & Tricks
- Nut Variations: Feel free to experiment with different nuts based on your preference or what you have on hand. Almonds, pecans, walnuts, or even macadamia nuts would work beautifully. Consider toasting the nuts lightly before chopping to enhance their flavor.
- Chocolate Intensity: The recipe calls for bittersweet chocolate, but you can adjust the sweetness by using semi-sweet or even milk chocolate. Keep in mind that milk chocolate will make the treats significantly sweeter.
- Peanut Butter Power: For a more intense peanut butter flavor, use natural peanut butter, but be sure to stir it well before measuring as the oil tends to separate.
- Glaze Consistency: The consistency of the glaze is crucial. If it becomes too thick, add a tiny splash of milk (dairy or non-dairy) to thin it out. If it’s too thin, cook it for a minute longer on low heat to reduce the liquid.
- Even Coating: To ensure that all the nuts are evenly coated, stir the mixture vigorously and use a spatula to scrape the bottom and sides of the saucepan.
- Clean Release: Lightly grease the mini paper cups or parchment paper with cooking spray to prevent the treats from sticking.
- Work Quickly: This is a no-bake recipe, so that means the mixture will start to firm up. Working quickly will help you get the treats portioned before this happens.
Serving & Storage Suggestions
These No-Bake Chocolate Peanut Butter Dream Bites are best served chilled, straight from the refrigerator. Arrange them on a platter for an appealing presentation, or package them in decorative bags for a delightful homemade gift.
Store any leftover treats in an airtight container in the refrigerator for up to a week. You can also freeze them for longer storage – up to a month. Let them thaw in the refrigerator before serving. They are best enjoyed cold, but you can bring them to room temperature for a softer texture, if preferred.
Nutritional Information
Note: Nutritional information is an estimate and may vary based on specific ingredients and portion sizes.
| Nutrient | Amount per Serving | % Daily Value |
|---|---|---|
| Calories | 75 kcal | 4% |
| Total Fat | 5g | 6% |
| Saturated Fat | 1g | 5% |
| Cholesterol | 0mg | 0% |
| Sodium | 35mg | 2% |
| Total Carbohydrate | 6g | 2% |
| Dietary Fiber | 1g | 4% |
| Sugars | 4g | 8% |
| Protein | 2g | 4% |
Variations & Substitutions
- Gluten-Free: This recipe is naturally gluten-free.
- Dairy-Free: Ensure your chocolate is dairy-free. Many bittersweet chocolates are naturally dairy-free, but always double-check the label.
- Nut-Free (ish): Use sunflower seed butter or tahini in place of peanut butter. Substitute the nuts with roasted sunflower seeds or pumpkin seeds.
- Spice It Up: Add a pinch of cinnamon or a dash of cayenne pepper to the chocolate mixture for a subtle warmth.
- Mix-Ins: Incorporate other mix-ins, such as dried cranberries, shredded coconut, or chopped pretzels for added texture and flavor.
- Extracts: Enhance the flavor with a drop or two of vanilla extract, almond extract, or even peppermint extract.
FAQs (Frequently Asked Questions)
Q: Can I use a different type of nut butter?
A: Absolutely! Almond butter, cashew butter, or sunflower seed butter are all great substitutes for peanut butter. The flavor profile will change slightly, but the texture will remain similar.
Q: Can I make these treats ahead of time?
A: Yes, these treats are perfect for making ahead of time! They can be stored in the refrigerator for up to a week or frozen for longer storage.
Q: What if I don’t have mini paper cups?
A: No problem! You can use parchment paper or silicone baking mats instead. Just drop the mixture onto the surface and let it set, then cut the sheet into squares.
Q: My chocolate is seizing up, what do I do?
A: Add a teaspoon of vegetable oil or shortening to the chocolate and stir continuously. This will help to smooth out the chocolate and prevent it from seizing. If that doesn’t work, sometimes a tablespoon of very hot water will loosen up the mixture.
Q: Can I use regular granulated sugar instead of the sugar listed?
A: While the recipe calls for sugar, you can definitely use granulated sugar as a substitute. The taste and consistency should remain generally the same.
Final Thoughts
These No-Bake Chocolate Peanut Butter Dream Bites are a testament to the fact that sometimes the simplest recipes are the most satisfying. With just a handful of ingredients and minimal effort, you can create a treat that’s bursting with flavor and texture. Whether you’re making them for a holiday gathering, a special occasion, or just a sweet craving, I encourage you to give this recipe a try. Don’t be afraid to experiment with different variations and make them your own! And please, share your creations and feedback – I’d love to hear how they turned out. Perhaps, pair these with a tall glass of cold milk or a steaming cup of coffee for the ultimate indulgence. Happy treat-making!