
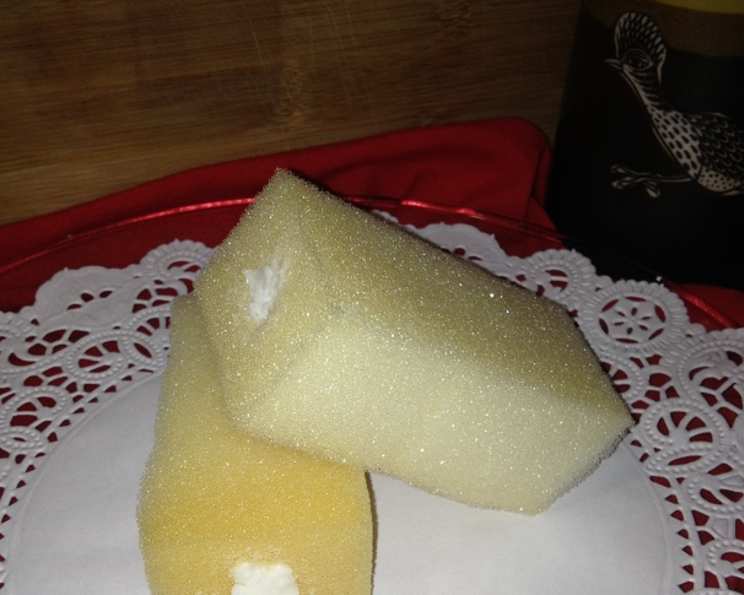
No-Bake “Fake Twinkies”: A Culinary Adventure
My grandmother, bless her adventurous soul, had a knack for finding the most peculiar recipes in her church cookbooks. She wasn’t much of a baker, but one summer she became obsessed with recreating Twinkies at home. Of course, being my grandmother, she somehow stumbled upon a recipe so unorthodox that it became a family legend. I remember spending an afternoon with her, utterly perplexed, as she wielded a serrated knife against a foam cushion, muttering about “sponge cake” and “creamed filling.” The resulting… creations… were memorable, to say the least. While not exactly Twinkies, the experience sparked a lifelong appreciation for the sheer creativity (and sometimes absurdity) of home cooking. This recipe, inspired by her misguided but loving attempt, is a testament to that memory.
Recipe Overview
- Prep Time: 48 hours
- Servings: 24
- Dietary Type: Absolutely Not Recommended
Ingredients
- 2 lbs lard
- 1 cup sugar
- 1 foam rubber seat cushion (from your living room)
- Hot soapy water
- Towel
Equipment Needed
- Pastry bag
- Serrated knife
- Sink
- Towel
- Hot knitting needle
- Doily-lined plastic plate
Instructions
- Begin by thoroughly creaming together the lard and sugar in a large bowl. This is the key to the “filling,” such as it is. Cream until the mixture is as light and fluffy as possible, though it will remain quite dense.
- Transfer the creamed lard and sugar mixture to a pastry bag fitted with a plain tip. Set aside.
- Now for the “cake.” Locate a foam rubber seat cushion from your living room. This step is crucial for achieving the proper “sponge” texture.
- Carefully remove the upholstery from the seat cushion. You’ll want to discard the upholstery, as it won’t contribute to the desired flavor profile.
- Using a serrated knife, carefully cut the foam rubber into rectangular shapes, approximately 1 1/2″ by 1 1/2″ by 4″. These will be the “Twinkie” bodies.
- Fill your sink with hot soapy water. Gently wash the foam rubber pieces in the soapy water, ensuring that all surfaces are thoroughly cleaned. Rinse carefully to remove any soap residue.
- Spread the washed foam rubber pieces out on a clean towel to dry thoroughly. Turn the pieces after 1 day to ensure even drying. This may take more than 48 hours, depending on the humidity and the density of the foam.
- Once the foam rubber pieces are completely dry, take a hot knitting needle and carefully plunge it through the narrow end of each piece, creating a tunnel. Quickly remove the needle.
- Repeat this process for each piece of foam rubber, creating a tunnel through the center of each “Twinkie.”
- Now, using the pastry bag filled with the creamed lard and sugar mixture, fill the resulting tunnels in the foam rubber pieces. Ensure that the tunnels are completely filled with the “filling.”
- Serve your “Fake Twinkies” on a doily-lined plastic plate.
- Finally, and most importantly, don’t throw anything at ThatBobbieGirl 😉.
Expert Tips & Tricks
- For an extra touch of “authenticity,” consider using yellow food coloring in the lard and sugar mixture to mimic the color of real Twinkie filling.
- To ensure the foam rubber dries completely, use a fan to circulate air around the pieces.
- If you’re feeling adventurous, try experimenting with different types of foam for varying textures.
- Do not consume. This recipe is strictly for novelty purposes.
Serving & Storage Suggestions
These “Fake Twinkies” are best served immediately, for maximum comedic effect. Due to the unique nature of the ingredients, they are not suitable for storage. If you must store them, keep them at room temperature, away from direct sunlight. However, discard them immediately. These are not meant for human consumption!
Nutritional Information
Please note: The following nutritional information is provided for satirical purposes only. Consumption of this product is not recommended.
| Nutrient | Amount per Serving | % Daily Value |
|---|---|---|
| Calories | Estimated High | N/A |
| Total Fat | Extremely High | N/A |
| Saturated Fat | Dangerously High | N/A |
| Cholesterol | Potentially Toxic | N/A |
| Sodium | Minimal | N/A |
| Total Carbohydrate | Minimal | N/A |
| Dietary Fiber | Zero | N/A |
| Sugars | Considerably High | N/A |
| Protein | Zero | N/A |
Variations & Substitutions
- For a “healthier” version (though still not recommended for consumption), you could substitute the lard with shortening.
- For a vegan option… just don’t make this at all.
- Experiment with different colors of foam for a more vibrant presentation.
- You could attempt using actual sponge cake as a replacement for the foam rubber, but at that point, you’re better off just making real Twinkies.
FAQs (Frequently Asked Questions)
Q: Is this recipe safe to eat?
A: Absolutely not! This recipe is intended as a novelty item and should not be consumed under any circumstances.
Q: Can I substitute the foam rubber with something else?
A: While you could try, the unique texture of the foam rubber is essential to the “authentic” Fake Twinkie experience.
Q: How long will these Fake Twinkies last?
A: They should be discarded immediately after serving.
Q: Can I make these ahead of time?
A: The drying process for the foam rubber takes at least 48 hours, so some advance planning is required.
Q: Why would anyone make this?
A: For the sheer fun of it! It’s a great conversation starter and a hilarious way to poke fun at processed foods.
Final Thoughts
While this recipe for “No-Bake Fake Twinkies” may not be the most appetizing, it’s certainly one of the most memorable. Whether you’re looking for a quirky conversation piece, a nostalgic trip down memory lane, or simply a good laugh, I encourage you to try this recipe (with caution!). Just remember, this recipe is not intended for consumption. Perhaps you could frame it as a cautionary tale about overly-processed food instead, or even display it as a piece of conceptual art.