
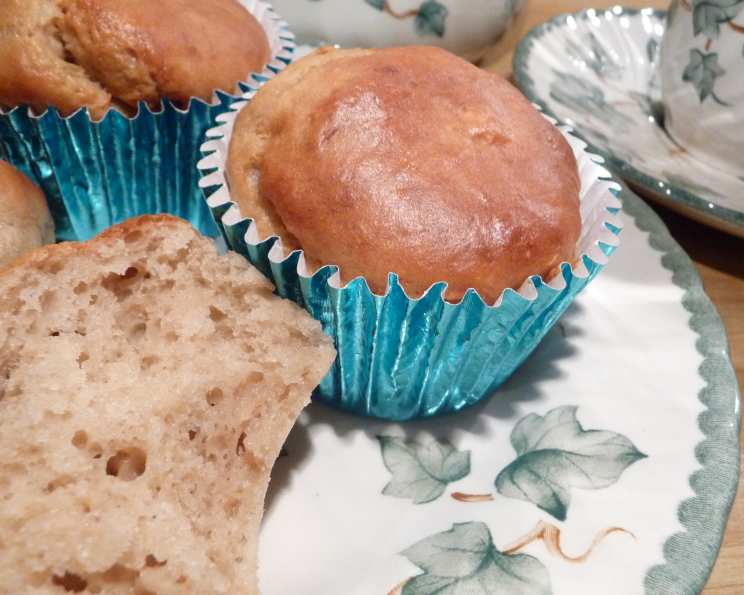
No Butter, All Flavor: A Banana Bread Revelation
I still remember the aroma that would waft from my grandmother’s kitchen every Sunday morning. It was a symphony of warm spices and sweet, ripe bananas, the telltale scent of her famous banana bread. Every slice was a hug, a comforting reminder of home. While I cherish those memories, I’ve been on a quest to recreate that cozy feeling with a slightly lighter touch. This no-butter banana bread delivers all the comforting flavors without the added fat, proving that you don’t have to sacrifice indulgence for a healthier treat.
Recipe Overview
- Prep Time: 15 minutes
- Cook Time: 50 minutes (bread pan) / 22 minutes (muffin pan)
- Total Time: 65 minutes (bread pan) / 37 minutes (muffin pan)
- Servings: Approximately 10 slices (bread) / 20 muffins
- Yield: 1 loaf of bread or 20 muffins
- Dietary Type: Can be adapted to dairy-free
Ingredients
- 1 1/2 cups all-natural plain yogurt (drained for 3-4 hours in cheesecloth)
- 1 cup sugar
- 2 eggs
- 2 tablespoons applesauce
- 4 large very well-ripened bananas (almost all brown)
- 2 cups flour
- 1 teaspoon baking soda
- 1 teaspoon salt
- 1 teaspoon vanilla
- 1/3 cup nuts (optional)
Ingredient Notes:
- For a dairy-free version, use a thick, plain dairy-free yogurt alternative like soy or coconut yogurt. Be sure to drain it as directed.
- The riper the bananas, the sweeter and more flavorful your bread will be. Don’t be afraid of those brown spots! They are your friends.
- Feel free to use your favorite type of nuts, such as walnuts, pecans, or even chopped almonds.
Equipment Needed
- Mixing bowls
- Whisk
- Measuring cups and spoons
- Cheesecloth
- Rubber spatula
- Greased bread pan (9×5 inch) or muffin pan
- Oven
Instructions
-
Drain the Yogurt: Begin by preparing your yogurt. Line a colander with several layers of cheesecloth. Place the yogurt in the cheesecloth and let it drain for 3-4 hours. The goal is to achieve a consistency similar to that of Crisco or softened butter. This step is crucial for the bread’s texture, as the drained yogurt provides the necessary moisture and binding without the fat.
-
Cream the Wet Ingredients: In a large mixing bowl, combine the drained yogurt, sugar, eggs, vanilla, and applesauce. Whisk these ingredients together until you achieve a smooth and creamy consistency. This step ensures that the wet ingredients are properly emulsified, which will contribute to a more even texture in the final product.
-
Combine the Dry Ingredients: In a separate mixing bowl, whisk together the dry ingredients: flour, baking soda, and salt. Make sure the baking soda is evenly distributed throughout the flour to ensure proper leavening.
-
Incorporate Dry into Wet: Gradually add the dry ingredient mixture to the yogurt mixture, stirring until just combined. Be careful not to overmix, as this can develop the gluten in the flour and result in a tough bread. A few streaks of flour are okay at this stage.
-
Add the Bananas: Gently fold in the mashed bananas. Mix for only about 30 seconds, or until the bananas are just broken up. It’s perfectly fine (and desirable) for the batter to remain somewhat chunky from the bananas. This adds to the rustic texture and intense banana flavor of the bread.
-
Add the Nuts (Optional): If using, fold in the nuts. Distribute them evenly throughout the batter.
-
Bake the Bread or Muffins: Pour the batter into a greased bread pan or divide it among a greased muffin pan.
- For a loaf of bread, bake at 350°F (175°C) for 50 minutes, or until a toothpick inserted into the center comes out clean.
- For muffins, bake at 350°F (175°C) for 22 minutes, or until a toothpick inserted into the center comes out clean.
-
Cool and Serve: Let the bread or muffins cool in the pan for 10 minutes before transferring them to a wire rack to cool completely. This prevents the bread from becoming soggy.
Expert Tips & Tricks
- Yogurt Drainage is Key: Don’t skip the yogurt draining step! This is essential for achieving the right texture without butter. The thicker the yogurt, the better the bread’s structure will be.
- Don’t Overmix: Overmixing develops gluten, leading to a tough bread. Mix until just combined.
- Banana Ripeness: The riper the bananas, the better. Brown, spotty bananas are ideal.
- Temperature Check: Use an oven thermometer to ensure your oven is at the correct temperature. Ovens can vary, and accurate temperature is key for even baking.
- Toothpick Test: Insert a wooden skewer or toothpick into the center. If it comes out with moist crumbs clinging to it, the bread is done. If it’s wet with batter, it needs more time.
- Spice It Up: Add a pinch of cinnamon, nutmeg, or cardamom to the dry ingredients for extra warmth and flavor.
- Chocolate Chips: For a truly decadent treat, add 1/2 cup of chocolate chips to the batter.
- Make-Ahead Batter: You can prepare the batter a day in advance and store it in the refrigerator. Let it come to room temperature before baking.
Serving & Storage Suggestions
Serve this delightful banana bread warm or at room temperature. It pairs perfectly with a cup of coffee or tea for breakfast or as an afternoon snack. You can also toast slices and spread them with a touch of honey or jam.
- Room Temperature: Store cooled bread in an airtight container at room temperature for up to 2 days.
- Refrigerator: For longer storage, keep the bread in the refrigerator for up to 5 days.
- Freezer: To freeze, wrap the bread tightly in plastic wrap and then in aluminum foil. Freeze for up to 2 months. Thaw overnight in the refrigerator before serving. To reheat, wrap in foil and bake at 350°F (175°C) for 10-15 minutes.
Nutritional Information
(Estimated per slice, based on 10 slices per loaf, without nuts):
| Nutrient | Amount per Serving | % Daily Value |
|---|---|---|
| Calories | 220 kcal | 11% |
| Total Fat | 3g | 4% |
| Saturated Fat | 1g | 5% |
| Cholesterol | 40mg | 13% |
| Sodium | 200mg | 9% |
| Carbohydrates | 45g | 15% |
| Fiber | 2g | 8% |
| Sugar | 25g | – |
| Protein | 5g | 10% |
Variations & Substitutions
- Gluten-Free: Substitute the all-purpose flour with a gluten-free all-purpose baking blend. Be sure to use a blend that contains xanthan gum.
- Vegan: Replace the eggs with flax eggs (1 tablespoon ground flaxseed mixed with 3 tablespoons water per egg, let sit for 5 minutes to thicken). Use a dairy-free yogurt alternative.
- Spiced Banana Bread: Add 1 teaspoon of ground cinnamon, 1/2 teaspoon of ground nutmeg, and 1/4 teaspoon of ground cloves to the dry ingredients.
- Tropical Twist: Add 1/2 cup of shredded coconut and 1/4 cup of chopped macadamia nuts to the batter.
- Chocolate Chunk Banana Bread: Fold in 1 cup of chopped dark chocolate chunks for a richer, more decadent flavor.
FAQs (Frequently Asked Questions)
Q: Why do I need to drain the yogurt?
A: Draining the yogurt removes excess liquid, resulting in a thicker consistency similar to butter. This ensures the bread has the right texture and doesn’t become soggy.
Q: Can I use frozen bananas?
A: Yes, you can use frozen bananas. Thaw them completely and drain any excess liquid before mashing and adding them to the batter.
Q: My banana bread is sinking in the middle. What did I do wrong?
A: This can be caused by several factors, including overmixing the batter, using too much liquid, or opening the oven door too frequently during baking. Make sure to measure ingredients accurately and avoid overmixing.
Q: How do I prevent the top of my banana bread from getting too dark?
A: If the top of the bread is browning too quickly, tent it with aluminum foil during the last 15-20 minutes of baking.
Q: Can I add other fruits to this bread?
A: Yes, you can add other fruits such as blueberries, cranberries, or chopped apples. Reduce the amount of banana slightly to compensate for the added moisture from the fruit.
Final Thoughts
This no-butter banana bread is a testament to the fact that you can enjoy a comforting classic without compromising on flavor or your health goals. It’s incredibly versatile and easy to adapt to your preferences. I encourage you to try this recipe and make it your own. Experiment with different variations, share your creations with loved ones, and let me know what you think. Happy baking!