
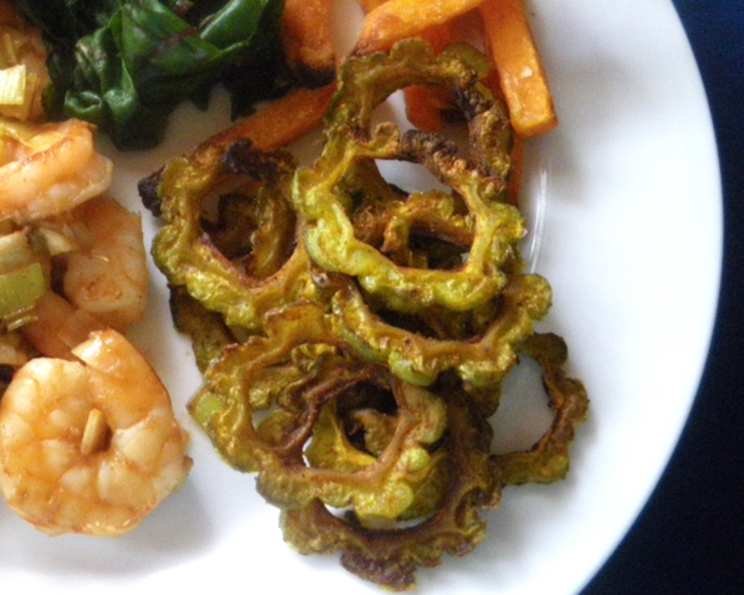
No-Fry Karela Crispies: Conquering the Bitter Melon
The first time I encountered karela, or bitter melon, it was at a bustling vegetarian thali restaurant in Mumbai. I remember being drawn to its peculiar, bumpy appearance and the almost defiant way it sat on the plate amongst its milder companions. One tentative bite sent a jolt through my senses – a bitterness so profound it was almost shocking. But then, something remarkable happened. The initial bitterness gave way to an earthy complexity, a lingering warmth that intrigued me. It was a flavor that demanded attention, a vegetable that refused to be ignored. I was hooked, and my culinary journey with karela began.
Recipe Overview
- Prep Time: 20 minutes
- Cook Time: 12-14 minutes
- Total Time: 35 minutes
- Servings: 4-6
- Dietary Type: Vegan, Gluten-Free
Ingredients
- 2 bitter melons (karela)
- 2-3 tablespoons oil (vegetable, canola, or peanut oil recommended)
- Salt, to taste
- 1/2 tablespoon red chili powder (adjust to your spice preference)
- 1/4 teaspoon turmeric powder
Equipment Needed
- Mandoline slicer (optional, but recommended for even slices)
- Baking tray
- Aluminum foil
- Large bowl
Instructions
-
Preheat your oven to 375°F (190°C).
-
Wash the bitter melons thoroughly. Using a mandoline slicer (or a sharp knife), carefully slice the melons into very thin, round slices. Aim for consistent thickness for even cooking.
-
In a large bowl, combine the sliced bitter melon with salt, turmeric powder, and red chili powder. Mix well, ensuring that all the slices are coated with the spices.
-
Let the mixture marinate for about 30 minutes. This allows the salt to draw out some of the bitter melon’s moisture and soften the slices. After marinating, squeeze the bitter melon slices gently to remove excess moisture. This step is crucial for achieving crispy results.
-
Line a baking tray with aluminum foil. Grease the foil with about 1 tablespoon of oil. This will prevent the bitter melon slices from sticking and promote even browning.
-
In the same bowl, toss the squeezed bitter melon slices with the remaining 2 tablespoons of oil. Make sure each slice is lightly coated.
-
Spread the bitter melon slices in a single layer on the prepared baking tray. Avoid overcrowding the tray, as this will steam the slices instead of crisping them. If necessary, use two baking trays.
-
Bake in the preheated oven for 5-7 minutes.
-
After baking, switch the oven to broil. Broil for 7-9 minutes, or until the bitter melon slices are golden brown and crispy. Keep a very close eye on them during broiling, as they can burn quickly. The exact broiling time will depend on your oven’s broiler strength.
-
Remove from the oven and let the karela crispies cool slightly on the baking tray before serving. They will crisp up further as they cool.
Expert Tips & Tricks
- Embrace the Thin Slice: The key to crispy karela is thin, even slices. A mandoline slicer makes this task effortless, but a sharp knife and patience will also do the trick.
- The Moisture Removal is Key: Don’t skip the marinating and squeezing steps. This significantly reduces the bitterness and promotes crispiness.
- Oil is Your Friend (But Not Too Much!): The oil helps the karela crisp up nicely, but too much oil will make them greasy. Aim for a light coating.
- Watch the Broiler: Broiling is where the magic happens, but it requires vigilance. Keep a close watch to prevent burning.
- Spice it Up (or Down): Adjust the amount of red chili powder to suit your spice preference. You can also add other spices like amchur (dried mango powder) for a tangy twist, or garam masala for a warmer flavor.
- Even Browning: For even browning, flip the karela slices halfway through the broiling process.
Serving & Storage Suggestions
Serve the No-Fry Karela Crispies as a snack, a side dish, or a crunchy topping for salads or rice bowls. They are best enjoyed fresh, while still crispy.
To store leftovers, let them cool completely and then store them in an airtight container at room temperature. They will lose some of their crispness over time, but they will still be flavorful. You can try to re-crisp them in a low oven (around 300°F or 150°C) for a few minutes. They are best consumed within 2-3 days. Refrigeration is not recommended, as it will make them soggy. Freezing is also not recommended.
Nutritional Information
| Nutrient | Amount per Serving | % Daily Value |
|---|---|---|
| Calories | 75 kcal | 4% |
| Total Fat | 6g | 9% |
| Saturated Fat | 0.5g | 3% |
| Cholesterol | 0mg | 0% |
| Sodium | 150mg | 7% |
| Total Carbohydrate | 4g | 1% |
| Dietary Fiber | 2g | 7% |
| Sugars | 1g | 2% |
| Protein | 1g | 2% |
Nutritional information is an estimate and may vary based on specific ingredients and preparation methods.
Variations & Substitutions
- Spice Level: Adjust the amount of red chili powder to your liking. You can also add a pinch of cayenne pepper for extra heat.
- Flavor Boost: Experiment with different spices. Garam masala, amchur (dried mango powder), cumin, or coriander powder can add unique flavors.
- Sweetness: A tiny pinch of sugar can balance the bitterness, but use it sparingly.
- Garlic & Ginger: Add a teaspoon of minced garlic and ginger to the marinade for an aromatic twist.
- Nuts & Seeds: Sprinkle toasted sesame seeds, sunflower seeds, or chopped almonds over the karela crispies after baking for added texture and flavor.
FAQs (Frequently Asked Questions)
Q: What if my karela is too bitter?
A: Marinating with salt and squeezing out excess moisture is essential for reducing bitterness. You can also soak the sliced karela in salted water for 30 minutes before marinating.
Q: Can I use an air fryer instead of baking?
A: Yes, you can air fry the karela crispies at 375°F (190°C) for about 8-10 minutes, flipping halfway through, until they are golden brown and crispy.
Q: How do I know when the karela is done?
A: The karela crispies are done when they are golden brown and crispy. Keep a close eye on them during broiling to prevent burning.
Q: Can I make this recipe without a mandoline slicer?
A: Yes, you can use a sharp knife, but it will take more time and effort to slice the karela evenly. Consistent thickness is crucial for even cooking.
Q: Can I use a different type of oil?
A: Yes, you can use any neutral-flavored oil with a high smoke point, such as canola oil, vegetable oil, or peanut oil.
Final Thoughts
Don’t be intimidated by the bitter melon’s reputation. These No-Fry Karela Crispies offer a surprisingly delicious and healthy way to enjoy this unique vegetable. With a few simple steps and a little patience, you can transform the notoriously bitter karela into a crunchy, flavorful snack that’s sure to impress. So, embrace the bitterness, experiment with spices, and discover the culinary potential of this often-overlooked ingredient. I encourage you to try this recipe and share your feedback. Pair these crispies with a refreshing yogurt dip or a spicy chutney for a complete and satisfying experience. Happy cooking!