
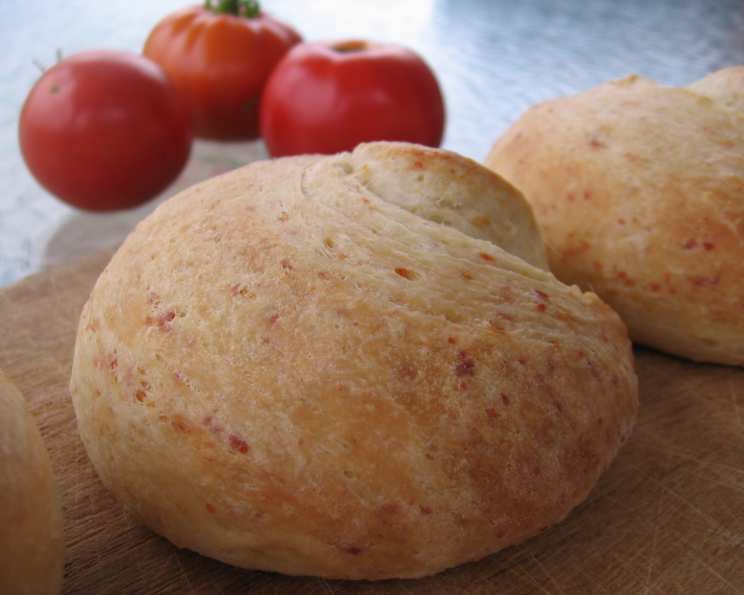
No-Knead Cheeseburger Buns: The Easiest Way to Bake Up Burger Perfection
I remember the first time I tried making homemade burger buns. It was a disaster. Hours of kneading, questionable rising, and rock-hard results. I almost swore off the idea forever. Then, I discovered the magic of no-knead bread, and a whole new world opened up. Suddenly, the idea of fresh, flavorful burger buns, infused with the savory tang of cheddar, became not only achievable, but almost ridiculously easy. These no-knead cheeseburger buns bring that same ease and deliver an unbeatable texture and taste that will elevate any burger night.
Recipe Overview
- Prep Time: 15 minutes
- Cook Time: 20 minutes
- Rise Time: 2 – 3 hours (combined)
- Total Time: 2 hours 35 minutes – 3 hours 35 minutes
- Servings: 6
- Yield: 6 Buns
- Dietary Type: Not Gluten-Free
Ingredients
- 2 3/4 cups unbleached all-purpose flour
- 1/2 cup finely grated sharp cheddar cheese or 1/2 cup Parmesan cheese
- 1 teaspoon salt
- 1 teaspoon onion powder (optional, but tasty!)
- 1 tablespoon sugar
- 2 1/2 teaspoons instant yeast
- 4 tablespoons softened butter
- 1 large egg
- 2/3 – 3/4 cup lukewarm water (Use the greater amount of liquid in winter or in drier climates, the lesser amount in summer, or in humid climates)
- 2 tablespoons melted butter (for brushing)
Equipment Needed
- Electric Mixer (stand mixer or hand mixer)
- Large mixing bowl or rising bucket
- Hamburger bun pan (optional)
- Baking sheet
- Parchment paper (optional)
- Instant-read thermometer
- Wire cooling rack
Instructions
- Combine the ingredients: In a large mixing bowl, combine the flour, grated cheese, salt, onion powder (if using), sugar, instant yeast, softened butter, egg, and lukewarm water.
- Mix the dough: Using an electric mixer on high speed, beat the ingredients together for 2 minutes. The dough will be quite sticky.
- First rise: Place the dough in a lightly greased bowl or rising bucket. Cover it with plastic wrap or a clean kitchen towel. Let it rise for 60 to 90 minutes, or until it’s noticeably puffy and has nearly doubled in size. The time will vary depending on the warmth of your kitchen.
- Shape the buns: Gently deflate the dough. Divide it into 6 equal pieces; each piece will be about 111g, or a scant 4 ounces. A kitchen scale helps ensure even-sized buns!
- Form into balls: Shape each piece of dough into a smooth ball.
- Second rise (pan vs. baking sheet): Place the dough balls into the wells of a lightly greased hamburger bun pan. If you don’t have a bun pan, space them evenly on a lightly greased or parchment-lined baking sheet.
- Flatten slightly: Gently flatten the buns with your hand until they fill the bottom of the pan’s wells (if using a bun pan), or until they are about 3 1/2″ to 4″ wide if using a baking sheet.
- Second rise: Cover the buns loosely with plastic wrap or a clean kitchen towel. Let them rise for another 60 to 90 minutes, or until they are noticeably puffy.
- Preheat the oven: Towards the end of the rising time, preheat your oven to 350°F (175°C).
- Brush with butter: Gently brush the tops of each bun with some of the melted butter. This will give them a beautiful golden color and a lovely, rich flavor.
- Bake: Bake the buns for about 20 minutes, or until they are a light, golden brown. To ensure they are fully baked, their internal temperature should be at least 200°F (93°C) when measured with an instant-read thermometer.
- Cool and finish: Remove the buns from the oven and immediately transfer them to a wire rack to cool. Brush the tops with the remaining melted butter. Allow the buns to cool completely before slicing and using.
- Storage: Store the cooled buns airtight at room temperature to maintain freshness.
Expert Tips & Tricks
- Cheese Choice: While sharp cheddar is fantastic, experiment with different cheeses! Gruyere, Monterey Jack, or even a smoked Gouda would add unique flavor profiles.
- Dough Consistency: The dough will be sticky, and that’s perfectly normal. Resist the urge to add more flour, as this can lead to tough buns.
- Oven Temperature: Every oven is different. Keep an eye on the buns during baking and adjust the time as needed. If they are browning too quickly, tent them loosely with foil.
- Even Baking: Rotating the baking sheet halfway through baking will ensure even browning.
- Bread Machine Option: If you have a bread machine, you can use it to mix and knead the dough. Simply put all the ingredients in the bread machine bucket according to the manufacturer’s instructions, and run the dough cycle. Then, skip to step 3 in the instructions.
- Make Ahead: You can prepare the dough ahead of time. After the first rise, punch down the dough, wrap it tightly in plastic wrap, and refrigerate for up to 24 hours. Allow the dough to come to room temperature for about 30 minutes before shaping and proceeding with the second rise and baking.
Serving & Storage Suggestions
These cheeseburger buns are, of course, best served with a juicy, grilled hamburger! But they are also delicious with pulled pork, veggie burgers, or even as sandwich rolls. They can be sliced horizontally with a bread knife and lightly toasted or used as is. To maintain optimal freshness, store the cooled buns in an airtight container at room temperature for up to 2 days. For longer storage, wrap them individually in plastic wrap and freeze for up to 2 months. Thaw at room temperature before using. To refresh, lightly toast the buns in a toaster oven or warm them in a low oven (300°F/150°C) for a few minutes.
Nutritional Information
(Estimated per bun)
| Nutrient | Amount per Serving | % Daily Value |
|---|---|---|
| Calories | 341 kcal | N/A |
| Total Fat | 12.3 g | 18% |
| Saturated Fat | 7.2 g | 36% |
| Cholesterol | 61.2 mg | 20% |
| Sodium | 528.6 mg | 22% |
| Total Carbohydrate | 47 g | 15% |
| Dietary Fiber | 2.1 g | 8% |
| Sugars | 2.4 g | N/A |
| Protein | 10.1 g | 20% |
Note: Nutritional information is an estimate and may vary based on specific ingredients and portion sizes.
Variations & Substitutions
- Gluten-Free: While this recipe is not inherently gluten-free, you can experiment with gluten-free all-purpose flour blends. Be sure to use a blend that contains xanthan gum or another binding agent.
- Dairy-Free: Substitute dairy-free butter and cheese alternatives to make these buns dairy-free.
- Herb Infusion: Add 1-2 tablespoons of finely chopped fresh herbs, such as rosemary, thyme, or oregano, to the dough for an herbaceous twist.
- Spicy Kick: Incorporate a pinch of red pepper flakes or a dash of hot sauce into the dough for a subtle heat.
- Sweet Buns: Reduce the salt to 1/2 teaspoon and increase the sugar to 2 tablespoons for slightly sweeter buns.
FAQs (Frequently Asked Questions)
Q: Can I use active dry yeast instead of instant yeast?
A: Yes, you can. Proof the active dry yeast in a small amount of the lukewarm water for 5-10 minutes before adding it to the other ingredients.
Q: My dough isn’t rising. What could be the problem?
A: Ensure your yeast is fresh and not expired. Also, the temperature of your kitchen can affect rising time; a warmer environment will encourage faster rising.
Q: Can I freeze the unbaked dough?
A: Yes, you can freeze the shaped buns after the first rise. Wrap them individually and freeze for up to 1 month. Thaw completely before allowing the second rise and baking.
Q: My buns are browning too quickly on top. What should I do?
A: Tent the buns loosely with aluminum foil during the last few minutes of baking to prevent excessive browning.
Q: Can I add sesame seeds or everything bagel seasoning to the tops of the buns?
A: Absolutely! Brush the buns with melted butter or an egg wash, and then sprinkle with your desired toppings before baking.
Final Thoughts
Baking these no-knead cheeseburger buns is a rewarding experience that will elevate your burger game to new heights. The aroma of cheesy, freshly baked bread filling your kitchen is simply irresistible. Don’t be intimidated by the yeast – this recipe is incredibly forgiving, and the results are well worth the effort. Gather your ingredients, follow the simple steps, and prepare to enjoy the best homemade burger buns you’ve ever tasted. I encourage you to get creative with your variations, share your successes (and challenges!) and most importantly, enjoy the process of creating something delicious from scratch!