
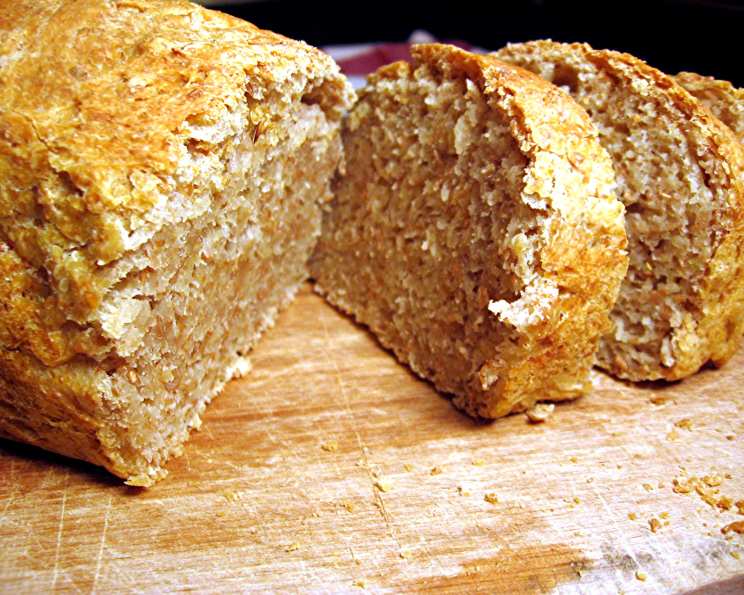
The Easiest, Most Delicious Whole Wheat Sandwich Bread: No Kneading Required!
The scent of freshly baked bread has always been a comforting anchor in my life. My grandmother, a woman of few words but immense warmth, had a knack for turning simple ingredients into culinary magic. I remember standing on a stool beside her, watching her strong, flour-dusted hands coax life into dough. While she favored traditional, time-intensive methods, I’ve since discovered the joy of no-knead bread, a revelation that allows even the busiest of us to experience the pleasure of homemade goodness. This whole wheat sandwich bread recipe is my tribute to her legacy – simplified, yet still packed with love and flavor.
Recipe Overview:
- Prep Time: 15 minutes
- Cook Time: 45-50 minutes
- Total Time: 2 hours 30 minutes to 5 hours (plus refrigeration time of at least 1 day and up to 5 days)
- Servings: Varies based on slice thickness
- Yield: Three 1 1/2 pound loaves
- Dietary Type: Vegetarian (can be made vegan by substituting the honey and butter)
Ingredients:
- 2 3/4 cups whole wheat flour
- 2 3/4 cups unbleached all-purpose flour
- 1/2 cup wheat germ
- 1/4 cup rye flour
- 3 1/2 teaspoons salt
- 1 1/2 tablespoons instant yeast
- 1 cup mild lager beer, such as Budweiser (or water)
- 2 cups lukewarm water
- 1 tablespoon white vinegar (or water)
- 1/4 cup honey (or maple syrup/agave for vegan option)
- 1/4 cup butter, melted (or olive oil/vegan butter)
Equipment Needed:
- Large bowl or 5-quart lidded container
- Rubber spatula
- Plastic wrap
- 9x4x3-inch nonstick loaf pan
- Serrated knife
- Broiler tray or cast iron skillet
- Wire rack
Instructions:
- In a large bowl or a 5-quart lidded container, thoroughly whisk together the whole wheat flour, all-purpose flour, wheat germ, rye flour, salt, and instant yeast. Ensure everything is evenly distributed to promote proper rising.
- In a separate bowl, stir together the honey and melted butter. Then, add this mixture to the lukewarm water, beer, and white vinegar. If you’re opting for the non-alcoholic and vinegar-free version, simply use water as a substitute.
- Pour the wet ingredients into the bowl of dry ingredients. Using a rubber spatula, fold the mixture together, scraping up any dry flour from the bottom of the bowl or container. Continue folding until a shaggy ball of dough forms. Don’t worry about making it perfectly smooth; a rough texture is expected at this stage. If the dough feels too dry, add a tablespoon of water at a time until it comes together. Use wet hands to prevent the dough from sticking excessively.
- Cover the bowl with plastic wrap (or the lid of the container, if using) and let it sit at room temperature until the dough rises and collapses slightly on top, or flattens; this usually takes between 2 to 5 hours, depending on the ambient temperature. The dough should at least double in size.
- Refrigerate the dough in a lidded (not airtight) container. This allows the dough to preferment, developing a more complex flavor. Let it chill for at least one day, or up to 5 days. The longer it chills, the tangier the flavor will become.
- Lightly grease a 9x4x3-inch nonstick loaf pan. This will ensure the bread releases easily after baking.
- With wet hands (to prevent sticking), pull up one end of the refrigerated dough. Using a serrated knife, cut off a 1 1/2 pound (or cantaloupe-size) piece of dough.
- Dust the piece of dough lightly with flour. Quickly shape it into a ball by gently stretching the surface of the dough around to the bottom on all four sides, rotating the ball a quarter-turn as you go. The aim is to create surface tension, which will help the loaf rise properly. Most of the dusting flour will fall off. The bottom of the loaf may appear to be a collection of bunched ends, but they will flatten out during resting and baking. The dough ball should be smooth and cohesive, and this process should take no more than 30 to 60 seconds.
- Form the dough ball into an elongated oval shape and carefully place it into the prepared loaf pan.
- Cover the loaf pan loosely with plastic wrap and allow the dough to rest until it has doubled in size, approximately 2 hours. The resting time may vary depending on the room temperature.
- Twenty minutes before baking, preheat your oven to 400 degrees Fahrenheit. Place an empty broiler tray or cast iron skillet on any shelf that won’t interfere with the rising bread. This will be used to create steam in the oven.
- Place the loaf on a rack near the center of the oven. Carefully pour 1 cup of hot tap water into the hot broiler tray or skillet and quickly close the oven door. The steam will help create a beautiful crust.
- Bake for 45 to 50 minutes, or until the loaf is golden brown and firm to the touch. Use a thermometer to check the internal temperature; it should reach around 200-210°F (93-99°C).
- Remove the bread from the pan and allow it to cool completely on a wire rack before slicing. This is crucial for preventing a gummy texture.
Expert Tips & Tricks:
- Don’t overmix the dough. The beauty of no-knead bread lies in its simplicity. Overmixing will develop too much gluten, resulting in a tougher loaf.
- Use a kitchen scale for accuracy, especially when measuring flour. This will ensure consistent results.
- The longer the cold fermentation, the better the flavor. Don’t be afraid to let the dough sit in the refrigerator for the full 5 days.
- For a crispier crust, brush the top of the loaf with melted butter or olive oil just before baking.
- If your oven tends to brown bread unevenly, rotate the loaf halfway through the baking time.
- If the crust is browning too quickly, tent the loaf loosely with aluminum foil during the last 15-20 minutes of baking.
Serving & Storage Suggestions:
This whole wheat sandwich bread is delicious served warm with butter, as toast, or used in your favorite sandwiches. It pairs well with soups, salads, and even grilled cheese.
- Room Temperature: Store the cooled bread in an airtight container or bread bag at room temperature for up to 3 days.
- Refrigerator: For longer storage, keep it in the refrigerator for up to a week. Be aware that refrigeration can dry out the bread, so wrap it tightly.
- Freezer: For extended storage, slice the bread and freeze it in a freezer-safe bag for up to 3 months. Thaw individual slices as needed.
- Reheating: To reheat, wrap the bread in foil and warm it in a 350°F (175°C) oven for about 10-15 minutes. Frozen slices can be toasted directly from the freezer.
Nutritional Information:
Please note that these values are estimates and can vary based on specific ingredients and portion sizes.
| Nutrient | Amount per Serving (estimated) | % Daily Value (estimated) |
|---|---|---|
| Calories | 250 kcal | 13% |
| Total Fat | 7g | 11% |
| Saturated Fat | 4g | 20% |
| Cholesterol | 15mg | 5% |
| Sodium | 950mg | 40% |
| Total Carbohydrate | 45g | 15% |
| Dietary Fiber | 7g | 28% |
| Sugars | 8g | N/A |
| Protein | 12g | 24% |
Variations & Substitutions:
- Vegan: Substitute the honey with maple syrup or agave nectar, and the butter with olive oil or vegan butter.
- Seed Bread: Add 1/4 cup of sunflower seeds, pumpkin seeds, or flax seeds to the dough.
- Herb Bread: Mix in 2 tablespoons of chopped fresh herbs, such as rosemary, thyme, or oregano.
- Cheese Bread: Add 1 cup of shredded cheddar, mozzarella, or Parmesan cheese to the dough.
- Sweet Bread: Increase the honey to 1/2 cup and add 1/4 cup of dried fruit, such as raisins or cranberries.
FAQs (Frequently Asked Questions):
Q: Can I use all whole wheat flour instead of a combination of whole wheat and all-purpose?
A: Yes, you can, but the bread will be denser and may require a little more liquid. Start by adding an extra tablespoon of water at a time until the dough comes together.
Q: Why is my dough so sticky?
A: Whole wheat flour tends to absorb more water than all-purpose flour. Using wet hands while shaping the dough will help prevent sticking. Avoid adding too much extra flour, as this can result in a dry loaf.
Q: Can I skip the refrigeration step?
A: While you can technically bake the bread after the initial rise, the refrigeration period is crucial for developing flavor and improving the dough’s texture.
Q: My bread is sinking in the middle. What did I do wrong?
A: This could be due to over-proofing (letting the dough rise for too long) or baking at too low a temperature. Ensure your oven is properly preheated and that the dough has doubled but not more than doubled before baking.
Q: How can I tell if my bread is done?
A: The bread should be golden brown and firm to the touch. You can also check the internal temperature with a thermometer; it should reach 200-210°F (93-99°C).
Final Thoughts:
This no-knead whole wheat sandwich bread is a testament to the fact that delicious, homemade bread doesn’t have to be complicated. With just a few simple ingredients and a little patience, you can create a loaf that’s both wholesome and incredibly satisfying. I encourage you to give this recipe a try and experience the joy of baking your own bread. Don’t hesitate to experiment with variations and share your feedback – I’d love to hear how it turns out! This bread is wonderful on its own, but even better with a smear of homemade jam and a steaming cup of coffee. Happy baking!