
Scented Memories: Crafting Cinnamon Ornaments
The scent of cinnamon instantly transports me back to childhood Christmases. I remember my grandmother, her hands dusted with flour and spice, carefully crafting ornaments that filled our home with a warm, comforting aroma. Each year, we’d gather around her kitchen table, giggling as we rolled out dough and pressed out shapes, the sweet, spicy fragrance clinging to our clothes and hair, a fragrant promise of the holidays to come. Though these aren’t for eating, the memory and scent are just as satisfying.
Recipe Overview
- Prep Time: 10 minutes
- Cook Time: Several hours (air drying) or a few hours (oven drying)
- Total Time: Several hours to several days
- Yields: 10-14 decorations
- Dietary Type: Non-Edible Craft
Ingredients
- 1 cup ground cinnamon
- 1 tablespoon ground cloves
- ¾ cup applesauce
- 1 teaspoon fragrance oil (apple, cinnamon, orange, or your own choice)
- 2 tablespoons white craft glue
Equipment Needed
- Large bowl
- Measuring cups and spoons
- Mixing spoons
- Rolling pin
- Cookie cutters (Christmas tree, hearts, stars, etc.)
- Wooden or metal skewer
- Paper towels
- Baking sheet (optional, for oven drying)
- Decorative ribbon (for hanging)
- Cookie stamps (optional)
- Decorative lace (optional)
- Shallow plaster, cookie, or candy molds (optional)
Instructions
- In a large bowl, thoroughly combine the ground cinnamon and ground cloves. Ensure there are no clumps for a smoother dough.
- Add the applesauce, fragrance oil, and white craft glue to the spice mixture.
- Begin to knead the mixture with your hands until it forms a firm, pliable dough. This may take a few minutes.
- Assess the dough’s consistency. If it’s too wet or sticky, gradually add more cinnamon, a tablespoon at a time, until you reach the desired consistency. If the dough is too dry and crumbly, add a small amount of applesauce, a teaspoon at a time. The consistency should be similar to playdough.
- Lightly dust a clean, flat surface with cinnamon to prevent sticking.
- Roll out the dough to a thickness of approximately ¼ inch.
- Use your favorite cookie cutters to cut out various shapes from the rolled dough. Popular choices include Christmas trees, hearts, and stars, but feel free to get creative!
- Before the ornaments dry, use a wooden or metal skewer to create a hole at the top of each shape. This hole should be large enough to accommodate the ribbon you plan to use for hanging.
- Air dry the ornaments on a sheet of paper towels for several days. To prevent warping, turn them over several times each day. Place in a well ventilated and dry area.
- Oven Drying (Optional): If you’re impatient, you can speed up the drying process by placing the ornaments on a baking sheet lined with parchment paper and baking them in a low oven at 200°F (93°C) for a few hours. Remember to turn them over periodically to ensure even drying. Check the dryness by gently pressing on the ornament, it should feel hard to the touch, not soft or bendable.
- Once the ornaments are completely dry, decorate them with a ribbon through the hole. This will allow you to hang them on your Christmas tree, use them as gift tags, or display them in other creative ways.
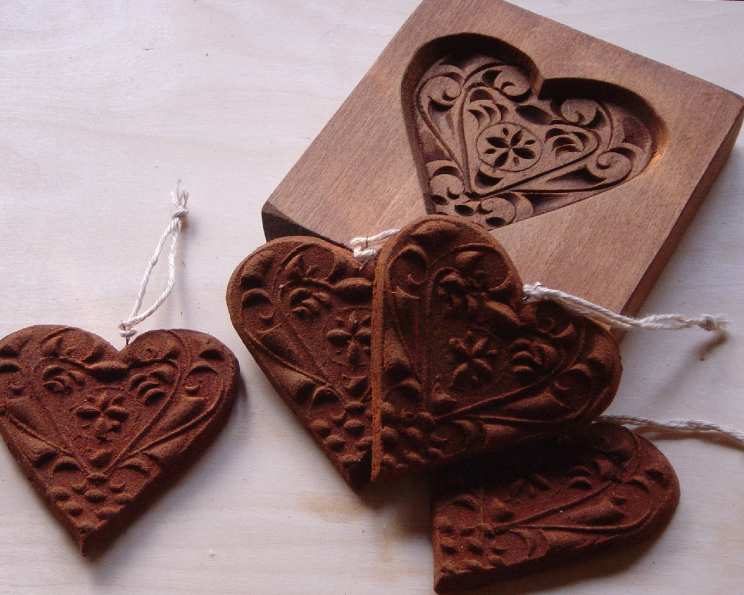
- Using Molds (Optional): For a more intricate design, press the dough into shallow plaster, cookie, or candy molds. Smooth the dough with a rolling pin, then carefully ease it out of the mold. Cut away any excess dough.
- Lace Impression (Optional): For a vintage touch, roll out the dough and place a piece of decorative lace on top. Use a rolling pin to firmly go over the lace until it leaves an impression in the dough. Then, use cookie cutters to cut out the desired shapes.
- Cookie Stamps (Optional): Cookie stamps can also be used to add detailed designs to the ornaments. Simply roll out the dough and press the stamp firmly onto the surface.
Expert Tips & Tricks
- Dough Consistency is Key: The correct dough consistency is crucial. If the dough is too wet, the ornaments will take longer to dry and may warp. If it’s too dry, they may crack. Adjust the cinnamon and applesauce accordingly.
- Preventing Cracking: To minimize cracking during drying, avoid placing the ornaments in direct sunlight or near a heat source.
- Adding Shine: After the ornaments are dried, you can brush them with a clear varnish or a thin coat of craft glue diluted with water for a glossy finish.
- Enhancing the Scent: If the scent fades over time, you can refresh the ornaments by adding a few drops of fragrance oil to the back.
- Creative Coloring: While the natural cinnamon color is beautiful, you can experiment with adding powdered food coloring to the dough for different shades. Add a small amount at a time until you achieve the desired color.
- Glittering: Before drying, sprinkle your cut-out shapes with glitter for a bit of holiday sparkle.
- Spice Blends: For a unique aroma, experiment with different spice blends. Try adding nutmeg, allspice, or ginger to the cinnamon and clove mixture.
Serving & Storage Suggestions
These ornaments are purely decorative and are not meant to be eaten. They can be used as Christmas tree ornaments, gift tags, or as part of a festive display. Store them in a cool, dry place away from direct sunlight. When properly stored, they can last for many years. Wrap them individually in tissue paper to prevent scratching and store in a box or container. If they get dusty, gently wipe them with a soft, dry cloth.
Nutritional Information
Since these are non-edible ornaments, nutritional information does not apply.
Variations & Substitutions
- Different Fragrance Oils: Experiment with various fragrance oils to customize the scent of your ornaments. Consider using essential oils like pine, peppermint, or frankincense for a more natural aroma.
- Textured Dough: Try adding finely ground coffee or tea leaves to the dough for a slightly textured finish and a subtle aroma.
- Natural Dyes: Explore using natural dyes like beet juice (for pink), spinach juice (for green), or turmeric (for yellow) to color the dough. However, be aware that these natural dyes may fade over time.
- Herb Infusion: For a rustic look and aroma, add dried herbs like lavender or rosemary to the dough.
FAQs (Frequently Asked Questions)
Q: Can I eat these cinnamon ornaments?
A: No, these ornaments are made with craft glue and are not intended for consumption.
Q: How long will the cinnamon scent last?
A: The cinnamon scent should last for several weeks or months, depending on storage conditions. You can refresh the scent by adding a few drops of fragrance oil to the back of the ornament.
Q: What can I do if my dough cracks while drying?
A: If your dough cracks, you can try patching the cracks with a small amount of fresh dough. Ensure the patched area is smooth and allow it to dry completely.
Q: How can I make the ornaments more durable?
A: Adding more glue to the mixture may help for durability, however make sure the dough isn’t too wet.
Q: Can I use different types of glue?
A: It’s best to stick with white craft glue, as it dries clear and is non-toxic. Avoid using strong adhesives or super glue, as these may be harmful and may not dry properly.
Final Thoughts
I hope this recipe inspires you to create your own scented memories this holiday season. These cinnamon ornaments are a fun and easy project for all ages, and they make wonderful homemade gifts. Don’t be afraid to experiment with different shapes, scents, and decorations to personalize your creations. Share your festive creations with friends and family, and spread the joy and warmth of the holidays. I would love to hear your feedback and see your versions of this craft!