
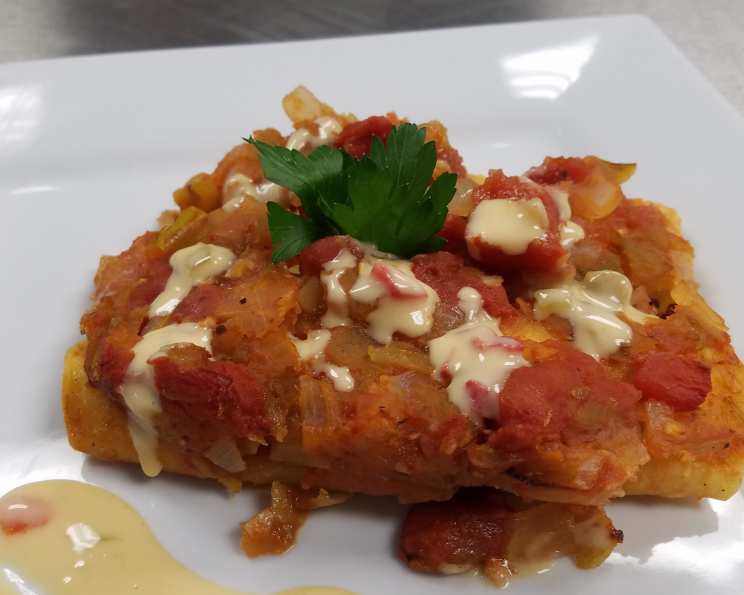
Nonna’s Tomato & Green Chile Chicken Enchiladas
The aroma always takes me back. I can still picture Nonna, her hands dusted with flour, humming a faint Italian tune as she assembled these enchiladas. The tangy, subtly spicy scent of the tomato-green chile sauce, a beautiful melding of her heritage and her adopted Southwest home, would fill the kitchen. It was more than just a meal; it was a warm hug, a taste of family, and a vibrant story on a plate. It’s a dish I make now, not just to feed my family, but to keep her memory alive.
Recipe Overview
- Prep Time: 20 minutes
- Cook Time: 20 minutes
- Total Time: 40 minutes
- Servings: 8
- Yield: 16 enchiladas
- Dietary Type: Not Gluten-Free
Ingredients
- 2 tablespoons vegetable oil
- 2 (4 ounce) cans diced green chilies, drained (we used mild)
- 1 large garlic clove, minced
- 1 (28 ounce) can petite diced tomatoes, drained (reserve 1 cup liquid)
- 1 large yellow onion, diced
- 2 teaspoons salt, divided
- 1/2 teaspoon oregano
- 2 chicken breasts, cooked and diced (about 1 lb.)
- 1 cup sour cream
- 6 ounces shredded cheddar cheese
- 1/3 cup vegetable oil
- 16 corn tortillas
Equipment Needed
- Large skillet or sauté pan
- 3-quart baking dish
- Mixing bowl
- Paper towels
Instructions
- Begin by preparing the tomato-green chile sauce. In a large skillet or sauté pan, heat 2 tablespoons of vegetable oil over medium heat.
- Add the drained diced green chilies and minced garlic to the heated oil. Sauté for about 2-3 minutes, until the garlic is fragrant and the chilies are slightly softened. Be careful not to burn the garlic; lower the heat if needed.
- Add the drained petite diced tomatoes, diced yellow onion, 1 teaspoon of salt, and oregano to the skillet. Pour in the reserved 1 cup of tomato liquid.
- Bring the mixture to a simmer. Then, reduce the heat to low, cover, and simmer for 20 minutes, or until the sauce has thickened slightly. Stir occasionally to prevent sticking.
- While the chile tomato sauce is simmering, prepare the chicken filling. In a mixing bowl, combine the diced cooked chicken, sour cream, shredded cheddar cheese, and the remaining 1 teaspoon of salt. Mix well to ensure all ingredients are evenly distributed.
- In a separate skillet or sauté pan, heat 1/3 cup of vegetable oil over medium heat.
- One at a time, dip each corn tortilla into the hot oil. Fry for a few seconds on each side, just until softened and pliable, but not crispy. This usually takes about 5-10 seconds per side.
- Remove the fried tortilla from the oil and place it on a paper towel-lined plate to drain off excess oil. Repeat with all the tortillas. This step is crucial to prevent the enchiladas from becoming soggy.
- Once the tortillas are fried, begin assembling the enchiladas. Place a spoonful (about 2-3 tablespoons) of the chicken mixture onto the center of each tortilla.
- Roll the tortilla tightly around the filling, creating an enchilada.
- Place the filled enchiladas seam-side down in a lightly greased 3-quart baking dish. Arrange them snugly next to each other.
- Once all the enchiladas are in the baking dish, pour the chile tomato sauce evenly over the top, ensuring that all the enchiladas are well-covered.
- Preheat your oven to 350 degrees F (175 degrees C).
- Bake the enchiladas in the preheated oven for 20 minutes, or until the sauce is bubbly and the cheese is melted and lightly golden brown.
- Remove the enchiladas from the oven and let them cool for a few minutes before serving. This prevents burning your mouth and allows the enchiladas to set slightly.
Expert Tips & Tricks
- Blending the Sauce: For a smoother sauce, you can use an immersion blender or carefully transfer the sauce to a regular blender after simmering, and blend until smooth. Be cautious when blending hot liquids!
- Tortilla Softening: If you prefer not to fry the tortillas, you can soften them by steaming them in a microwave for a few seconds between damp paper towels.
- Cheese Placement: For extra cheesy enchiladas, sprinkle some extra cheddar cheese over the top of the sauce before baking.
- Spice Level: Adjust the amount of green chilies to control the heat level. Use hot chilies for a spicier dish, or omit them altogether for a milder flavor. You can also use different varieties of green chilies.
- Make Ahead: Assemble the enchiladas ahead of time and store them, covered, in the refrigerator for up to 24 hours before baking. Add an extra 5-10 minutes to the baking time if baking straight from the fridge.
Serving & Storage Suggestions
Serve Nonna’s Tomato & Green Chile Chicken Enchiladas hot, straight from the oven. Garnish with a dollop of sour cream, a sprinkle of fresh cilantro, or a drizzle of queso fresco for added flavor and visual appeal. These enchiladas pair well with a side of Mexican rice, refried beans, or a simple green salad.
Leftover enchiladas can be stored in an airtight container in the refrigerator for up to 3-4 days. To reheat, bake in a preheated oven at 350 degrees F (175 degrees C) for about 15-20 minutes, or until heated through. You can also reheat individual portions in the microwave. For longer storage, you can freeze the enchiladas for up to 2-3 months. Thaw them in the refrigerator overnight before reheating.
Nutritional Information
| Nutrient | Amount per Serving | % Daily Value |
|---|---|---|
| Calories | 448.7 kcal | N/A |
| Calories from Fat | 271 g | 61% |
| Total Fat | 30.2 g | 46% |
| Saturated Fat | 10.6 g | 53% |
| Cholesterol | 60.5 mg | 20% |
| Sodium | 1121.8 mg | 46% |
| Total Carbohydrate | 29.3 g | 9% |
| Dietary Fiber | 4.8 g | 19% |
| Sugars | 5.6 g | 22% |
| Protein | 17.5 g | 35% |
Variations & Substitutions
- Gluten-Free: Ensure that the corn tortillas are made with 100% corn and do not contain any added wheat flour.
- Vegetarian: Substitute the chicken with black beans, pinto beans, or a mixture of sautéed vegetables like zucchini, bell peppers, and corn.
- Spicy: Add a pinch of cayenne pepper or some chopped jalapeños to the chicken mixture or the tomato-green chile sauce for extra heat.
- Cheese: Experiment with different types of cheese, such as Monterey Jack, Asadero, or a Mexican cheese blend.
- Creamy Sauce: Add a splash of heavy cream or half-and-half to the tomato-green chile sauce for a richer, creamier flavor.
- Different Protein: Use shredded pork or beef instead of chicken.
FAQs (Frequently Asked Questions)
Q: Can I make these enchiladas ahead of time and freeze them?
A: Yes, you can assemble the enchiladas, cover them tightly with plastic wrap and foil, and freeze them for up to 2-3 months. Thaw in the refrigerator overnight before baking.
Q: What if I don’t have diced green chilies?
A: You can substitute with a can of chopped green bell peppers, although the flavor will be milder. Roasting your own poblano peppers and dicing them is also a delicious option.
Q: How can I prevent the tortillas from falling apart when I roll them?
A: The key is to soften the tortillas properly by frying them briefly in hot oil. This makes them pliable and less likely to crack or tear.
Q: Can I use a different type of tomato?
A: Yes, you can use crushed tomatoes or tomato puree as a substitute for the petite diced tomatoes. Just adjust the amount of liquid accordingly to achieve the desired sauce consistency.
Q: Is there a substitute for sour cream in the filling?
A: Greek yogurt can be used as a substitute for sour cream in the filling. It will provide a similar tang and creaminess. You could also use a plant-based sour cream alternative.
Final Thoughts
Nonna’s Tomato & Green Chile Chicken Enchiladas are more than just a recipe; they’re a taste of tradition and a celebration of family. The combination of savory chicken, tangy tomato-green chile sauce, and melted cheese creates a dish that is both comforting and satisfying. So, gather your ingredients, roll up your sleeves, and give this recipe a try. I’m certain these enchiladas will become a new favorite in your household, just as they have in mine. Don’t be afraid to personalize it, add your own little twist, and most importantly, share it with loved ones. And if you do, please leave a comment and let me know how it turned out! Enjoy!