
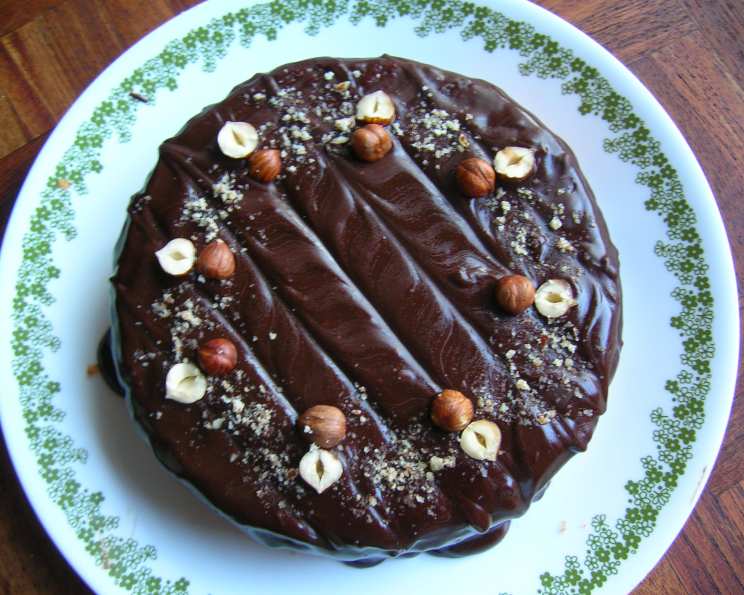
The Irresistible Charm of Norwegian Hazelnut Cake
I can still remember the first time I tasted this cake. It was at a cozy little cafe nestled in the heart of Oslo, during a family trip many years ago. The aroma of freshly brewed coffee mingled with the sweet, nutty fragrance wafting from the counter, and I knew I had to try whatever was causing such a delightful sensation. One bite of the moist, tender cake, topped with a rich chocolate glaze and crunchy hazelnuts, and I was instantly transported to a place of pure bliss. Since then, I’ve been trying to recreate that perfect flavor, and I’m thrilled to share this recipe that comes as close as possible to capturing that magic.
Recipe Overview
- Prep Time: 20 minutes
- Cook Time: 35-40 minutes
- Total Time: 1 hour 15 minutes (including cooling)
- Servings: 12-16
- Yield: 1 Cake
- Dietary Type: Not Gluten-Free
Ingredients
- 3/4 cup hazelnuts
- 1/2 cup (1 stick) butter, softened
- 1 1/2 cups white sugar
- 1 teaspoon vanilla extract
- 2 cups all-purpose flour
- 2 teaspoons baking powder
- 1/4 teaspoon salt
- 1/2 cup heavy whipping cream
- 1 cup semi-sweet chocolate chips (or milk chocolate)
- 3 eggs
- 1/2 teaspoon vanilla extract (for the glaze)
Equipment Needed
- 10-inch springform pan
- Food processor
- Small saucepan
- Large mixing bowl
- Electric mixer (handheld or stand mixer)
- Measuring cups and spoons
- Spatula
- Toothpick
Instructions
- Preheat your oven to 350 degrees F (175 degrees C). Ensure the oven rack is positioned in the center.
- Lightly grease the bottom of your 10-inch springform pan. This will prevent the cake from sticking and allow for easy removal.
- Reserve 8 whole hazelnuts for garnish. These will add a beautiful finishing touch to the cake.
- Pulse the remaining hazelnuts in a food processor until they are finely ground. Be careful not to over-process into hazelnut butter. Reserve 1 tablespoon of the ground hazelnuts for garnish.
- Melt the butter in a small saucepan over low heat. Once melted, remove from heat and allow it to cool slightly. This step is crucial to prevent the hot butter from cooking the eggs in the next step.
- In a large bowl, beat the eggs, sugar, and 1 teaspoon of vanilla extract together using an electric mixer until the mixture is thick and lemon-colored. This typically takes about 2 to 3 minutes. Incorporating air into the batter at this stage is essential for a light and airy cake.
- Add the flour, baking powder, salt, and the remaining ground hazelnuts to the egg mixture. Mix well until just combined. Be careful not to overmix, as this can lead to a tough cake.
- Continue to beat the mixture while slowly adding the cooled melted butter until everything is thoroughly blended. The batter will be quite thick at this point, which is perfectly normal.
- Spread the batter evenly into the prepared springform pan.
- Bake in the preheated oven for 35 to 40 minutes, or until a toothpick inserted into the center comes out clean. The cake should be golden brown on top. If the top starts to brown too quickly, you can loosely cover it with aluminum foil during the last 10-15 minutes of baking.
- Once baked, cool the cake in the pan for 15 minutes. This allows the cake to firm up slightly, making it easier to handle.
- After 15 minutes, carefully remove the sides of the springform pan.
- Remove the pan bottom and invert the cake onto a serving plate.
- Cover the cake with a clean cloth towel and allow it to cool completely for another 30 minutes before glazing. This prevents the glaze from melting and running off.
- To Make the Glaze: In a medium saucepan, bring the heavy whipping cream just to a boil over medium heat. Watch carefully, as it can easily boil over.
- Remove the saucepan from the heat and stir in the semi-sweet chocolate chips (or milk chocolate) until they are completely melted and the glaze is smooth.
- Stir in the remaining 1/2 teaspoon of vanilla extract to enhance the flavor of the glaze.
- Spread the glaze evenly over the top of the cooled cake, allowing it to gracefully run down the sides.
- Sprinkle the reserved ground hazelnuts around the top edge of the cake.
- Arrange the reserved whole hazelnuts artfully over the ground nuts.
- Enjoy!
Expert Tips & Tricks
- Toast the Hazelnuts: For a deeper, richer hazelnut flavor, toast the hazelnuts in a dry skillet or in the oven before grinding. This enhances their natural oils and brings out their nutty aroma. To toast in the oven, spread the hazelnuts on a baking sheet and bake at 350°F (175°C) for 8-10 minutes, or until fragrant and the skins start to crack.
- Prevent a Soggy Bottom: Ensure the melted butter is cooled before adding it to the egg mixture. Hot butter can partially cook the eggs, leading to a denser, less airy cake.
- Glaze Consistency: If the glaze is too thick, add a tablespoon of milk or cream at a time until it reaches the desired consistency. If it’s too thin, let it cool slightly before spreading.
- Even Baking: To ensure even baking, use an oven thermometer to verify your oven temperature is accurate. Rotate the cake halfway through baking.
Serving & Storage Suggestions
This Norwegian Hazelnut Cake is best served at room temperature, allowing its flavors to fully develop. It pairs beautifully with a scoop of vanilla ice cream, a dollop of whipped cream, or a dusting of powdered sugar. For a truly Scandinavian experience, serve it alongside a cup of strong, dark coffee.
Store any leftover cake in an airtight container at room temperature for up to 2 days, or in the refrigerator for up to 5 days. The glaze may harden slightly in the refrigerator, but the cake will remain moist. You can also freeze the cake for up to 2 months. Wrap it tightly in plastic wrap and then in foil to prevent freezer burn. Thaw overnight in the refrigerator before serving.
Nutritional Information
| Nutrient | Amount per Serving | % Daily Value |
|---|---|---|
| Calories | 310 kcal | 16% |
| Total Fat | 16g | 21% |
| Saturated Fat | 8g | 40% |
| Cholesterol | 60mg | 20% |
| Sodium | 150mg | 7% |
| Total Carbohydrate | 39g | 13% |
| Dietary Fiber | 2g | 8% |
| Sugars | 25g | N/A |
| Protein | 4g | 8% |
Note: Nutritional information is an estimate and may vary based on specific ingredients and portion sizes.
Variations & Substitutions
- Gluten-Free: Substitute the all-purpose flour with a gluten-free blend. You may need to add a binder like xanthan gum to improve the texture.
- Dairy-Free Glaze: Use coconut cream instead of heavy whipping cream for a dairy-free glaze. Ensure the chocolate chips are also dairy-free.
- Nut Variations: While hazelnuts are the star, you can experiment with other nuts like almonds or walnuts.
- Espresso Boost: Add a teaspoon of instant espresso powder to the batter for a coffee-infused hazelnut cake.
FAQs (Frequently Asked Questions)
Q: Can I use margarine instead of butter?
A: Yes, you can substitute margarine for butter, but butter will provide a richer flavor.
Q: Can I use pre-ground hazelnuts?
A: While pre-ground hazelnuts are convenient, grinding them fresh will yield a more intense flavor. Be sure the pre-ground nuts are fresh to begin with.
Q: How do I prevent the cake from sticking to the springform pan?
A: Ensure you grease the bottom of the pan thoroughly. You can also line the bottom with parchment paper for extra protection.
Q: Can I make this cake ahead of time?
A: Absolutely! The cake can be baked a day in advance and stored at room temperature. Glaze it just before serving.
Q: What if I don’t have a springform pan?
A: You can use a regular cake pan, but it may be more difficult to remove the cake without damaging it. Make sure to grease and flour the pan well.
Final Thoughts
This Norwegian Hazelnut Cake is more than just a dessert; it’s a taste of Scandinavian tradition, a celebration of simple yet exquisite flavors, and a reminder of the joy that comes from sharing a homemade treat with loved ones. I encourage you to try this recipe and experience the delightful combination of nutty, sweet, and chocolatey goodness. Don’t hesitate to experiment with variations and make it your own! And if you do, I would love to hear about your experience and any creative twists you add. Happy baking!