
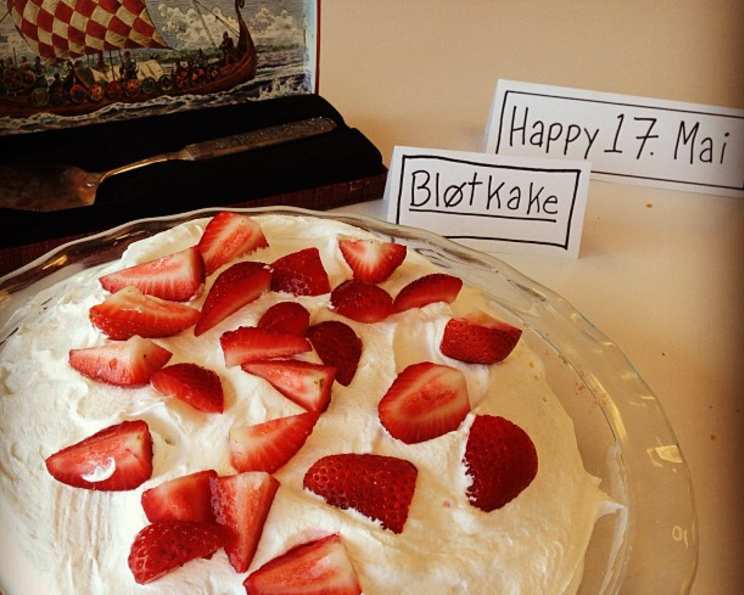
Norwegian Strawberry Cream Cake (Bløtkake): A Taste of Summer
My grandmother, Inga, made the most ethereal bløtkake. I remember summers spent in her Oslo kitchen, the air thick with the scent of freshly baked sponge and ripe strawberries. Sunlight streamed through the lace curtains as she delicately layered the cake, her hands, weathered from years of love and labor, moving with practiced grace. The taste was pure joy – light, airy sponge soaked with strawberry juice, creamy custard, and clouds of whipped cream, a symphony of textures and flavors that epitomized the simple pleasures of a Norwegian summer. This recipe is my attempt to recreate that magic, to bring a little piece of Inga’s kitchen into your home.
Recipe Overview
- Prep Time: 45 minutes
- Cook Time: 30 minutes
- Total Time: 1 hour 15 minutes
- Servings: 16
- Yield: 1 cake
- Dietary Type: Not Gluten-Free
Ingredients
For the Cake:
- ¾ cup cake flour (not self-rising flour)
- 1 teaspoon baking powder
- 6 eggs, separated (at room temperature)
- 1 cup sugar
For the Filling:
- 3 egg yolks
- 2 tablespoons butter
- 2 tablespoons cornstarch
- 1 ½ cups half-and-half cream (half milk, half cream)
- ¼ cup sugar
- 2 teaspoons vanilla extract
- ½ cup strawberry jam or ½ cup apricot jam, warmed and strained
- 1 pint fresh strawberries
For the Topping:
- 1 ½ cups whipping cream
- 2 tablespoons powdered sugar (sometimes called icing sugar or confectioners’)
- 1 teaspoon vanilla
Equipment Needed
- Two 9-inch round cake pans
- Mixing bowls (various sizes)
- Electric mixer (hand or stand)
- Small saucepan
- Whisk
- Rubber spatula
- Cake plate
Instructions
-
Prepare the Flour: In a small bowl, whisk together the cake flour and baking powder. Set aside. This ensures the baking powder is evenly distributed for a consistent rise.
-
Whip the Egg Whites: In a large bowl, using an electric mixer, whip the egg whites until fluffy. Gradually add the sugar, beating continuously until stiff and meringue-like peaks form. This is crucial for the cake’s light and airy texture.
-
Beat the Egg Yolks: In a separate, small bowl, beat the egg yolks until frothy. This incorporates air and lightens the yolks.
-
Combine Wet and Dry Ingredients: Gently fold the egg yolks and the flour mixture into the egg whites. Be careful not to overmix, as this will deflate the egg whites and result in a dense cake. Fold just until combined.
-
Prepare the Cake Pans: Butter two 9-inch round cake pans and dust them lightly with flour, tapping out any excess. This will prevent the cakes from sticking to the pans.
-
Divide the Batter: Divide the batter evenly between the prepared cake pans. Use a spatula to spread the batter evenly.
-
Bake the Cakes: Preheat your oven to 350°F (175°C). Bake the cake layers for 30 minutes, or until the centers spring back when lightly touched with your finger. Don’t open the oven door frequently, as this can cause the cakes to collapse.
-
Cool the Cakes: Let the cakes cool in the pans for about 10 minutes before inverting them onto a wire rack to cool completely. The centers of the cakes may sink slightly, which is perfectly normal.
-
Prepare the Custard Filling: While the cakes are cooling, prepare the custard filling. In a small saucepan, whisk together the egg yolks, butter, cornstarch, half-and-half cream, and sugar.
-
Cook the Custard: Cook the custard mixture over medium heat, stirring constantly with a whisk, until it is smooth and thick. This will take about 5-7 minutes. Ensure you scrape the bottom of the pan to prevent sticking and burning.
-
Cool the Custard: Remove the custard from the heat, cover it with plastic wrap (pressing the plastic directly onto the surface to prevent a skin from forming), and let it cool completely. Stir in the vanilla extract.
-
Assemble the Cake: To assemble the cake, use a long serrated knife to carefully cut each cake layer horizontally into two layers, creating four layers in total.
-
Layer the Cake: Place the bottom layer of cake on a cake plate and spread it with half of the cooled custard.
-
Add Jam and Strawberries: Top with the next cake layer and spread it with the strawberry jam (or apricot jam). Reserve a few of the nicest strawberries for garnish. Slice the remaining strawberries and arrange them evenly on top of the jam layer.
-
Repeat Layers: Top with the third cake layer and spread it with the remaining custard.
-
Final Cake Layer: Top with the remaining cake layer.
-
Whip the Cream: No more than 1 hour before serving, whip the whipping cream in a chilled bowl using an electric mixer until soft peaks form. Gradually add the powdered sugar and vanilla and continue whipping until stiff peaks form. Be careful not to overwhip, as this can cause the cream to curdle.
-
Frost the Cake: Pile the whipped cream on top of the cake, creating a generous, cloud-like layer.
-
Garnish and Serve: Garnish the cake with the reserved fresh strawberries. Slice and serve immediately.
Expert Tips & Tricks
- Room Temperature Eggs: Using eggs at room temperature helps them whip up to a greater volume, resulting in a lighter cake.
- Don’t Overmix: Overmixing the batter develops the gluten in the flour, leading to a tough cake. Fold gently until just combined.
- Cool Completely: Ensure the cake layers and custard filling are completely cool before assembling the cake. This prevents the whipped cream from melting.
- Chilled Bowl and Beaters: For the best whipped cream, chill your mixing bowl and beaters in the freezer for 15-20 minutes before whipping the cream.
- Strawberry Juice Infusion: For an extra burst of strawberry flavor, lightly brush the cut cake layers with strawberry juice before adding the fillings.
- Make Ahead Custard: The custard can be made a day in advance and stored in the refrigerator. This saves time on the day of assembly.
Serving & Storage Suggestions
Serve the Norwegian Strawberry Cream Cake chilled or at room temperature. It is best enjoyed within a few hours of assembly, as the whipped cream can soften over time.
Storage: Store leftover cake in the refrigerator, covered, for up to 2 days. The cake is not suitable for freezing, as the whipped cream and custard will change texture upon thawing.
Nutritional Information
| Nutrient | Amount per Serving | % Daily Value |
|---|---|---|
| Calories | 294 kcal | – |
| Calories from Fat | 134 kcal | – |
| Total Fat | 15 g | 23% |
| Saturated Fat | 8.6 g | 42% |
| Cholesterol | 143.7 mg | 47% |
| Sodium | 86.2 mg | 3% |
| Total Carbohydrate | 35.7 g | 11% |
| Dietary Fiber | 0.7 g | 2% |
| Sugars | 24.6 g | – |
| Protein | 4.7 g | 9% |
Note: Nutritional information is an estimate and may vary based on specific ingredients and preparation methods.
Variations & Substitutions
- Gluten-Free: Substitute the cake flour with a gluten-free all-purpose flour blend. You may need to add a binding agent like xanthan gum to improve the texture.
- Dairy-Free: Use a plant-based whipping cream alternative, such as coconut cream or almond-based whipping cream. Substitute the half-and-half cream with a plant-based alternative like oat milk or almond milk. Use a dairy-free butter substitute.
- Jam Variations: Experiment with different types of jam, such as raspberry, blueberry, or lingonberry, for a unique flavor profile.
- Citrus Zest: Add a teaspoon of lemon or orange zest to the cake batter for a bright, citrusy note.
FAQs (Frequently Asked Questions)
Q: Can I use store-bought sponge cake layers to save time?
A: Yes, you can use store-bought sponge cake layers, but the homemade version will provide a superior flavor and texture. Look for a light and airy sponge cake.
Q: Why do I need to separate the eggs?
A: Separating the eggs allows you to whip the egg whites to a greater volume, which creates a lighter and airier cake.
Q: Can I make the cake ahead of time?
A: You can bake the cake layers and make the custard filling a day in advance. Store them separately in the refrigerator. Assemble the cake no more than 1 hour before serving to prevent the whipped cream from softening.
Q: What if my custard is lumpy?
A: If your custard becomes lumpy, try whisking it vigorously over low heat. You can also strain it through a fine-mesh sieve to remove any lumps.
Q: Can I add other fruits to the cake?
A: Yes, you can add other fruits, such as raspberries, blueberries, or sliced bananas, to the filling.
Final Thoughts
This Norwegian Strawberry Cream Cake, or bløtkake, is more than just a dessert; it’s a celebration of simple, fresh ingredients and the joy of sharing a delicious treat with loved ones. Don’t be intimidated by the multiple steps—each one is straightforward and contributes to the cake’s incredible texture and flavor. I encourage you to try this recipe and create your own memories around it. Perhaps pair it with a cup of strong Norwegian coffee or a glass of chilled white wine. And please, share your creations and feedback! I’d love to hear about your bløtkake adventures.