
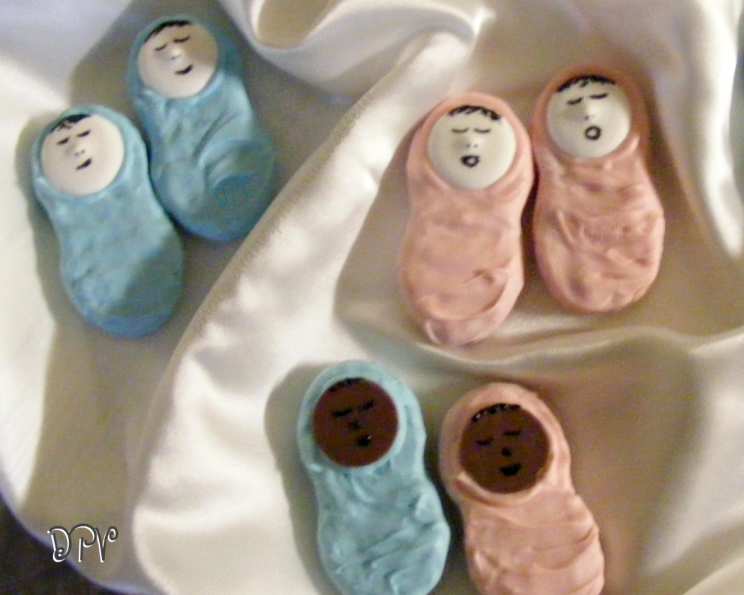
Nutter Butter Babies: A Sweet Treat for Baby Showers
The first baby shower I ever attended was for my best friend, Sarah. I was tasked with bringing a dessert, and, being a novice baker at the time, I felt immense pressure. I wanted something cute, memorable, and, most importantly, delicious. After hours of searching, I stumbled upon a recipe for Nutter Butter Babies, and they were an instant hit! Sarah’s face lit up when she saw these adorable cookie creations, and they were gone in minutes. Now, years later, they’re my go-to for any baby shower; they’re always a guaranteed crowd-pleaser.
Recipe Overview
- Prep Time: 20 minutes
- Cook Time: None
- Total Time: 40 minutes
- Yields: 16 Babies
- Serves: 16
- Dietary Type: Vegetarian
Ingredients
- 4 ounces pink candy melts (or white candy melts with pink food coloring)
- 4 ounces blue candy melts
- 16 round white chocolate candy melts, unmelted (faces)
- Black decorating gel (and a fine-tipped paint brush)
- 16 Nutter Butter sandwich cookies
- Wax paper
Equipment Needed
- Small microwave-safe dishes
- Wax paper
- Fine-tipped paint brush (or piping bag with small tip)
- Microwave
Instructions
-
Begin by preparing the pink candy melts. Place them in a small, microwave-safe dish. Microwave on 50% power in 30-second intervals, stirring after each interval, until completely melted and smooth. Be cautious not to overheat the candy melts, as they can seize and become unusable. If the mixture seems too thick, add a very small amount (about ½ teaspoon) of vegetable shortening to thin it out.
-
Now it’s time to create the Pink Babies. Take eight Nutter Butter cookies and dip each one completely into the melted pink candy. Ensure the entire cookie is coated evenly.
-
Immediately place the dipped cookies onto a sheet of wax paper. This will prevent them from sticking.
-
While the pink candy coating is still wet, gently press a round white chocolate candy melt into the upper section of each cookie. This creates the baby’s face. Ensure the “face” is centered and firmly attached before the candy hardens.
-
Allow the pink-coated Nutter Butter Babies to harden completely at room temperature. This typically takes about 15-20 minutes.
-
Repeat steps 1-5 with the blue candy melts and the remaining eight Nutter Butter cookies to create the Blue Babies. Remember to microwave the blue candy melts on 50% power to avoid burning.
-
Once both the pink and blue candy coatings have fully hardened, it’s time to add the facial features. Squeeze a small amount of black decorating gel onto a piece of wax paper.
-
Using a fine-tipped paint brush, carefully draw the baby’s eyes, nose, and mouth onto the white chocolate faces. You can adjust the expressions to make each baby unique! Alternatively, you could use a piping bag fitted with a small round tip to pipe the facial features.
-
Allow the decorating gel to harden completely before serving or storing the Nutter Butter Babies. This will prevent smudging.
Expert Tips & Tricks
- Candy Melt Consistency: Achieving the right consistency for the candy melts is crucial. If the melted candy is too thick, it will be difficult to dip the cookies evenly. Add a tiny amount of vegetable shortening (a few drops at a time) until you reach a smooth, flowing consistency.
- Working Quickly: Work quickly when dipping the cookies and attaching the faces, as the candy coating hardens relatively fast. If the coating starts to harden before you attach the face, you can gently warm the coated cookie with your fingers to soften the surface slightly.
- Even Coating: To ensure an even candy coating, gently tap the dipped cookie against the side of the dish to remove any excess candy.
- Practice Makes Perfect: If you’re not confident with drawing the facial features, practice on a piece of wax paper first.
- Alternative Facial Features: Instead of black decorating gel, you could use melted dark chocolate or even colored icing to create the baby’s facial features.
Serving & Storage Suggestions
The Nutter Butter Babies are best served at room temperature. Arrange them on a platter or in a decorative box for a charming baby shower display. Store leftover Nutter Butter Babies in an airtight container at room temperature for up to 5 days. The candy coating may soften slightly over time, but the cookies will still be delicious. Avoid storing them in the refrigerator, as the candy coating can become sticky due to condensation.
Nutritional Information
| Nutrient | Amount per Serving | % Daily Value |
|---|---|---|
| Calories | 67 kcal | N/A |
| Calories from Fat | 26 kcal | N/A |
| Total Fat | 3 g | 4% |
| Saturated Fat | 0.7 g | 3% |
| Cholesterol | 0 mg | 0% |
| Sodium | 51.5 mg | 2% |
| Total Carbohydrate | 9.2 g | 3% |
| Dietary Fiber | 0.3 g | 1% |
| Sugars | 5 g | N/A |
| Protein | 1.2 g | 2% |
Note: Nutritional information is an estimate and may vary based on specific ingredients and portion sizes.
Variations & Substitutions
- Candy Melt Colors: Feel free to use any colors of candy melts to match the baby shower theme. Pastel shades like lavender, mint green, or yellow are all great options.
- Cookie Variety: While Nutter Butters are the classic choice, you could also use other sandwich cookies like Oreos (for a black and white theme) or vanilla wafers.
- Nut-Free Option: If you need a nut-free option, substitute the Nutter Butter cookies with a nut-free sandwich cookie.
- Gender-Neutral Babies: Use yellow or green candy melts for a gender-neutral baby shower. You can also use pastel rainbow colors to create a vibrant and festive treat.
FAQs (Frequently Asked Questions)
Q: Can I make these ahead of time?
A: Yes, these can be made 1-2 days in advance. Store them in an airtight container at room temperature to maintain their freshness.
Q: My candy melts are too thick. What can I do?
A: Add a very small amount of vegetable shortening (about ½ teaspoon at a time) to thin out the candy melts. Be careful not to add too much, as this can make the coating too thin.
Q: The white chocolate faces are sliding off the cookies. What am I doing wrong?
A: Make sure you are pressing the white chocolate faces into the candy coating while it is still wet. If the coating has already hardened, gently warm the coated cookie with your fingers to soften the surface slightly before attaching the face.
Q: How can I make the facial features more precise?
A: Use a very fine-tipped paint brush or a piping bag with a small round tip to create the facial features. Practice on a piece of wax paper first to perfect your technique.
Q: Can I freeze these Nutter Butter Babies?
A: Freezing is not recommended, as the candy coating can become sticky and discolored when thawed.
Final Thoughts
These Nutter Butter Babies are a delightful and adorable treat that are sure to be a hit at any baby shower. Their simplicity and customizable nature make them a perfect addition to any celebration. Don’t be afraid to get creative with the colors and facial expressions to make them truly unique. I encourage you to try this recipe and spread the joy of these sweet little babies. Share your creations with me and let me know what fun variations you come up with! Perhaps serve them alongside a refreshing fruit punch or a light and airy angel food cake for a truly memorable baby shower spread.